豹龟拉稀怎么办,股票名博,西川史子
之前的项目全都在windows系统环境下部署的,这次尝试在linux系统环境下部署,于是这次我们组织在7台主机上安装了jdk、maven、jboss其中一台安装了mysql,并将局域网配置好,终于大功告成了。下面将安装步骤与大家分享!
系统版本:centos6.3-i386 32位操作系统
硬件配置:内核 intel(r) pentium(r) 4 cpu 3.00ghz 内存998.5m
安装环境:使用shell 命令
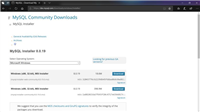
此次安装在桌面环境下,使用shell命令进行安装,下载安装包为:
mysql-5.6.25-1.linux_glibc2.5.i386.rpm-bundle.tar;
a. 检查mysql及相关rpm包,是否安装,如果有安装,则移除(rpm –e 名称)
[root@localhost ~]# rpm -qa | grep -i mysql
mysql-libs-5.1.66-2.el6_3.x86_64
[root@localhost ~]# yum -y remove mysql-libs*
b. 选择linux对应的rpm包,如下:
[root@localhost rpm]# ll
total 74364
-rw-r--r--. 1 root root 18442536 dec 11 20:19 mysql-client-5.6.15-1.el6.x86_64.rpm
-rw-r--r--. 1 root root 3340660 dec 11 20:06 mysql-devel-5.6.15-1.el6.x86_64.rpm
-rw-r--r--. 1 root root 54360600 dec 11 20:03 mysql-server-5.6.15-1.el6.x86_64.rpm
c. 安装mysql
[root@localhost rpm]# rpm -ivh mysql-server-5.6.15-1.el6.x86_64.rpm
[root@localhost rpm]# rpm -ivh mysql-devel-5.6.15-1.el6.x86_64.rpm
[root@localhost rpm]# rpm -ivh mysql-client-5.6.15-1.el6.x86_64.rpm
#修改配置文件位置
[root@localhost rpm]# cp /usr/share/mysql/my-default.cnf /etc/my.cnf
d. 初始化mysql及设置密码
[root@localhost rpm]# /usr/bin/mysql_install_db
[root@localhost rpm]# service mysql start
[root@localhost rpm]# cat /root/.mysql_secret #查看root账号密码
# the random password set for the root user at wed dec 11 23:32:50 2013 (local time): qktafznl
[root@localhost ~]# mysql -uroot –pqktafznl
mysql> set password = password('123456');  #设置密码为123456
mysql> exit
[root@localhost ~]# mysql -uroot -p123456
e. 远程登陆用户设置
mysql> use mysql;
mysql> select host,user,password from user;
+-----------------------+------+-------------------------------------------+
| host         | user | password                 |
+-----------------------+------+-------------------------------------------+
| localhost       | root | *6bb4837eb74329105ee4568dda7dc67ed2ca2ad9 |
| localhost.localdomain | root | *1237e2ce819c427b0d8174456dd83c47480d37e8 |
| 127.0.0.1       | root | *1237e2ce819c427b0d8174456dd83c47480d37e8 |
| ::1          | root | *1237e2ce819c427b0d8174456dd83c47480d37e8 |
+-----------------------+------+-------------------------------------------+
mysql> update user set password=password('123456') where user='root';
mysql> update user set host='%' where user='root' and host='localhost';
mysql> flush privileges;
mysql> exit
f. 设置开机自启动
[root@localhost ~]# chkconfig mysql on
[root@localhost ~]# chkconfig --list | grep mysql
mysql      0:off  1:off  2:on  3:on  4:on  5:on  6:off
g. mysql的默认安装位置
/var/lib/mysql/        #数据库目录
/usr/share/mysql       #配置文件目录
/usr/bin           #相关命令目录
/etc/init.d/mysql       #启动脚本
h. 修改字符集和数据存储路径
配置/etc/my.cnf文件,修改数据存放路径、mysql.sock路径以及默认编码utf-8.
[client]
password    = 123456
port      = 3306
default-character-set=utf8
[mysqld]
port      = 3306
character_set_server=utf8
character_set_client=utf8
collation-server=utf8_general_ci
#(注意linux下mysql安装完后是默认:表名区分大小写,列名不区分大小写; 0:区分大小写,1:不区分大小写)
lower_case_table_names=1
#(设置最大连接数,默认为 151,mysql服务器允许的最大连接数16384; )
max_connections=1000
[mysql]
default-character-set = utf8
可查看字符集
show variables like '%collation%';
show variables like '%char%';
i.如果想远程连接登录mysql则需要:授权,并关闭防火墙。
1.授权;在服务端进入mysql,输入以下命令
2.关闭防火墙
service iptables stop 关闭命令
chkconfig iptables off 永久关闭防火墙
两个命令同时运行,运行完成后查看防火墙关闭状态
service iptables status
到此,mysql就安装完成并配置成功了。
以上就是本文的全部内容,希望对大家的学习有所帮助,也希望大家多多支持移动技术网。
如对本文有疑问,请在下面进行留言讨论,广大热心网友会与你互动!! 点击进行留言回复
小白安装登录mysql-8.0.19-winx64的教程图解(新手必看)
Navicat连接MySQL时报10060、1045错误及my.ini位置问题

网友评论