重生之官路风流,好的旅游网站,三中张金玉告白
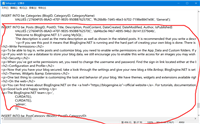
首先,我们来看下stack overflow网站的请求头文件:
可以看到一些我们熟悉或是陌生的HTTP头部文件字段。
在这里我们在对HTTP输入流的头部文件中,做一些基本的防护。首先要明确,既然我们是对HTTP头部做处理,那么就需要在Startup.cs类的
Configuration方法中做处理,因为这里就是处理HTTP输入流的。
首先做一些基本的处理,比如中间件和基本的类:
public class SecurityHeadersPolicy
{
    public IDictionary<string, string> SetHeaders { get; }
         = new Dictionary<string, string>();

    public ISet<string> RemoveHeaders { get; }
        = new HashSet<string>();
}
这里的头部信息是我们定义好的,用来增加或是删除头部信息,然后就是我们的中间件:
public class SecurityHeadersMiddleware
{
    private readonly RequestDelegate _next;
    private readonly SecurityHeadersPolicy _policy;

    public SecurityHeadersMiddleware(RequestDelegate next, SecurityHeadersPolicy policy)
    {
        _next = next;
        _policy = policy;
    }

    public async Task Invoke(HttpContext context)
    {
        IHeaderDictionary headers = context.Response.Headers;

        foreach (var headerValuePair in _policy.SetHeaders)
        {
            headers[headerValuePair.Key] = headerValuePair.Value;
        }

        foreach (var header in _policy.RemoveHeaders)
        {
            headers.Remove(header);
        }

       await _next(context);
    }
}
基于IApplicationBuilder接口做一个中间件的扩展方法:
public static class MiddlewareExtensions
{
    public static IApplicationBuilder UseSecurityHeadersMiddleware(this IApplicationBuilder app, SecurityHeadersBuilder builder)
    {
        SecurityHeaderPolicy policy = builder.Build();
        return app.UseMiddleware<SecurityHeadersMiddleware>(policy);
    }
}
封装好相关的安全类:
public class SecurityHeadersBuilder
{
    private readonly SecurityHeadersPolicy _policy = new SecurityHeadersPolicy();

    public SecurityHeadersBuilder AddDefaultSecurePolicy()
    {
        AddFrameOptionsDeny();
        AddXssProtectionBlock();
        AddContentTypeOptionsNoSniff();
        AddStrictTransportSecurityMaxAge();
        RemoveServerHeader();

        return this;
    }

    public SecurityHeadersBuilder AddFrameOptionsDeny()
    {
        _policy.SetHeaders[FrameOptionsConstants.Header] = FrameOptionsConstants.Deny;
        return this;
    }

    public SecurityHeadersBuilder AddFrameOptionsSameOrigin()
    {
        _policy.SetHeaders[FrameOptionsConstants.Header] = FrameOptionsConstants.SameOrigin;
        return this;
    }

    public SecurityHeadersBuilder AddFrameOptionsSameOrigin(string uri)
    {
        _policy.SetHeaders[FrameOptionsConstants.Header] = string.Format(FrameOptionsConstants.AllowFromUri, uri);
        return this;
    }

    public SecurityHeadersBuilder RemoveServerHeader()
    {
        _policy.RemoveHeaders.Add(ServerConstants.Header);
        return this;
    }

    public SecurityHeadersBuilder AddCustomHeader(string header, string value)
    {
        _policy.SetHeaders[header] = value;
        return this;
    }

    public SecurityHeadersBuilder RemoveHeader(string header)
    {
        _policy.RemoveHeaders.Add(header);
        return this;
    }

    public SecurityHeadersPolicy Build()
    {
        return _policy;
    }
}
最后注入到HTTP的输入流中:
app.UseSecurityHeadersMiddleware(new SecurityHeadersBuilder()
.AddDefaultSecurePolicy()
);
然后我们浏览一下网页,就可以在HTTP的头部信息中看到:
HTTP/1.1 200 OK
Content-Type: text/html; charset=utf-8
X-Frame-Options: DENY
X-XSS-Protection: 1; mode=block
X-Content-Type-Options: nosniff
Strict-Transport-Security: max-age=31536000
X-Powered-By: ASP.NET
还有一个就是CSRF的防护,如果之前你用过ASP.NET MVC,在最基本的MVC模板中,可能你会留意到已有的cshtml页面中的form表单有这么一句:
@Html.AntiForgeryToken()
这就是微软在MVC框架中为我们提供的防护CSRF的方法。我们在表单中直接使用上面那句代码就可以了,然后在表单提交的Action方法中:
[ValidateAntiForgeryToken]
[HttpPost]
public IActionResult AntiForm(string message)
{
return Content(message);
}
使用[ValidateAntiForgeryToken]属性,来验证CSRF。
参考链接:
(如何使用自定义中间件在ASP.NET Core中添加安全标头)
代码地址:
https://github.com/RyanOvO/aspnetcore-fileup-demo
如对本文有疑问,请在下面进行留言讨论,广大热心网友会与你互动!! 点击进行留言回复


asp.net搭建博客,使用BlogEngine.NET+MySql搭建博客
网友评论