炮轰圣光哨站怎么做,相信我,马依萌
maya 制作龙卷风效果。制作过程如下。
用 cv 工具创建一条笔直向上的线

创建一个 nurbs circle, 使用以下的属性设置 :
translate x : -.5
rotate x : 90
radius : .04
sweep : 90
sections : 3

选中这个 circle, 按下 insert 键 , 使用网格捕捉将 pivot 放到原点 .

先选择 nurbs circle 然后选择曲线 , 在建模菜单下选择 surfaces %26gt; extrude 命令 , 并在 channel box 中设置
如下属性 .
fixed path : on
use component pivot : on
use profile normal : off
rotation : 5000
scale : 6
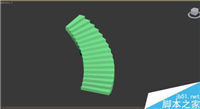
这样将会出现下图的形状 , 你可以通过调整 rotation 和 scale 来调整形状 .

在删除历史记录和曲线后将物体命名为 tornado.
选中 tornado, 在 channel box 中的 rotate y 属性上点右键 , 并在菜单中选择 expressions. 在 expression editor 的 expression area 输入 "tornado.rotatey = frame * # " 你可以自行确定 # 的数值 , 数值越大龙卷风的自旋就越快

然后选中 tornado, 并切到 dynamics 菜单下 , 选择 particles %26gt; emit from object %26gt; options. 在 option 对话框中 ,emitter type 选择 surface, 然后创建它 . 当你播放动画时 , 粒子就会从表面飞散出去了 . 有可能粒子会像内部飞散 . 这样就需要翻转表面方向 (modeling menu set - edit nurbs %26gt; reverse surface direction).

打开 emitter's attributes 设置以下属性 .
rate : 1000
speed : 0
现在我们有了更多的粒子 , 并且粒子会围绕在 tornado 的附近 . 选中这些粒子并在属性编辑器中设置以下属
性 .
lifespan mode : random range
lifespan : 2
lifespan random : .25
particle render type : cloud (s/w) (click current render type button)
radius: .661
threshold: .661
现在将 tornado 隐藏起来 , 只留下一个自旋的粒子云 . 可以自行调节一些属性

如对本文有疑问,请在下面进行留言讨论,广大热心网友会与你互动!!
点击进行留言回复
您可能感兴趣的文章:


网友评论