安布闭壳龟,陈轻歌,学习炒股票
以前在web端的身份认证都是基于cookie | session的身份认证, 在没有更多的终端出现之前,这样做也没有什么问题,但在web api时代,你所需要面对的就不止是浏览器了,还有各种客户端,这样就有了一个问题,这些客户端是不知道cookie是什么鬼的。 (cookie其实是浏览器搞出来的小猫腻,用来保持会话的,但http本身是无状态的, 各种客户端能提供的无非也就是http操作的api)
而基于token的身份认证就是应对这种变化而生的,它更开放,安全性也更高。
基于token的身份认证有很多种实现方式,但我们这里只使用微软提供的api。
接下来的例子将带领大家完成一个使用微软jwtsecuritytokenhandler完成一个基于beare token的身份认证。
注意:这种文章属于step by step教程,跟着做才不至于看晕,下载完整代码分析代码结构才有意义。
前期准备
推荐使用vs2015 update3作为你的ide,下载地址:
你需要安装.net core的运行环境以及开发工具,这里提供vs版:
创建项目
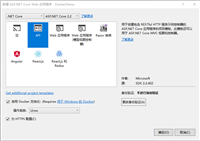
在vs中新建项目,项目类型选择asp.net core web application(.net core), 输入项目名称为cstokenbaseauth
coding
创建一些辅助类
在项目根目录下创建一个文件夹auth,并添加rsakeyhelper.cs以及tokenauthoption.cs两个文件
在rsakeyhelper.cs中
using system.security.cryptography;

namespace cstokenbaseauth.auth
{
  public class rsakeyhelper
  {
    public static rsaparameters generatekey()
    {
      using (var key = new rsacryptoserviceprovider(2048))
      {
        return key.exportparameters(true);
      }
    }
  }
}
在tokenauthoption.cs中
using system;
using microsoft.identitymodel.tokens;

namespace cstokenbaseauth.auth
{
  public class tokenauthoption
  {
    public static string audience { get; } = "exampleaudience";
    public static string issuer { get; } = "exampleissuer";
    public static rsasecuritykey key { get; } = new rsasecuritykey(rsakeyhelper.generatekey());
    public static signingcredentials signingcredentials { get; } = new signingcredentials(key, securityalgorithms.rsasha256signature);

    public static timespan expiresspan { get; } = timespan.fromminutes(20);
  }
}
startup.cs
在configureservices中添加如下代码:
services.addauthorization(auth =>
{
auth.addpolicy("bearer", new authorizationpolicybuilder()
.addauthenticationschemes(jwtbearerdefaults.authenticationscheme)
.requireauthenticateduser().build());
});
完整的代码应该是这样
public void configureservices(iservicecollection services)
{
// add framework services.
services.addapplicationinsightstelemetry(configuration);
// enable the use of an [authorize("bearer")] attribute on methods and classes to protect.
services.addauthorization(auth =>
{
auth.addpolicy("bearer", new authorizationpolicybuilder()
.addauthenticationschemes(jwtbearerdefaults.authenticationscheme)
.requireauthenticateduser().build());
});
services.addmvc();
}
在configure方法中添加如下代码
app.useexceptionhandler(appbuilder => {
  appbuilder.use(async (context, next) => {
    var error = context.features[typeof(iexceptionhandlerfeature)] as iexceptionhandlerfeature;
    //when authorization has failed, should retrun a json message to client
    if (error != null && error.error is securitytokenexpiredexception)
    {
      context.response.statuscode = 401;
      context.response.contenttype = "application/json";
      await context.response.writeasync(jsonconvert.serializeobject(
        new { authenticated = false, tokenexpired = true }
      ));
    }
    //when orther error, retrun a error message json to client
    else if (error != null && error.error != null)
    {
      context.response.statuscode = 500;
      context.response.contenttype = "application/json";
      await context.response.writeasync(jsonconvert.serializeobject(
        new { success = false, error = error.error.message }
      ));
    }
    //when no error, do next.
    else await next();
  });
});
这段代码主要是handle error用的,比如当身份认证失败的时候会抛出异常,而这里就是处理这个异常的。
接下来在相同的方法中添加如下代码,
app.useexceptionhandler(appbuilder => {
  appbuilder.use(async (context, next) => {
    var error = context.features[typeof(iexceptionhandlerfeature)] as iexceptionhandlerfeature;

    //when authorization has failed, should retrun a json message to client
    if (error != null && error.error is securitytokenexpiredexception)
    {
      context.response.statuscode = 401;
      context.response.contenttype = "application/json";

      await context.response.writeasync(jsonconvert.serializeobject(
        new { authenticated = false, tokenexpired = true }
      ));
    }
    //when orther error, retrun a error message json to client
    else if (error != null && error.error != null)
    {
      context.response.statuscode = 500;
      context.response.contenttype = "application/json";
      await context.response.writeasync(jsonconvert.serializeobject(
        new { success = false, error = error.error.message }
      ));
    }
    //when no error, do next.
    else await next();
  });
});
应用jwtbearerauthentication
app.usejwtbearerauthentication(new jwtbeareroptions {
  tokenvalidationparameters = new tokenvalidationparameters {
    issuersigningkey = tokenauthoption.key,
    validaudience = tokenauthoption.audience,
    validissuer = tokenauthoption.issuer,
    validateissuersigningkey = true,
    validatelifetime = true,
    clockskew = timespan.fromminutes(0)
  }
});
完整的代码应该是这样
using system;
using microsoft.aspnetcore.builder;
using microsoft.aspnetcore.hosting;
using microsoft.extensions.configuration;
using microsoft.extensions.dependencyinjection;
using microsoft.extensions.logging;
using microsoft.aspnetcore.authorization;
using microsoft.aspnetcore.authentication.jwtbearer;
using cstokenbaseauth.auth;
using microsoft.aspnetcore.diagnostics;
using microsoft.identitymodel.tokens;
using microsoft.aspnetcore.http;
using newtonsoft.json;
namespace cstokenbaseauth
{
public class startup
{
public startup(ihostingenvironment env)
{
var builder = new configurationbuilder()
.setbasepath(env.contentrootpath)
.addjsonfile("appsettings.json", optional: true, reloadonchange: true)
.addjsonfile($"appsettings.{env.environmentname}.json", optional: true);
if (env.isenvironment("development"))
{
// this will push telemetry data through application insights pipeline faster, allowing you to view results immediately.
builder.addapplicationinsightssettings(developermode: true);
}
builder.addenvironmentvariables();
configuration = builder.build();
}
public iconfigurationroot configuration { get; }
// this method gets called by the runtime. use this method to add services to the container
public void configureservices(iservicecollection services)
{
// add framework services.
services.addapplicationinsightstelemetry(configuration);
// enable the use of an [authorize("bearer")] attribute on methods and classes to protect.
services.addauthorization(auth =>
{
auth.addpolicy("bearer", new authorizationpolicybuilder()
.addauthenticationschemes(jwtbearerdefaults.authenticationscheme)
.requireauthenticateduser().build());
});
services.addmvc();
}
// this method gets called by the runtime. use this method to configure the http request pipeline
public void configure(iapplicationbuilder app, ihostingenvironment env, iloggerfactory loggerfactory)
{
loggerfactory.addconsole(configuration.getsection("logging"));
loggerfactory.adddebug();
app.useapplicationinsightsrequesttelemetry();
app.useapplicationinsightsexceptiontelemetry();
#region handle exception
app.useexceptionhandler(appbuilder => {
appbuilder.use(async (context, next) => {
var error = context.features[typeof(iexceptionhandlerfeature)] as iexceptionhandlerfeature;
//when authorization has failed, should retrun a json message to client
if (error != null && error.error is securitytokenexpiredexception)
{
context.response.statuscode = 401;
context.response.contenttype = "application/json";
await context.response.writeasync(jsonconvert.serializeobject(
new { authenticated = false, tokenexpired = true }
));
}
//when orther error, retrun a error message json to client
else if (error != null && error.error != null)
{
context.response.statuscode = 500;
context.response.contenttype = "application/json";
await context.response.writeasync(jsonconvert.serializeobject(
new { success = false, error = error.error.message }
));
}
//when no error, do next.
else await next();
});
});
#endregion
#region usejwtbearerauthentication
app.usejwtbearerauthentication(new jwtbeareroptions {
tokenvalidationparameters = new tokenvalidationparameters {
issuersigningkey = tokenauthoption.key,
validaudience = tokenauthoption.audience,
validissuer = tokenauthoption.issuer,
validateissuersigningkey = true,
validatelifetime = true,
clockskew = timespan.fromminutes(0)
}
});
#endregion
app.usemvc(routes =>
{
routes.maproute(
name: "default",
template: "{controller=login}/{action=index}");
});
}
}
}
在controllers中新建一个web api controller class,命名为tokenauthcontroller.cs。我们将在这里完成登录授权
在同文件下添加两个类,分别用来模拟用户模型,以及用户存储,代码应该是这样
public class user
{
  public guid id { get; set; }
  public string username { get; set; }
  public string password { get; set; }
}

public static class userstorage
{
  public static list<user> users { get; set; } = new list<user> {
    new user {id=guid.newguid(),username="user1",password = "user1psd" },
    new user {id=guid.newguid(),username="user2",password = "user2psd" },
    new user {id=guid.newguid(),username="user3",password = "user3psd" }
  };
}
接下来在tokenauthcontroller.cs中添加如下方法
private string generatetoken(user user, datetime expires)
{
  var handler = new jwtsecuritytokenhandler();

  claimsidentity identity = new claimsidentity(
    new genericidentity(user.username, "tokenauth"),
    new[] {
      new claim("id", user.id.tostring())
    }
  );

  var securitytoken = handler.createtoken(new securitytokendescriptor
  {
    issuer = tokenauthoption.issuer,
    audience = tokenauthoption.audience,
    signingcredentials = tokenauthoption.signingcredentials,
    subject = identity,
    expires = expires
  });
  return handler.writetoken(securitytoken);
}
该方法仅仅只是生成一个auth token,接下来我们来添加另外一个方法来调用它
在相同文件中添加如下代码
[httppost]
public string getauthtoken(user user)
{
  var existuser = userstorage.users.firstordefault(u => u.username == user.username && u.password == user.password);

  if (existuser != null)
  {
    var requestat = datetime.now;
    var expiresin = requestat + tokenauthoption.expiresspan;
    var token = generatetoken(existuser, expiresin);

    return jsonconvert.serializeobject(new {
      statecode = 1,
      requertat = requestat,
      expiresin = tokenauthoption.expiresspan.totalseconds,
      accesstoken = token
    });
  }
  else
  {
    return jsonconvert.serializeobject(new { statecode = -1, errors = "username or password is invalid" });
  }
}
该文件完整的代码应该是这样
using system;
using system.collections.generic;
using system.linq;
using system.threading.tasks;
using microsoft.aspnetcore.mvc;
using newtonsoft.json;
using system.identitymodel.tokens.jwt;
using system.security.claims;
using system.security.principal;
using microsoft.identitymodel.tokens;
using cstokenbaseauth.auth;

namespace cstokenbaseauth.controllers
{
  [route("api/[controller]")]
  public class tokenauthcontroller : controller
  {
    [httppost]
    public string getauthtoken(user user)
    {
      var existuser = userstorage.users.firstordefault(u => u.username == user.username && u.password == user.password);

      if (existuser != null)
      {
        var requestat = datetime.now;
        var expiresin = requestat + tokenauthoption.expiresspan;
        var token = generatetoken(existuser, expiresin);

        return jsonconvert.serializeobject(new {
          statecode = 1,
          requertat = requestat,
          expiresin = tokenauthoption.expiresspan.totalseconds,
          accesstoken = token
        });
      }
      else
      {
        return jsonconvert.serializeobject(new { statecode = -1, errors = "username or password is invalid" });
      }
    }

    private string generatetoken(user user, datetime expires)
    {
      var handler = new jwtsecuritytokenhandler();

      claimsidentity identity = new claimsidentity(
        new genericidentity(user.username, "tokenauth"),
        new[] {
          new claim("id", user.id.tostring())
        }
      );

      var securitytoken = handler.createtoken(new securitytokendescriptor
      {
        issuer = tokenauthoption.issuer,
        audience = tokenauthoption.audience,
        signingcredentials = tokenauthoption.signingcredentials,
        subject = identity,
        expires = expires
      });
      return handler.writetoken(securitytoken);
    }
  }

  public class user
  {
    public guid id { get; set; }

    public string username { get; set; }

    public string password { get; set; }
  }

  public static class userstorage
  {
    public static list<user> users { get; set; } = new list<user> {
      new user {id=guid.newguid(),username="user1",password = "user1psd" },
      new user {id=guid.newguid(),username="user2",password = "user2psd" },
      new user {id=guid.newguid(),username="user3",password = "user3psd" }
    };
  }
}
接下来我们来完成授权验证部分
在controllers中新建一个web api controller class,命名为valuescontroller.cs
在其中添加如下代码
public string get()
{
  var claimsidentity = user.identity as claimsidentity;

  var id = claimsidentity.claims.firstordefault(c => c.type == "id").value;

  return $"hello! {httpcontext.user.identity.name}, your id is:{id}";
}
为方法添加装饰属性
[httpget]
[authorize("bearer")]

完整的文件代码应该是这样
using system.linq;
using microsoft.aspnetcore.mvc;
using microsoft.aspnetcore.authorization;
using system.security.claims;

namespace cstokenbaseauth.controllers
{
  [route("api/[controller]")]
  public class valuescontroller : controller
  {
    [httpget]
    [authorize("bearer")]
    public string get()
    {
      var claimsidentity = user.identity as claimsidentity;

      var id = claimsidentity.claims.firstordefault(c => c.type == "id").value;

      return $"hello! {httpcontext.user.identity.name}, your id is:{id}";
    }
  }
}
最后让我们来添加视图
在controllers中新建一个web controller class,命名为logincontroller.cs
其中的代码应该是这样
using microsoft.aspnetcore.mvc;

namespace cstokenbaseauth.controllers
{
  [route("[controller]/[action]")]
  public class logincontroller : controller
  {
    public iactionresult index()
    {
      return view();
    }
  }
}
在项目views目录下新建一个名为login的目录,并在其中新建一个index.cshtml文件。
代码应该是这个样子
<html xmlns="http://www.w3.org/1999/xhtml">
<head>
  <title></title>
</head>
<body>
  <button id="gettoken">gettoken</button>
  <button id="requestapi">requestapi</button>

  <script src="https://code.jquery.com/jquery-3.1.1.min.js"></script>
  <script>
    $(function () {
      var accesstoken = undefined;

      $("#gettoken").click(function () {
        $.post(
          "/api/tokenauth",
          { username: "user1", password: "user1psd" },
          function (data) {
            console.log(data);
            if (data.statecode == 1)
            {
              accesstoken = data.accesstoken;

              $.ajaxsetup({
                headers: { "authorization": "bearer " + accesstoken }
              });
            }
          },
          "json"
        );
      })

      $("#requestapi").click(function () {
        $.get("/api/values", {}, function (data) {
          alert(data);
        }, "text");
      })
    })
  </script>
</body>
</html>
以上就是本文的全部内容,希望对大家的学习有所帮助,也希望大家多多支持移动技术网。
如对本文有疑问,请在下面进行留言讨论,广大热心网友会与你互动!! 点击进行留言回复


asp.net搭建博客,使用BlogEngine.NET+MySql搭建博客
网友评论