明末之帝国时代,美女 艺术,上海展览展示公司
上两节介绍完hybrid模式在mvc下的使用,包括验证从数据获取的user和claim对mvc的身份授权。本节将介绍implicit模式在javascript应用程序中的使用,使用node.js+express构建javascript客户端,实现前后端分离。本节授权服务和资源服务器基于第四和第五节。
(1)首先需要node.js环境
下载并安装node.js,官网下载地址:
输入指令:node –v 检测是否已安装node.js,已安装会显示安装的node.js版本

(2)安装express
打开cmd,输入指令:npm install express-generator –g
输入指令:express –h 已安装express会显示帮助文档

(3)新建文件,创建javascript_client应用程序
新建文件夹(在d盘新建express文件夹),cmd进入该文件夹。
输入:express javascript_client 在当前目录下创建一个名为javascript_client的应用。目录结构如下:

(4)安装依赖包
输入:cd javascript_client 进入javascript_client目录
输入:npm install 安装依赖包

(5)启动并测试项目
输入:npm start

浏览器打开:
看到以下页面证明成功了。

(1)安装oidc-client库
输入:npm install oidc-client –save
我们会发现在d:\express\javascript_client\node_modules\oidc-client\dist 有两个js文件

我们只需使用这两个文件。把这两个文件复制到d:\express\javascript_client\public\ javascripts 目录下
(2)添加测试用的html文件
使用vscode打开javascript_client文件夹,在public(d:\express\javascript_client\public)下新建文件。添加几个测试用的按钮。
<!doctype html>
<html>
<head>
    <meta charset="utf-8" />
    <title></title>
</head>
<body>
    <button id="login">login</button>
    <button id="api">call api</button>
    <button id="logout">logout</button>

    <pre id="results"></pre>

    <script src=" javascripts/oidc-client.js"></script>
    <script src="app.js"></script>
</body>
</html>
(3)添加测试的js文件
在public下新建app.js文件。
黏贴以下代码

/// <reference path=" javascripts/oidc-client.js" />

function log() {
    document.getelementbyid('results').innertext = '';

    array.prototype.foreach.call(arguments, function (msg) {
        if (msg instanceof error) {
            msg = "error: " + msg.message;
        }
        else if (typeof msg !== 'string') {
            msg = json.stringify(msg, null, 2);
        }
        document.getelementbyid('results').innerhtml += msg + '\r\n';
    });
}

document.getelementbyid("login").addeventlistener("click", login, false);
document.getelementbyid("api").addeventlistener("click", api, false);
document.getelementbyid("logout").addeventlistener("click", logout, false);

var config = {
    authority: "http://localhost:5000",
    client_id: "js",
    redirect_uri: "http://localhost:5003/callback.html",
    response_type: "id_token token",
    scope:"openid profile api1",
    post_logout_redirect_uri : "http://localhost:5003/",
};
var mgr = new oidc.usermanager(config);

mgr.getuser().then(function (user) {
    if (user) {
        log("user logged in", user.profile);
    }
    else {
        log("user not logged in");
    }
});

function login() {
    mgr.signinredirect();
}

function api() {
    mgr.getuser().then(function (user) {
        var url = "http://localhost:5001/identity";

        var xhr = new xmlhttprequest();
        xhr.open("get", url);
        xhr.onload = function () {
            log(xhr.status, json.parse(xhr.responsetext));
        }
        xhr.setrequestheader("authorization", "bearer " + user.access_token);
        xhr.send();
    });
}

function logout() {
    mgr.signoutredirect();
}
以下对app.js代码进行分析
app.js中log函数用来记录消息
function log() {
    document.getelementbyid('results').innertext = '';

    array.prototype.foreach.call(arguments, function (msg) {
        if (msg instanceof error) {
            msg = "error: " + msg.message;
        }
        else if (typeof msg !== 'string') {
            msg = json.stringify(msg, null, 2);
        }
        document.getelementbyid('results').innerhtml += msg + '\r\n';
    });
}
使用oidc-client库中的usermanager类来管理openid连接协议。添加此代码以配置和实例化usermanager:
var config = {
    authority: "http://localhost:5000",
    client_id: "js",
    redirect_uri: "http://localhost:5003/callback.html",
    response_type: "id_token token",
    scope:"openid profile api1",
    post_logout_redirect_uri : "http://localhost:5003/",
};
var mgr = new oidc.usermanager(config);
接下来,usermanager提供一个getuser api来获取用户是否登录到javascript应用程序。返回的user对象有一个profile属性,其中包含用户的声明。添加此代码以检测用户是否登录到javascript应用程序:
mgr.getuser().then(function (user) {
    if (user) {
        log("user logged in", user.profile);
    }
    else {
        log("user not logged in");
    }
});
接下来,我们要实现登录、api和注销功能。usermanager提供登录用户的signinredirect和用户登出的signoutredirect。我们在上述代码中获得的用户对象还有一个access_token属性,可以使用该属性对web api进行身份验证。access_token将通过bearer模式传递给web api。添加以下代码在我们的应用程序中实现这三个功能:
function login() {
    mgr.signinredirect();
}

function api() {
    mgr.getuser().then(function (user) {
        var url = "http://localhost:5001/identity";

        var xhr = new xmlhttprequest();
        xhr.open("get", url);
        xhr.onload = function () {
            log(xhr.status, json.parse(xhr.responsetext));
        }
        xhr.setrequestheader("authorization", "bearer " + user.access_token);
        xhr.send();
    });
}

function logout() {
    mgr.signoutredirect();
}
(4)再新建一个callback.html。一旦用户登录到identityserver,这个html文件就是指定的redirect_uri页面。它将完成openid connect协议与identityserver的登录握手。这里的代码都由我们前面使用的usermanager类提供。登录完成后,我们可以将用户重定向回页面。添加此代码完成登录过程:
<!doctype html>
<html>
<head>
    <meta charset="utf-8" />
    <title></title>
</head>
<body>
    <script src=" javascripts/oidc-client.js"></script>
    <script>
        new oidc.usermanager().signinredirectcallback().then(function () {
            window.location = "";
        }).catch(function (e) {
            console.error(e);
        });
    </script>
</body>
</html>

(8)修改服务端口为5003

(1)修改授权服务配置
在authserver项目,打开config.cs文件,在getclients中添加javascript客户端配置
                // javascript client
                new client
                {
                    clientid = "js",
                    clientname = "javascript client",
                    allowedgranttypes = granttypes.implicit,
                    allowaccesstokensviabrowser = true,

                    redirecturis = { "http://localhost:5003/callback.html" },
                    postlogoutredirecturis = { "http://localhost:5003/" },
                    allowedcorsorigins = { "http://localhost:5003" },

                    allowedscopes =
                    {
                        identityserverconstants.standardscopes.openid,
                        identityserverconstants.standardscopes.profile,
                        "api1"
                    },
                }
(2)在资源服务配置允许跨域调用api
在resourceapi项目,打开startup.cs文件中的configureservices方法,配置cors,允许ajax调用从http://localhost:5003调用http://localhost:5001的web api。
 //js-allow ajax calls to be made from http://localhost:5003 to http://localhost:5001.
            services.addcors(options =>
            {
                //this defines a cors policy called "default"
                options.addpolicy("default", policy =>
                {
                    policy.withorigins("http://localhost:5003")
                        .allowanyheader()
                        .allowanymethod();
                });
            });

在configure方法中将cors中间件添加到管道中
 //js-add the cors middleware to the pipeline in configure:

            app.usecors("default");
(3)添加测试用的api接口
添加identitycontroller控制器
[route("[controller]")]
    public class identitycontroller : controllerbase
    {
        [authorize(roles ="admin")]
        [httpget]
        public iactionresult get()
        {
            return new jsonresult(from c in user.claims select new { c.type, c.value });
        }
    }
(4)测试
运行authserver项目,运行resourceapi项目。
在vscode终端输入:npm start

打开浏览器:

点击login,使用账号:zhubingjian 密码:123 登录

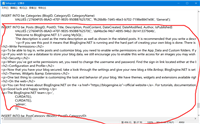
登录返回用户的claims信息

点击call api,调用资源服务器的api接口

成功获取接口返回的信息。
通过这六节的内容,大概地介绍了identityserver4中client的应用场景,包括mvc、前后端分离和服务端。
此外还介绍了如何动态配置client、如何验证从数据库中获取的user以及自定义claims的方法。
这个系列对identityserver4的介绍也是我博客的起点,写博客虽然很花时间,但是可以帮助我加深对知识点的理解。然而文中也体现到我对某些知识点的理解还是不到位的,望大家见谅。
参考官网地址:
授权服务和资源服务源码地址:https://github.com/bingjian-zhu/mvc-hybridflow.git
javascript客户端源码地址:https://github.com/bingjian-zhu/identity-javascript_client.git
如对本文有疑问,请在下面进行留言讨论,广大热心网友会与你互动!! 点击进行留言回复


asp.net搭建博客,使用BlogEngine.NET+MySql搭建博客

网友评论