世家贵女的另类人生,原来我们都是被你们骗大的!,再谈彭宇案真相
本篇开始进入is4实战学习,从第一个示例开始,该示例是 “使用客户端凭据保护api”,这是使用identityserver保护api的最基本场景。该示例涉及到三个项目包括:identityserver项目、api项目、client项目,都有自己的宿主,为了方便开发,放在了一个解决方案下(quickstart.sln),三个项目的分工如下:
(1) identityserver项目是包含基本的identityserver设置的asp.net core应用程序,是令牌端点。
(2) api项目是web api,是要保护的资源。
(3) client项目是客户端用户,用来访问web api。
最后客户端client项目请求获取identityserver上的访问令牌。作为客户端client和identityserver都知道secret密钥,client将使用令牌访问web api。开源地址github
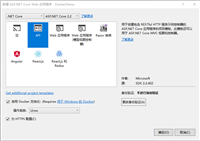
创建一个asp.net core web(或空)模板。项目名为identityserver,解决方案为quickstart。是一个包含基本identityserver设置的asp.net core应用程序。该项目使用的协议是http,当在kestrel上运行时,端口设置为5000或在iisexpress上的随机端口。
首次启动时,identityserver将为您创建一个开发人员签名密钥,它是一个名为的文件tempkey.rsa。您不必将该文件检入源代码管理中,如果该文件不存在,将重新创建该文件。项目最终目录结构如下所示:

下面进行说明,以及用序号来表示开发实现步骤:
2.1 安装:install-package identityserver4
2.2 新增config.cs文件, 该文件是identityserver资源和客户端配置文件。在该文件中定义api资源,以及定义客户端(可以访问此api的客户端)
        /// <summary>
        /// 定义api资源,要保护的资源
        /// </summary>
        /// <returns></returns>
        public static ienumerable<apiresource> getapis()
        {
            return new list<apiresource>
            {
                new apiresource("api1", "my api")
            };
        }
        /// <summary>
        /// 定义客户端,可以访问此api的客户端
        /// </summary>
        /// <returns></returns>
        public static ienumerable<client> getclients()
        {
            return new list<client>
            {
                new client
                {
                    clientid = "client",

                    // no interactive user, use the clientid/secret for authentication
                    allowedgranttypes = granttypes.clientcredentials,

                    //使用密钥进行身份认证  secret for authentication
                    clientsecrets =
                    {
                        new secret("secret".sha256())
                    },

                    //客户端允许访问的范围
                    allowedscopes = { "api1" }
                }
            };
        }
2.3 startup配置
        /// <summary>
        /// 配置identityserver,加载api资源和客户端
        /// </summary>
        /// <param name="services"></param>
        public void configureservices(iservicecollection services)
        {
            // uncomment, if you wan to add an mvc-based ui
            //services.addmvc().setcompatibilityversion(microsoft.aspnetcore.mvc.compatibilityversion.version_2_1);
             //添加addidentityserver
            var builder = services.addidentityserver()
                //添加内存的identity资源
                .addinmemoryidentityresources(config.getidentityresources())
                //添加api资源
                .addinmemoryapiresources(config.getapis())
                 //添加clinet
                .addinmemoryclients(config.getclients());

            if (environment.isdevelopment())
            {
          //开发环境下使用临时签名凭据
                builder.adddevelopersigningcredential();
            }
            else
            {
                throw new exception("need to configure key material");
            }
        }
        public void configure(iapplicationbuilder app)
        {
            if (environment.isdevelopment())
            {
                app.usedeveloperexceptionpage();
            }

            // uncomment if you want to support static files
            //app.usestaticfiles();

            app.useidentityserver();

            // uncomment, if you wan to add an mvc-based ui
            //app.usemvcwithdefaultroute();
        }
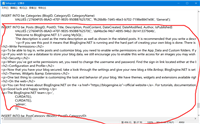
运行服务器并浏览浏览器 http://localhost:5000/.well-known/openid-configuration, 客户端和api将使用它来下载必要的配置数据。下面是截取的部分配置数据:

在解决方案下继续添加api项目,添加asp.net core web api(或空)模板。将api应用程序配置为http://www.lhsxpumps.com/_localhost:5001运行。项目最终目录结构如下所示:

(1) 在api项目中添加一个新文件夹controllers和一个新控制器identitycontroller
   //定义路由
    [route("identity")]
    //需要授权
    [authorize]
    public class identitycontroller : controllerbase
    {
        /// <summary>
        /// 测试授权,获取该用户下声明集合claims
        /// </summary>
        /// <returns></returns>
        public iactionresult get()
        {
            return new jsonresult(from c in user.claims select new { c.type, c.value });
        }
    }
(2) startup配置
    public void configureservices(iservicecollection services)
        {
            //将最基本的mvc服务添加到服务集合中
            services.addmvccore()
                //向基本的mvc服务中添加授权
                .addauthorization()
                //向基本的mvc服务中添加格式化
                .addjsonformatters();

            //将身份验证服务添加到di服务集合中,并配置"bearer"为默认方案
            services.addauthentication("bearer")
                //验证令牌是否有效用于此api
                .addjwtbearer("bearer", options =>
                {
                    options.authority = "http://localhost:5000";
                    //在开发环境禁用,默认true
                    options.requirehttpsmetadata = false;
                    options.audience = "api1";
                });
        }
        public void configure(iapplicationbuilder app)
        {
            //添加身份验证中间件
            app.useauthentication();
            app.usemvc();
        }
启动程序运行http://www.lhsxpumps.com/_localhost:5001/identity时返回401状态码,未授权。意味着api需要凭证,现在受identityserver保护。如下所示:

我们通过上面知道,直接用浏览器来访问api是返回401状态码未授权,下面在client项目中使用凭证,来获得api授权访问。下面是client项目目录结构,这里client是一个控制台应用程序。对于客户端可以是任意应用程序,比如手机端,web端,win服务等等。

在identityserver的令牌端点实现了oauth 2.0协议,客户端可以使用原始http来访问它。但是,我们有一个名为identitymodel的客户端库,它将协议交互封装在易于使用的api中。
3.1 安装:install-package identitymodel
3.2 发现identityserver端点
identitymodel包括用于发现端点的客户端库。只需要知道identityserver的基地址 - 可以从元数据中读取实际的端点地址:
        private static async task main()
        {
            // discover endpoints from metadata
            var client = new httpclient();
            var disco = await client.getdiscoverydocumentasync("http://localhost:5000");
            if (disco.iserror)
            {
                //当停掉identityserver服务时
                //error connecting to http://localhost:5000/.well-known/openid-configuration: 由于目标计算机积极拒绝,无法连接。
                console.writeline(disco.error);
                return;
            }
            //...
其中getdiscoverydocumentasync是属于identitymodel库的,是对httpclient扩展方法。http://localhost:5000是identityserver的基地址。
3.3 请求令牌token
在mian方法中继续向identityserver请求令牌,访问api1资源。这里的requestclientcredentialstokenasync方法也是httpclient扩展方法。
            // request token,带入需要的4个参数,请求令牌,返回tokenresponse
            var tokenresponse = await client.requestclientcredentialstokenasync(new clientcredentialstokenrequest
            {
                //identityserver基地址 http://localhost:5000/connect/token
                address = disco.tokenendpoint,
                //设置客户端标识
                clientid = "client",
                //设置密钥
                clientsecret = "secret",
                //访问的资源范围
                scope = "api1"
            });

            if (tokenresponse.iserror)
            {
                console.writeline(tokenresponse.error);
                return;
            }
            //打印 token 信息
            console.writeline(tokenresponse.json);
            console.writeline("\n\n");
3.4 调用api
在mian方法中继续向下,当访问令牌取得后,开始调用web api。 下面将访问令牌发送到web api,通常使用http authorization标头。这是使用setbearertoken扩展方法完成的,该方法是identitymodel库的httpclient扩展方法。
            // call api
            var apiclient = new httpclient();
            //发送访问令牌
            apiclient.setbearertoken(tokenresponse.accesstoken);

            //访问api,获取该用户下声明集合claims
            var response = await apiclient.getasync("http://localhost:5001/identity");
            if (!response.issuccessstatuscode)
            {
                console.writeline(response.statuscode);
            }
            else
            {
                //输出 claims 名称值 对
                var content = await response.content.readasstringasync();
                console.writeline(jarray.parse(content));
            }
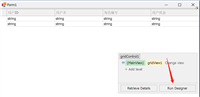
下面开始测试,先启动identityserver程序,再启动api程序,最后启动client客户端来访问api,通过下图可以了解到:(1)客户端请求令牌成功,(2) 客户端使用令牌来访问api成功。

如果想进一步尝试激发错误,来了解系统的行为,可以错误的去配置如下:
(1) 尝试停掉identityserver服务程序,这个已经测试了。
(2) 尝试使用无效的客户端id标识 clientid = "client",
(3) 尝试在令牌请求期间请求无效范围 scope = "api1"
(4) 尝试在api程序未运行时调用api
(5) 尝试不要将令牌发送到api
总结:通过本篇了解到了is4保护api的最基本场景。流程是首先创建一个identityserver 令牌程序。 接着创建api项目,使用identityserver令牌程序来保护api。 最后创建要访问的client项目,获取访问令牌后再调用api方法。
identityserver令牌端对要保护api资源做了配置 new apiresource("api1", "my api")
限制了访问api的客户端标识和访问资源范围clientid = "client", allowedscopes = { "api1" }还有客户端需要的秘钥。
参考文献
如对本文有疑问,请在下面进行留言讨论,广大热心网友会与你互动!! 点击进行留言回复


asp.net搭建博客,使用BlogEngine.NET+MySql搭建博客
网友评论