三峡之窗欢迎您,卡司派,涂鸦跳跃java

当我们安装完 dotnetcore 3.0 版本的 sdk 后,我们就可以创建基于 dotnetcore 的 wpf 项目模板,通过如下 cli 可以方便快捷的创建并运行我们的项目:
dotnet new wpf -n wpfapp
cd wpfapp
dotnet restore
dotnet run
做过 wpf 开发的朋友都知道,这个项目模板肯定不符合我们的预期,我们希望我们的项目模板能够加入 mvvm 的默认代码段,并且能够和 dotnetcore 紧密合作,这样岂不是更加方便了吗? 所以本文使用 mvvm 的一种实现 mvvmlightstd10 来教大家如何创建一个我们理想的项目模板。
首先,我们基于 dotnetcore 3.0 创建一个原始的 wpf 项目模板,然后引用如下库:
可通过执行 cli 命令进行安装
dotnet add package microsoft.extensions.dependencyinjection
dotnet add package mvvmlightlibsstd10
注:因为我们使用了 dotnetcore,所以我们尽量让我们安装的第三方包是基于 .net standard 方式来实现。
然后,尝试修改我们的这个项目,把它改成我们以后期望创建的项目模板的样子。可以参考我的如下修改:
项目结构如下图所示:

其中,src\models\dataitem.cs 的示例代码如下所示:
using system;
using system.collections.generic;
using system.text;

namespace wpfapp.models
{
    public class dataitem
    {
        public string title { get; private set; }

        public dataitem(string title)
        {
            title = title;
        }
    }
}
src\models\idataservice.cs 的示例代码如下所示:
using system;
using system.collections.generic;
using system.text;

namespace wpfapp.models
{
    public interface idataservice
    {
        void getdata(action<dataitem, exception> callback);
    }
}
src\models\dataservice.cs 的示例代码如下所示:
using system;
using system.collections.generic;
using system.text;

namespace wpfapp.models
{
    public class dataservice : idataservice
    {
        public void getdata(action<dataitem, exception> callback)
        {
            var item = new dataitem("hello .net core!");
            callback(item, null);
        }
    }
}
src\viewmodels\mainviewmodel.cs 的示例代码如下所示:
using galasoft.mvvmlight;
using wpfapp.models;

namespace wpfapp.viewmodels
{
    public class mainviewmodel : viewmodelbase
    {
        private readonly idataservice _dataservice;

        private string _welcometitle;
        public string welcometitle
        {
            get { return _welcometitle; }
            set { set(ref _welcometitle, value); }
        }

        public mainviewmodel(idataservice dataservice)
        {
            _dataservice = dataservice;
              _dataservice.getdata(
                (item, error) =>
                {
                    if (error != null)
                    {
                        return;
                    }

                    welcometitle = item.title;
                });
        }
    }
}
src\views\mainview.xaml 的示例代码如下所示:
<window
    x:class="wpfapp.views.mainview"
    xmlns="http://schemas.microsoft.com/winfx/2006/xaml/presentation"
    xmlns:x="http://schemas.microsoft.com/winfx/2006/xaml"
    xmlns:d="http://schemas.microsoft.com/expression/blend/2008"
    xmlns:local="clr-namespace:wpfapp"
    xmlns:mc="http://schemas.openxmlformats.org/markup-compatibility/2006"
    title="mainwindow"
    width="800"
    height="450"
    mc:ignorable="d">
    <grid>
        <label
            horizontalalignment="center"
            verticalalignment="center"
            content="{binding welcometitle}"
            fontsize="40" />
    </grid>
</window>
src\views\mainview.xaml.cs 的示例代码如下所示:
using system.windows;
using wpfapp.viewmodels;

namespace wpfapp.views
{
    public partial class mainview : window
    {
        public mainview(mainviewmodel vm)
        {
            initializecomponent();
            this.datacontext = vm;
        }
    }
}
src\app.xaml 的示例代码如下所示:
<application
    x:class="wpfapp.app"
    xmlns="http://schemas.microsoft.com/winfx/2006/xaml/presentation"
    xmlns:x="http://schemas.microsoft.com/winfx/2006/xaml"
    xmlns:local="clr-namespace:wpfapp" />
src\app.xaml.cs 的示例代码如下所示:
using microsoft.extensions.dependencyinjection;
using system.windows;
using wpfapp.models;
using wpfapp.viewmodels;
using wpfapp.views;

namespace wpfapp
{
    public partial class app : application
    {
        public serviceprovider serviceprovider { get; private set; }

        protected override void onstartup(startupeventargs e)
        {
            base.onstartup(e);

            var servicecollection = new servicecollection();
            configureservices(servicecollection);

            serviceprovider = servicecollection.buildserviceprovider();

            var mainwindow = serviceprovider.getrequiredservice<mainview>();
            mainwindow.show();
        }

        private void configureservices(servicecollection services)
        {
            services.addtransient<mainview>();
            services.addtransient<mainviewmodel>();

            services.addscoped<idataservice, dataservice>();
        }
    }
}
修改完毕后尝试编译运行我们的项目,确保可以正常编译运行。
之后,在我们的项目根目录 src 下新建一个 .template.config 文件夹,然后在里面新建一个 template.json 文件,进行如下示例配置:
{
    "$schema": "http://json.schemastore.org/template",
    "author": "hippiezhou <hippiezhou@outlook.com>",
    "classifications": ["wpf", "mvvmlight", "dependency injection"],
    "name": "wpf mvvmlight: use dotnetcore to create wpf with mvvmlight.",
    "tags": {
        "language": "c#",
        "type": "project"
    },
    "identity": "wpf.mvvmlight",
    "shortname": "wpf-mvvmlight",
    "sourcename": "wpf.mvvmlight",
    "prefernamedirectory": true
}
最后,打开我们的终端,将目录切换至当前项目目录下(就是 .template.config 所在的目录),然后执行下述安装操作
dotnet new -i c:\users\hippiezhou\desktop\helloworld\wpfapp
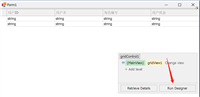
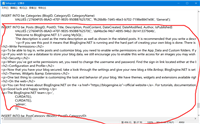
此时,我们的项目模板会被打包到 dotnetcore 的 cli 中,如下图所示:

同时,在 c:\users\hippiezhou.templateengine\dotnetcli\v3.0.100-preview3-010431 目录下的以 templatecache.json 结尾的 json 文件内容也会发生修改,会在 templateinfo 结点下新增一个如下的节点内容:
 {
      "configmountpointid": "f3861181-7a43-4fc5-ab1c-12d95e734c0a",
      "author": "hippiezhou <hippiezhou@outlook.com>",
      "classifications": [
        "wpf",
        "mvvmlight",
        "dependency injection"
      ],
      "defaultname": null,
      "description": "",
      "identity": "wpf.mvvmlight",
      "generatorid": "0c434df7-e2cb-4dee-b216-d7c58c8eb4b3",
      "groupidentity": "",
      "precedence": 0,
      "name": "wpf mvvmlight: use dotnetcore to create wpf with mvvmlight.",
      "shortnamelist": [
        "wpf-mvvmlight"
      ],
      "tags": {
        "language": {
          "description": null,
          "choicesanddescriptions": {
            "c#": ""
          },
          "defaultvalue": "c#"
        },
        "type": {
          "description": null,
          "choicesanddescriptions": {
            "project": ""
          },
          "defaultvalue": "project"
        }
      },
      "cacheparameters": {
        "name": {
          "datatype": "string",
          "defaultvalue": null,
          "description": "the default name symbol"
        }
      },
      "configplace": "/.template.config/template.json",
      "localeconfigmountpointid": "00000000-0000-0000-0000-000000000000",
      "localeconfigplace": null,
      "hostconfigmountpointid": "00000000-0000-0000-0000-000000000000",
      "hostconfigplace": null,
      "thirdpartynotices": null,
      "baselineinfo": {},
      "hasscriptrunningpostactions": false,
      "configtimestamputc": null
},
注:如果后期我们不慎将我们的模板删除了,我们通过删除掉这两个文件里面对应的模板节点就可以在 cli 中取消应用了。
我们可以使用下述操作进行测试一下:
# 使用我们自定义的项目模板,创建 wpf 项目
dotnet new wpf-mvvmlight -n test

cd test

dotnet restore

dotnet run
如果不出意外的话,我们就可以看到这个项目的代码段和我们自定义的模板代码段是一样的。
如果卸载我们的项目模板可以使用如下命令:
dotnet new -u c:\users\hippiezhou\desktop\helloworld\wpfapp
注:我们需要确保我们的自定义模板不能丢失,要不然到时候就卸载就麻烦了(至少目前看来是这样的)。
关于如何将我们的自定义模板可以上传到 nuget 供别人下载使用,这里就不做介绍了,具体操作可参考园里介绍如何在 dotnetcore mvc 中打造自己的项目模板方法是一样的。我在本文中的创建的代码模板也不会提交上去,还是等着 mvvmlight 的原作者 laurent bugnion 来操刀会好一些。
本文介绍了如何通过 dotnet cli 来创建自定义的 wpf 项目模板。在实际的使用过程中,cli 的功能和支持的参数会更多,所以感兴趣的朋友可以自行研究。
如对本文有疑问,请在下面进行留言讨论,广大热心网友会与你互动!! 点击进行留言回复


asp.net搭建博客,使用BlogEngine.NET+MySql搭建博客
网友评论