一天什么时候最冷,知心手机zx918,重生小地主19楼
一、问题需求: 在项目中经常遇到需要写配置文件地方,目的就是不想在程序中关于一些信息写死,发布的时候只需要修改一下配置文件就可以,不需要每次都修改程序,如项目名称、数据库连接字符串、ip端口之类 的;对于小项目或者服务程序,配置信息可以通过系统自带的appsettings进行配置,但大项目或者配置信息太多,如果都用appsettings来配置就感觉比较杂乱,运维人员在修改配置的时候不好修改,而且如果想找某一模块相关或者某一节点配置容易出错,这时如果能分类管理,例如跟数据库相关的写到一个节点里,跟某个业务独立相关的可以也能单独写一个节点上 等等;
二、解决方案:其实 使用.net自带的configsections,将配置信息分块管理,并提供实体类且还能单配置文件管理,这样程序员可以根据业务类型等其他方式分类写入配置文件,运维人员可以针对某一项进行修改部署维护;
三、具体实现:接下来演示一下几种自定义的configsections节点,有单节点配置、多节点配置、自定义节点配置
1、 首先演示一下单节点配置:
1.1 新建一个类继承configurationsection,新增属性及调用方法
 /// <summary>
    /// 单级自定义配置节点
    /// </summary>
   public class customersingleconfig:configurationsection
    {
        /// <summary>
        /// 获取配置信息
        /// </summary>
        /// <returns></returns>
        public static customersingleconfig getconfig()
        {
            return getconfig("customersingleconfig");
        }
        /// <summary>
        /// 获取配置信息
        /// </summary>
        /// <param name="sectionname"></param>
        /// <returns></returns>
        public static customersingleconfig getconfig(string sectionname)
        {
            customersingleconfig section = (customersingleconfig)configurationmanager.getsection(sectionname);
            if (section == null)
                throw new configurationerrorsexception("section " + sectionname + " is not found.");
            return section;
        }

        /// <summary>
        /// 平台中文名称
        /// </summary>
       [configurationproperty("platchname",defaultvalue = "", isrequired = true, iskey = false)]
        public string platchname
        {
            get { return (string)this["platchname"]; }
            set { this["platchname"]=value; }
        }

        /// <summary>
        /// 平台英文名称
        /// </summary>
       [configurationproperty("platenname",defaultvalue = "", isrequired = true, iskey = false)]
        public string platenname
        {
            get { return (string)this["platenname"]; }
            set { this["platenname"] = value; }
        }

    }
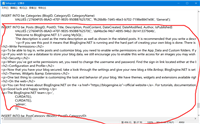
1.2 在app.config------>configuration--------->configsections里面加入customersingleconfig节点,如下:
<!--单级配置节点测试-->
        <section name="customersingleconfig" type="configdemo.customersingleconfig,configdemo"/>
1.3 在app.config------>configuration------->新建customersingleconfig里面加入配置信息
<customersingleconfig platchname="监控平台系统" platenname="monitoring platform system"></customersingleconfig>
1.4 调用获取配置信息
  static void main(string[] args)
        {
            console.writeline("---------------------单级配置节点测试-----------------");
            console.writeline("platchname:" + customersingleconfig.getconfig().platchname);
            console.writeline("platenname:" + customersingleconfig.getconfig().platenname);
        }
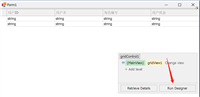
1.5 运行效果如下

1.6 针对1.3还可以更进一步分离配置写法,可以单独配置成一个config文件
将1.3 <section name="customersingleconfig" type="configdemo.customersingleconfig,configdemo"/>这个节点内容换成如下配置:
<customersingleconfig configsource="cfgfiles\customersingleconfig.config" />
再新一个cfgfiles文件夹在文件里面新增customersingleconfig.config:
<?xml version="1.0" encoding="utf-8" ?>
<customermulticonfig >
<customerelement connectionstring="data source='.';initial catalog='unidatanh';user id='sa';password='123456'" enabled="true"></customerelement>
</customermulticonfig>
整体截图配置如下:

2、接下来演示一下多级节点
2.1先定义一个子节点类customerelement继承configurationelement
public class customerelement:configurationelement
    {
        private const string enablepropertyname = "enabled";

        private const string connectionstringpropery = "connectionstring";

        [configurationproperty(enablepropertyname, isrequired = true)]
        public bool enabled
        {
            get { return (bool)base[enablepropertyname]; }
            set { base[enablepropertyname] = value; }
        }

        [configurationproperty(connectionstringpropery, isrequired = true)]
        public string connectionstring
        {
            get { return (string)base[connectionstringpropery]; }
            set { base[connectionstringpropery] = value; }
        }
    }
2.2再定一个配置节点类customermulticonfig继承configurationsection,和单个节点配置一样
namespace configdemo
{
    /// <summary>
    /// 多级配置文件自定义节点配置
    /// </summary>
   public class customermulticonfig:configurationsection
    {
        private const string customerconfigpropertyname = "customerelement";
        /// <summary>
        /// 获取配置信息
        /// </summary>
        /// <returns></returns>
        public static customermulticonfig getconfig()
        {
            return getconfig("customermulticonfig");
        }
        /// <summary>
        /// 获取配置信息
        /// </summary>
        /// <param name="sectionname">xml节点名称</param>
        /// <returns></returns>
        public static customermulticonfig getconfig(string sectionname)
        {
            customermulticonfig section = (customermulticonfig)configurationmanager.getsection(sectionname);
            if (section == null)
                throw new configurationerrorsexception("section " + sectionname + " is not found.");
            return section;
        }
        [configurationproperty(customerconfigpropertyname)]
        public customerelement customerelementconfig
        {
            get { return (customerelement)base[customerconfigpropertyname]; }
            set { base[customerconfigpropertyname] = value; }
        }
    }
}
2.3 接下就是在app.config------>configuration--------->configsections里面加入customermulticonfig节点,详细步骤和单节点一下 如图配置

2.4 调用获取配置信息代码如下:
console.writeline("---------------------多级配置节点测试-----------------");
            console.writeline("connectionstring:" + customermulticonfig.getconfig().customerelementconfig.enabled);
            console.writeline("enabled:" + customermulticonfig.getconfig().customerelementconfig.connectionstring);
2.5 运行效果如下图:

3、再演示一下自定义节点配置,可以随意添加配置节点信息
3.1 具体操作步骤类似,代码如下:
namespace configdemo
{
    public class testconfiginfo : configurationsection
    {
        [configurationproperty("trackers", isdefaultcollection = false)]
        public trackers trackers { get { return (trackers)base["trackers"]; } }
        /// <summary>
        /// 获取配置信息
        /// </summary>
        /// <returns></returns>
        public static testconfiginfo getconfig()
        {
            return getconfig("testconfiginfo");
        }
        /// <summary>
        /// 获取配置信息
        /// </summary>
        /// <param name="sectionname">xml节点名称</param>
        /// <returns></returns>
        public static testconfiginfo getconfig(string sectionname)
        {
            testconfiginfo section = (testconfiginfo)configurationmanager.getsection(sectionname);
            if (section == null)
                throw new configurationerrorsexception("section " + sectionname + " is not found.");
            return section;
        }
        [configurationproperty("testname", isrequired = false)]
        public string testname
        {
            get { return (string)base["testname"]; }
            set { base["testname"] = value; }
        }
        [configurationproperty("testid", isrequired = false)]
        public string testid
        {
            get { return (string)base["testid"]; }
            set { base["testid"] = value; }
        }
    }

    public class trackers : configurationelementcollection
    {
        [configurationproperty("trackername", isrequired = false)]
        public string trackername
        {
            get { return (string)base["trackername"]; }
            set { base["trackername"] = value; }
        }
        protected override configurationelement createnewelement()
        {
            return new tracker();
        }

        protected override object getelementkey(configurationelement element)
        {
            return ((tracker)element).host;
        }
    }
    public class tracker : configurationelement
    {
        #region 配置節設置,設定檔中有不能識別的元素、屬性時,使其不報錯

        protected override bool ondeserializeunrecognizedattribute(string name, string value)
        {
            return base.ondeserializeunrecognizedattribute(name, value);

        }

        protected override bool ondeserializeunrecognizedelement(string elementname, system.xml.xmlreader reader)
        {
            return base.ondeserializeunrecognizedelement(elementname, reader);

        }
        #endregion

        [configurationproperty("host", defaultvalue = "localhost", isrequired = true)]
        public string host { get { return this["host"].tostring(); } }

        [configurationproperty("port", defaultvalue = "22122", isrequired = true)]
        public int port { get { return (int)this["port"]; } }

    }
}
3.2 在cfgfiles新建testconfiginfo.config配置文件
<?xml version="1.0" encoding="utf-8" ?>
<testconfiginfo testname="lxsh" testid="8893">
    <trackers trackername="testname">
        <add host="60.195.251.71" port="22122" />
        <add host="60.195.251.72" port="22123" />
        <add host="60.195.251.73" port="22124" />
    </trackers>
</testconfiginfo>
3.3 右键testconfiginfo.config属性,选择输出目录为始终复制,这样操作目地是在运行目录下面生成该文件(其他配置文件也需要这样操作)

3.4 调用获取配置信息代码如下:
            console.writeline("---------------------自定义新增节点测试-----------------");
            console.writeline("testid:" + testconfiginfo.getconfig().testid);
            console.writeline("testname:" + testconfiginfo.getconfig().testname);
            foreach (tracker item in testconfiginfo.getconfig().trackers)
            {
                console.writeline("host:" + item.host + " port:" + item.port);
            }
3.5 运行效果如下图:

4 系统appsettings配置文件单独建立配置文件
4.1 appconfig配置文件修改截图如下

4.2 system.config配置文件内容如下

4.3 调用方式和没有分开是一样的,如下
  console.writeline("---------------------系统自带appsettings配置文件-----------------");
            console.writeline("loglevel:" + system.configuration.configurationmanager.appsettings["loglevel"]);
            console.writeline("logtype:" + system.configuration.configurationmanager.appsettings["logtype"]);
四、四种方式演示源码github地址:https://github.com/lxshwyan/configdemo.git
如对本文有疑问,请在下面进行留言讨论,广大热心网友会与你互动!! 点击进行留言回复


asp.net搭建博客,使用BlogEngine.NET+MySql搭建博客
网友评论