前言
这一段时间,flutter的势头是越来越猛了,作为一个android程序猿,我自然也是想要赶紧尝试一把。在学习到动画的这部分后,为了加深对flutter动画实现的理解,我决定把之前写的一个卡片切换效果的开源小项目,用flutter“翻译”一遍。
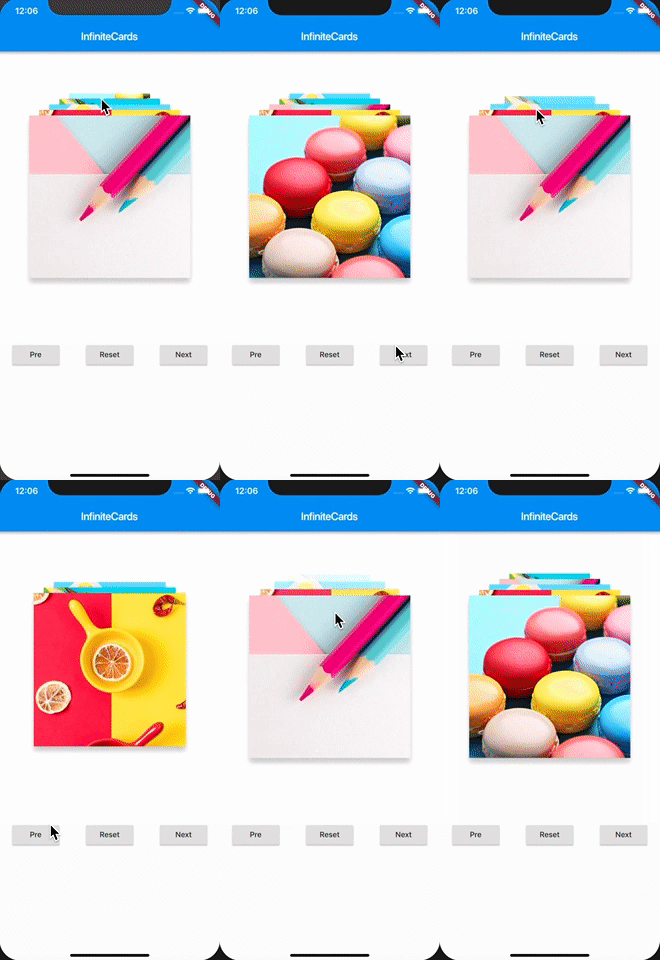
废话不多说,先来看看效果吧:

ios

github地址:https://github.com/bakerjq/flutter-infinitecards
思路
首先,关于卡片的层叠效果,在原android项目中,是通过scale差异以及translationy来体现的,flutter可以继续采用这种方式。
其次,对于自定义卡片的内容,原android项目是通过adapter实现,对于flutter,则可以采用indexedwidgetbuilder实现。
最后,就是自定义动效的实现,原android项目是通过一个0到1的valueanimator来定义动画的展示过程,而flutter中,正好有与之对应的animation和animationcontroller,如此我们就可以直接自定义一个动画过程中,具体的视图展示方式。
组件总览
由于卡片视图需要根据动画情况进行渲染,所以显然是一个statefulwidget。
同时,我们给出三种基本的动画模式:
enum animtype {
 to_front,//被选中的卡片通过自定义动效移至第一,其他的卡片通过通用动效补位
 switch,//选中的卡片和第一张卡片互换位置,并都是自定义动效
 to_end,//第一张图片通过自定义动效移至最后,其他卡片通过通用动效补位
}
并通过helper和controller来处理所有的动画逻辑
其中controller由构造方法传入
infinitecards({
 @required this.controller,
 this.width,
 this.height,
 this.background,
});
helper在initstate中进行构建,并初始化,同时将helper绑定给controller:
@override
void initstate() {
 ...
 _helper = animhelper(
   controller: widget.controller,
   //传入动画更新监听,动画时调用setstate进行实时渲染
   listenerforsetstate: () {
    setstate(() {});
   });
 _helper.init(this, context);
 if (widget.controller != null) {
   widget.controller.animhelper = _helper;
 }
}
而build过程中,则通过helper返回具体的widget列表,而stack则是为了实现层叠效果。
widget build(buildcontext context) {
 ...
 return container(
  ...
  child: stack(
   children: _helper.getcardlist(_width, _height),
  ),
 );
}
如此,基本的初始化等操作就算是完成了。下面我们来看看controller和helper都是怎么工作的。
controller
我们先来看看controller所包含的内容:
class infinitecardscontroller {
 //卡片构造器
 indexedwidgetbuilder _itembuilder;
 //卡片个数
 int _itemcount;
 //动画时长
 duration _animduration;
 //点击卡片是否触发切换动画
 bool _clickitemtoswitch;
 //动画transform
 animtransform _transformtofront,_transformtoback,...;
 //排序transform
 zindextransform _zindextransformcommon,...;
 //动画类型
 animtype _animtype;
 //曲线定义(类android插值器)
 curve _curve;
 //helper
 animhelper _animhelper;
 ...
 void anim(int index) {
  _animhelper.anim(index);
 }
 void reset(...) {
  ...
  //重设各参数
  setcontrollerparams();
  _animhelper.reset();
  ...
 }
}
由此可以看到,controller基本上就是作为参数配置器和helper的方法代理的存在。由此童鞋们肯定就知道了,对于动效的自定义和动效的触发等操作,都是通过controller来完成,demo如下:
//构建controller
_controller = infinitecardscontroller(
 itembuilder: _renderitem,
 itemcount: 5,
 animtype: animtype.switch,
);
//调用reset
_controller.reset(
 itemcount: 4,
 animtype: animtype.to_front,
 transformtoback: _customtobacktransform,
);
//调用展示下一张卡片动画
_controller.reset(animtype: animtype.to_end);
_controller.next();
关于具体的自定义,我们稍后再聊,咱们先来看看helper。
helper
helper是整个动画效果实现的核心类,我们先看几个它所包含的核心成员:
class animhelper {
 final infinitecardscontroller controller;
 //切换动画
 animationcontroller _animationcontroller;
 animation<double> _animation;
 //卡片列表
 list<carditem> _cardlist = new list();
 //需要向后切换的卡片,和需要向前切换的卡片
 carditem _cardtoback, _cardtofront;
 //需要向后切换的卡片位置,和需要向前切换的卡片位置
 int _positiontoback, _positiontofront;
}
现在我们来看看,如果要触发一个切换动画,这些成员是如何相互配合的。
当选中一张卡片进行切换时,这张卡片就是需要向前切换的卡片(tofront),而第一张卡片,就是需要向后切换的卡片(toback)。
void _cardanim(int index, carditem card) {
 //记录要切换的卡片
 _cardtofront = card;
 _cardtoback = _cardlist[0];
 _positiontoback = 0;
 _positiontofront = index;
 //触发动画
 _animationcontroller.forward(from: 0.0);
}
由于设置了animationlistener,在动画过程中,setstate就会被调用,如此就会触发widget的build,从而触发helper的getcardlist方法。我们来看看在切换动画的过程中,是如何返回卡片widget列表的。
list<widget> getcardlist(double width, double height) {
 for (int i = 0; i < controller.itemcount; i++) {
  ...
  if (_isswitchanim) {
   //处理切换动画
   _switchtransform(width, height, i);
  }
  ...
 }
 //根据zindex进行排序渲染
 list<carditem> copy = list.from(_cardlist);
 copy.sort((card1, card2) {
  return card1.zindex < card2.zindex ? 1 : -1;
 });
 return copy.map((card) {
  return card.transformwidget;
 }).tolist();
}
如上代码所示,先进行动画处理,后根据zindex进行排序,因为要保证在前面的后渲染。
而动画是如何处理的呢,以切换到前面的卡片为例:
void _tofronttransform(double width, double height, int fromposition, int toposition) {
  carditem carditem = _cardlist[fromposition];
  controller.zindextransformtofront(
    carditem, _animation.value,
    _getcurvevalue(_animation.value),
    width, height, fromposition, toposition);
  carditem.transformwidget = controller.transformtofront(
    carditem.widget, _animation.value,
    _getcurvevalue(_animation.value),
    width, height, fromposition, toposition);
 }
原来,正是在这一步,helper通过controller中配置的自定义动画方法,得到了卡片的widget。
由此,动画展示的基本流程就描述完了,下面我们进入最关键的部分--如何自定义动画。
自定义动画
我们以通用动画为例,来看看自定义动画的主要流程。
首先,animtransform为如下方法的定义:
typedef animtransform = transform function(
  widget item,//卡片原始widget
  double fraction,//动画执行的系数
  double curvefraction,//曲线转换后的系数
  double cardheight,//整体高度
  double cardwidth,//整体宽度
  int fromposition,//卡片开始位置
  int toposition);//卡片要移动到的位置
该方法返回的是一个transform,专门用于处理视图变换的widget,而我们要做的,就是根据传入的参数,构建相应系数下的widget。以defaultcommontransform为例:
transform _defaultcommontransform(widget item,
  double fraction, double curvefraction, double cardheight, double cardwidth, int fromposition, int toposition)
 //需要跨越的卡片数量{
 int positioncount = fromposition - toposition;
 //以0.8做为第一张的缩放尺寸,每向后一张缩小0.1
 //(0.8 - 0.1 * fromposition) = 当前位置的缩放尺寸
 //(0.1 * fraction * positioncount) = 移动过程中需要改变的缩放尺寸
 double scale = (0.8 - 0.1 * fromposition) + (0.1 * fraction * positioncount);
 //在y方向的偏移量,每向后一张,向上偏移卡片宽度的0.02
 //-cardheight * (0.8 - scale) * 0.5 对卡片做整体居中处理
 double translationy = -cardheight * (0.8 - scale) * 0.5 -
   cardheight * (0.02 * fromposition - 0.02 * fraction * positioncount);
 //返回缩放后,进行y方向偏移的widget
 return transform.translate(
  offset: offset(0, translationy),
  child: transform.scale(
   scale: scale,
   child: item,
  ),
 );
}
对于向第一位移动的选中卡片,也是同理,只不过是根据该卡片对应的转换器来进行自定义动画的转换。
最后的效果,就像演示图中第一次点击,图片向前翻转到第一位的效果一样。
总结
由于flutter采用的是声明式的视图构建方式,在编码初期,多少会受到原生编码方式的思维影响,而觉得很难受。但是在熟悉了之后,就会发现其实很多思想都是共通的,比如animation,比如插值器的概念等等。
另外,研读源码仍然是最有效的解决问题的方式,比如相比android中直接对scrollview进行animateto操作,在flutter中需要通过scrollcontroller进行animateto操作,正是这一点让我找到了在flutter中实现infinitecards效果的方法。
更具体的demo请前往github的flutter-infinitecards repo,欢迎大家star和提issue。
再次贴一下github地址:https://github.com/bakerjq/flutter-infinitecards
以上就是本文的全部内容,希望对大家的学习有所帮助,也希望大家多多支持移动技术网。
如对本文有疑问, 点击进行留言回复!!

Xamarin 安卓 相机 各种坑 目标API Android 6以后,我选的目标API版本是 Android 10
Android 9.0+软件某些功能突然暴毙:cleartext not permitted

Android : Resource is not a Drawable (color or path)

Flutter问题集锦——Android Studio 4.0.1 在AVD Manger中启动模拟器报“unable to locate abd”
网友评论