android平台有三种网络接口可以使用,他们分别是:java.net.*(标准java接口)、org.apache接口和android.net.*(android网络接口)。下面分别介绍这些接口的功能和作用。
1.标准java接口
java.net.*提供与联网有关的类,包括流、数据包套接字(socket)、internet协议、常见http处理等。比如:创建url,以及urlconnection/httpurlconnection对象、设置链接参数、链接到服务器、向服务器写数据、从服务器读取数据等通信。这些在java网络编程中均有涉及,我们看一个简单的socket编程,实现服务器回发客户端信息。
下面用个例子来说明:
a、客户端:
新建android项目工程:socketforandroid(这个随意起名字了吧,我是以这个建立的!)
下面是main_activity.xml的代码:
<?xml version="1.0" encoding="utf-8"?>
<linearlayout xmlns:android="http://schemas.android.com/apk/res/android"
 android:layout_width="fill_parent"
 android:layout_height="fill_parent"
 android:orientation="vertical">
 <textview
  android:layout_width="fill_parent"
  android:layout_height="wrap_content"
  android:text="@string/hello" />
 <edittext
  android:id="@+id/message"
  android:layout_width="match_parent"
  android:layout_height="wrap_content"
  android:hint="@string/hint" />
 <button
  android:id="@+id/send"
  android:layout_width="fill_parent"
  android:layout_height="wrap_content"
  android:text="@string/send" />
</linearlayout>
mainactivity.java的代码入下:
package com.yaowen.socketforandroid;
import android.os.bundle;
import android.support.v7.app.appcompatactivity;
import android.view.view;
import android.widget.button;
import android.widget.edittext;
import java.io.bufferedreader;
import java.io.bufferedwriter;
import java.io.ioexception;
import java.io.inputstreamreader;
import java.io.outputstreamwriter;
import java.io.printwriter;
import java.net.socket;
public class mainactivity extends appcompatactivity {
 private edittext message;
 private button send;
 @override
 protected void oncreate(bundle savedinstancestate) {
  super.oncreate(savedinstancestate);
  setcontentview(r.layout.activity_main);
  //初始化两个ui控件
  message = (edittext) findviewbyid(r.id.message);
  send = (button) findviewbyid(r.id.send);
  //设置发送按钮的点击事件响应
  send.setonclicklistener(new view.onclicklistener() {
   @override
   public void onclick(view v) {
    socket socket = null;
    //获取message输入框里的输入的内容
    string msg = message.gettext().tostring() + "\r\n";
    try {
     //这里必须是192.168.3.200,不可以是localhost或者127.0.0.1
     socket = new socket("192.168.3.200", 18888);
     printwriter out = new printwriter(
       new bufferedwriter(
         new outputstreamwriter(
           socket.getoutputstream()
         )
       ), true);
     //发送消息
     out.println(msg);
     //接收数据
     bufferedreader in = new bufferedreader(
      new inputstreamreader(
       socket.getinputstream()
      )
     );
     //读取接收的数据
     string msg_in = in.readline();
     if (null != msg_in) {
      message.settext(msg_in);
      system.out.println(msg_in);
     } else {
      message.settext("接收的数据有误!");
     }
     //关闭各种流
     out.close();
     in.close();
    } catch (ioexception e) {
     e.printstacktrace();
    } finally {
     try {
      if (null != socket) {
       //socket不为空时,最后记得要把socket关闭
       socket.close();
      }
     } catch (ioexception e) {
      e.printstacktrace();
     }
    }
   }
  });
 }
}
最后别忘记添加访问网络权限:
<uses-permission android:name="android.permission.internet" />
b、服务端:
package service;
import java.io.bufferedreader;
import java.io.bufferedwriter;
import java.io.ioexception;
import java.io.inputstreamreader;
import java.io.outputstreamwriter;
import java.io.printwriter;
import java.net.serversocket;
import java.net.socket;
public class serverandroid implements runnable {
 @override
 public void run() {
 socket socket = null;
 try {
 serversocket server = new serversocket(18888);
 // 循环监听客户端链接请求
 while (true) {
 system.out.println("start...");
 // 接收请求
 socket = server.accept();
 system.out.println("accept...");
 // 接收客户端消息
 bufferedreader in = new bufferedreader(new inputstreamreader(socket.getinputstream()));
 string message = in.readline();
 system.out.println(message);
 // 发送消息,向客户端
 printwriter out = new printwriter(new bufferedwriter(new outputstreamwriter(socket.getoutputstream())),
  true);
 out.println("server:" + message);
 // 关闭流
 in.close();
 out.close();
 }
 } catch (ioexception e) {
 e.printstacktrace();
 } finally {
 if (null != socket) {
 try {
  socket.close();
 } catch (ioexception e) {
  e.printstacktrace();
 }
 }
 }
 }
 // 启动服务器
 public static void main(string[] args) {
 thread server = new thread(new serverandroid());
 server.start();
 }
}
c、启动服务器,控制台会打印出“start...”字符串!
d、运行android项目文件,如下图:
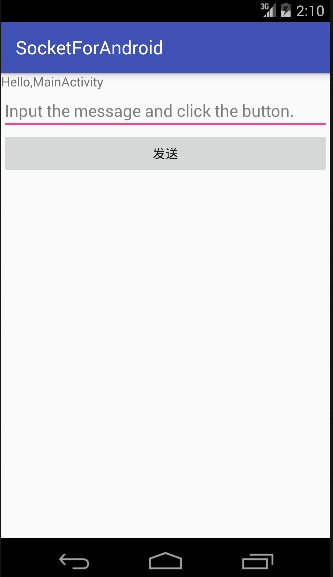
在输入框里输入如下字符串,点发送按钮:

服务器收到客户端发来的消息并打印到控制台:

2、apache接口
对于大部分应用程序而言jdk本身提供的网络功能已远远不够,这时就需要android提供的apache httpclient了。它是一个开源项目,功能更加完善,为客户端的http编程提供高效、最新、功能丰富的工具包支持。
下面我们以一个简单例子来看看如何使用httpclient在android客户端访问web。
首先,要在你的机器上搭建一个web应用test,有两个很简单的php文件:hello_get.php和hello_post.php!
内容如下:
hello_get.php的代码如下:
<html>
 <body>
 welcome <?php echo $_get["name"]; ?><br>
 you connected this page on : <?php echo $_get["get"]; ?>
 </body>
</html>
hello_post.php的代码如下:
<html>
<body>
welcome <?php echo $_post["name"]; ?><br>
you connected this page on : <?php echo $_post["post"]; ?>
</body>
</html>
在原来的android项目里新建一个apache活动类:apache.java,代码如下:
package com.yaowen.socketforandroid;
import android.os.bundle;
import android.support.v7.app.appcompatactivity;
import android.view.view;
import android.widget.button;
import android.widget.textview;
import org.apache.http.httpentity;
import org.apache.http.httpresponse;
import org.apache.http.namevaluepair;
import org.apache.http.client.clientprotocolexception;
import org.apache.http.client.httpclient;
import org.apache.http.client.entity.urlencodedformentity;
import org.apache.http.client.methods.httpget;
import org.apache.http.client.methods.httppost;
import org.apache.http.impl.client.defaulthttpclient;
import org.apache.http.message.basicnamevaluepair;
import java.io.bufferedreader;
import java.io.ioexception;
import java.io.inputstreamreader;
import java.io.unsupportedencodingexception;
import java.util.arraylist;
import java.util.list;
/**
 * created by yaowen on 2015/11/10.
 */
public class apacheactivity extends appcompatactivity implements view.onclicklistener {
 private textview textview;
 private button get1, post1;
 @override
 protected void oncreate(bundle savedinstancestate) {
  super.oncreate(savedinstancestate);
  setcontentview(r.layout.apache);
  textview = (textview) findviewbyid(r.id.textview);
  get1 = (button) findviewbyid(r.id.get);
  post1 = (button) findviewbyid(r.id.post);
  get1.setonclicklistener(this);
  post1.setonclicklistener(this);
 }
 @override
 public void onclick(view v) {
  if (v.getid() == r.id.get) {
   //注意:此处ip不能用127.0.0.1或localhost,android模拟器已将它自己作为了localhost
   string url = "http://192.168.3.200/test/hello_get.php?name=yaowen&get=get";
   textview.settext(get(url));
  }
  if (v.getid() == r.id.post) {
   string url="http://192.168.3.200/test/hello_post.php";
   textview.settext(post(url));
  }
 }
 /**
  * 以post方式发送请求,访问web
  *
  * @param url web地址
  * @return 响应数据
  */
 private string post(string url) {
  bufferedreader reader = null;
  stringbuffer sb = null;
  string result = "";
  httpclient client = new defaulthttpclient();
  httppost requset = new httppost(url);
  //保存要传递的参数
  list<namevaluepair> params = new arraylist<namevaluepair>();
  //添加参数
  params.add(new basicnamevaluepair("name", "yaowen"));
  params.add(new basicnamevaluepair("post","post"));
  try {
   httpentity entity = new urlencodedformentity(params, "utf-8");
   requset.setentity(entity);
   httpresponse response = client.execute(requset);
   if (response.getstatusline().getstatuscode() == 200) {
    system.out.println("post success");
    reader = new bufferedreader(new inputstreamreader(response.getentity().getcontent()));
    sb = new stringbuffer();
    string line = "";
    string nl = system.getproperty("line.separator");
    while ((line = reader.readline()) != null) {
     sb.append(line);
    }
   }
  } catch (unsupportedencodingexception e) {
   e.printstacktrace();
  } catch (clientprotocolexception e) {
   e.printstacktrace();
  } catch (ioexception e) {
   e.printstacktrace();
  } finally {
   if (null != reader) {
    try {
     reader.close();
    } catch (ioexception e) {
     e.printstacktrace();
    }
   }
   if (null != sb) {
    result = sb.tostring();
   }
  }
  return result;
 }
 /**
  * 以get方式发送请求,访问web
  *
  * @param url web地址
  * @return 响应数据
  */
 private static string get(string url) {
  bufferedreader bufferedreader = null;
  stringbuffer sb = null;
  string result = "";
  httpclient client = new defaulthttpclient();
  httpget request = new httpget(url);
  //发送请求,得到响应
  try {
   httpresponse response = client.execute(request);
   //请求成功
   if (response.getstatusline().getstatuscode() == 200) {
    bufferedreader = new bufferedreader(
      new inputstreamreader(
        response.getentity()
          .getcontent()
      )
    );
    sb = new stringbuffer();
    string line = "";
    string nl = system.getproperty("line.separator");
    while ((line = bufferedreader.readline()) != null) {
     sb.append(line);
    }
   }
  } catch (ioexception e) {
   e.printstacktrace();
  } finally {
   if (null != bufferedreader) {
    try {
     bufferedreader.close();
     //bufferedreader=null;
    } catch (ioexception e) {
     e.printstacktrace();
    }
   }
   if (null != sb) {
    result = sb.tostring();
   }
  }
  return result;
 }
}
新建一个apache.xml文件,如下:
<?xml version="1.0" encoding="utf-8"?>
<linearlayout xmlns:android="http://schemas.android.com/apk/res/android"
 android:layout_width="fill_parent"
 android:layout_height="fill_parent"
 android:orientation="vertical">
 <textview
  android:id="@+id/textview"
  android:layout_width="fill_parent"
  android:layout_height="wrap_content"
  android:gravity="center"
  android:text="通过按钮选择不同方式访问网页" />
 <button
  android:id="@+id/get"
  android:layout_width="match_parent"
  android:layout_height="wrap_content"
  android:text="get" />
 <button
  android:id="@+id/post"
  android:layout_width="match_parent"
  android:layout_height="wrap_content"
  android:text="post" />
</linearlayout>
结果运行如下:

3.android.net编程:
常常使用此包下的类进行android特有的网络编程,如:访问wifi,访问android联网信息,邮件等功能。
这里就不详细做例子了,因为这个接触比较多~~~。
下面给大家介绍android的网络通讯
我们知道,java提供的socket可以完成了两台pc机的通信。tcpserver需要客户端和服务器,服务器用socketserver和socket完成,客户端使用socket完成......这些我们都很熟悉。此章主要是通过tcpserver完成android 与pc机的通信,
首先来看我们熟悉的服务器程序:
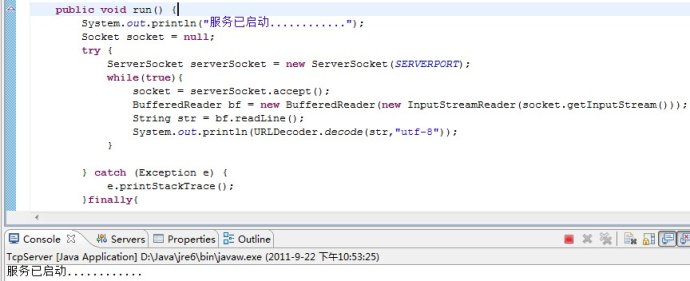
上图用主方法main其他一个thread,然后在run方法里面无限监听发送过来的内容,如果有内容则输出。利用的是java的api,很经典。
接下来就是在android端发送数据给pc端,其代码如下:

这样就完成了android与pc机间的通信。
如对本文有疑问, 点击进行留言回复!!
IjkPlayer【1】 Demo Android的最简单实现

一起Talk Android吧(第二百六十回:Android中的BottomNavigationView概述)


网友评论