今日徐水,mj晓布,抓破网
使用 shiro-spring-boot-web-starter 在 spring boot 中集成 shiro 只需要再添加一个依赖
<dependency>
    <groupid>org.apache.shiro</groupid>
    <artifactid>shiro-spring-boot-web-starter</artifactid>
    <version>1.4.1</version>
</dependency>
shiro-spring-boot-web-starter 按照 spring boot 的设计理念,底层实现了大量的配置。按照官方的介绍,用户只需要添加两个必须的 bean,就可以运行 shiro。一个是 realm,另一个是 shirofilterchaindefinition。其中 realm 可以添加多个,在启动时,会自动将他们添加进 securitymanager。
代码如下
@configuration
public class shiroconfig {
    /**
     * 配置自定义 realm
     * @return
     */
    @bean
    public realm realm() {
        loginrealm loginrealm = new loginrealm();
        hashedcredentialsmatcher credentialsmatcher = new hashedcredentialsmatcher();
        credentialsmatcher.sethashiterations(3);
        credentialsmatcher.sethashalgorithmname("md5");
        loginrealm.setcredentialsmatcher(credentialsmatcher);
        return loginrealm;
    }

    @bean
    public shirofilterchaindefinition shirofilterchaindefinition() {
        defaultshirofilterchaindefinition shirofilterchaindefinition = new defaultshirofilterchaindefinition();
        shirofilterchaindefinition.addpathdefinition("/lib/**","anon");
        shirofilterchaindefinition.addpathdefinition("/static/**","anon");
        shirofilterchaindefinition.addpathdefinition("/verifycode.jsp","anon");
        shirofilterchaindefinition.addpathdefinition("/checkverifycode","anon");
        shirofilterchaindefinition.addpathdefinition("/logout","logout");
        shirofilterchaindefinition.addpathdefinition("/login","authc");
        shirofilterchaindefinition.addpathdefinition("/**","user");
        return shirofilterchaindefinition;
    }
}
另外,如果需要配置 cachemanager,还可以添加一个 bean,例如下面使用 ehcache 作为缓存管理。
//配置缓存
@bean
public cachemanager cachemanager() {
    ehcachemanager ehcachemanager = new ehcachemanager();
    ehcachemanager.setcachemanagerconfigfile("classpath:shiro-ehcache.xml");
    return ehcachemanager;
}
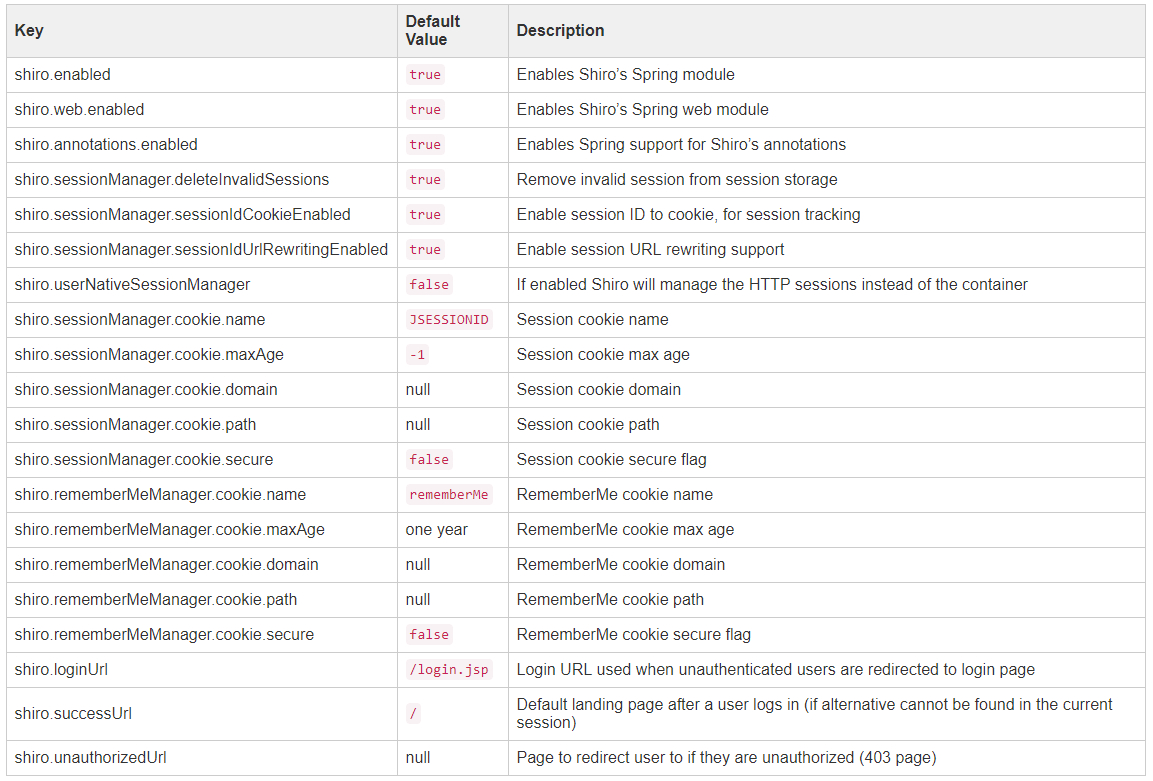
shiro-spring-boot-web-starter 还支持使用 application.properties 配置自定义参数,修改默认值,用于程序启动时初始化自动生成的 bean。比如常见的 cookie 和 session 的时效、loginurl、successurl 等。
#配置shiro
shiro.loginurl=/login
shiro.successurl=/index
shiro.unauthorizedurl=/unauthorized
shiro.usernativesessionmanager=true
shiro.remembermemanager.cookie.maxage=259200
shiro.sessionmanager.cookie.maxage=10800
阅读源码可以知道,底层会将 spring 容器中的 realm 和 shirofilterchaindefinition 用 @autowired 的方式注入后,用于创建 securitymanager 和 shirofilterfactorybean。
shiro-spring-boot-web-starter 底层自动配置的 securitymanager 对应生成 bean 的配置类在 org.apache.shiro.spring.config.web.autoconfigure.shirowebautoconfiguration,该类继承 abstractshirowebconfiguration,而 abstractshirowebconfiguration 继承 org.apache.shiro.spring.config.abstractshiroconfiguration,下面是解析。

在以前使用 shiro-spring 进行集成的时候,我们需要在 shiro 的配置文件配置 shirofilterfactorybean 时,配置安全管理器、successurl、loginurl、filterchaindefinitions 等配置。如下
<!--配置 shiro 框架的过滤器-->
<bean id="shirofilter" class="org.apache.shiro.spring.web.shirofilterfactorybean">
    <!--注入安全管理器-->
    <property name="securitymanager" ref="securitymanager"/>
    <!--默认的认证成功后跳转的页面-->
    <property name="successurl" value="/index"/>
    <!--认证失败、登录访问的页面-->
    <property name="loginurl" value="/login"/>
    <!--没有权限访问时跳转的页面-->
    <property name="unauthorizedurl" value="/unauthorized"/>

    <!--注入自定义 filter-->
    <property name="filters">
        <map>
            <entry key="authc" value-ref="myformauthenticationfilter"/>
        </map>
    </property>

    <!--配置过滤器链-->
    <property name="filterchaindefinitions">
        <value>
            <!--静态资源不需要验证,放行-->
            /lib/** = anon
            /static/** = anon
            /verifycode.jsp = anon
            /checkverifycode = anon

            <!--退出登录-->
            /logout = logout

            <!--只有登录界面走验证-->
            /login = authc

            <!--其它所有页面都可以在rememberme后访问-->
            /** = user
        </value>
    </property>
</bean>
而使用了 shiro-spring-boot-web-starter 后,底层会自动装配生成 shirofilterfactorybean,参考的源码在 org.apache.shiro.spring.config.web.autoconfigure.shirowebautoconfiguration,该类继承 abstractshirowebfilterconfiguration,具体的方法在抽象类内,解析如下

参考官网,可选的配置项有:
实际开发中我们可能需要重写 filter,例如 formauthenticationfilter 以实现业务需求。这时候我们就需要手动创建 shirofilterfactorybean 覆盖框架自动生成的。源码和解析如下

需要注意的一点是,使用 shiro-spring-boot-web-starter 时,会出现一些 bug:在 controller 内的方法上用注解的方式做权限控制时(打了 @requirespermissions 标签),@requestmapping 标签会出问题,前台浏览器访问时会报 404 错误。解决办法就是在添加一个 bean,如下
/**
 * setuseprefix(true)用于解决一个奇怪的bug。在引入spring aop的情况下。
 * 在@controller注解的类的方法中加入@requiresrole等shiro注解,会导致该方法无法映射请求,导致返回404。
 * 加入这项配置能解决这个bug
 */
@bean
public static defaultadvisorautoproxycreator getdefaultadvisorautoproxycreator(){
    defaultadvisorautoproxycreator defaultadvisorautoproxycreator=new defaultadvisorautoproxycreator();
    defaultadvisorautoproxycreator.setuseprefix(true);
    return defaultadvisorautoproxycreator;
}
如对本文有疑问,请在下面进行留言讨论,广大热心网友会与你互动!! 点击进行留言回复
apollo与springboot集成实现动态刷新配置的教程详解
网友评论