本文包含:springboot的自动配置原理及如何自定义springbootstar等
我们知道,在使用springboot的时候,我们只需要如下方式即可直接启动一个web程序:
@springbootapplication
public class demoapplication {
    public static void main(string[] args) {
        springapplication.run(demoapplication.class, args);
    }
}
和我们之前使用普通spring时繁琐的配置相比简直不要太方便,那么你知道springboot实现这些的原理么
首先我们看到类上方包含了一个@springbootapplication注解
@springbootconfiguration
@enableautoconfiguration
@componentscan(
    excludefilters = {@filter(
    type = filtertype.custom,
    classes = {typeexcludefilter.class}
), @filter(
    type = filtertype.custom,
    classes = {autoconfigurationexcludefilter.class}
)}
)
public @interface springbootapplication {
    @aliasfor(
        annotation = enableautoconfiguration.class
    )
    class<?>[] exclude() default {};

    @aliasfor(
        annotation = enableautoconfiguration.class
    )
    string[] excludename() default {};

    @aliasfor(
        annotation = componentscan.class,
        attribute = "basepackages"
    )
    string[] scanbasepackages() default {};

    @aliasfor(
        annotation = componentscan.class,
        attribute = "basepackageclasses"
    )
    class<?>[] scanbasepackageclasses() default {};
}
这个注解上边包含的东西还是比较多的,咱们先看一下两个简单的热热身
@componentscan 注解@componentscan(excludefilters = {
@filter(type = filtertype.custom, classes = typeexcludefilter.class),
@filter(type = filtertype.custom, classes = autoconfigurationexcludefilter.class) })
这个注解咱们都是比较熟悉的,无非就是自动扫描并加载符合条件的bean到容器中,这个注解会默认扫描声明类所在的包开始扫描,例如:
类cn.shiyujun.demo类上标注了@componentscan 注解,则cn.shiyujun.controller、cn.shiyujun.service等等包下的类都可以被扫描到
这个注解一共包含以下几个属性:
basepackages:指定多个包名进行扫描
basepackageclasses:对指定的类和接口所属的包进行扫
excludefilters:指定不扫描的过滤器
includefilters:指定扫描的过滤器
lazyinit:是否对注册扫描的bean设置为懒加载
namegenerator:为扫描到的bean自动命名
resourcepattern:控制可用于扫描的类文件
scopedproxy:指定代理是否应该被扫描
scoperesolver:指定扫描bean的范围
usedefaultfilters:是否开启对@component,@repository,@service,@controller的类进行检测
@springbootconfiguration注解这个注解更简单了,它只是对configuration注解的一个封装而已
@target({elementtype.type})
@retention(retentionpolicy.runtime)
@documented
@configuration
public @interface springbootconfiguration {
}
enableautoconfiguration注解这个注解可是重头戏了,springboot号称的约定大于配置,也就是本文的重点自动装配的原理就在这里了
@import({autoconfigurationimportselector.class})
public @interface enableautoconfiguration {
    string enabled_override_property = "spring.boot.enableautoconfiguration";

    class<?>[] exclude() default {};

    string[] excludename() default {};
}
简单概括一下,这个注解存在的意义就是:利用@import注解,将所有符合自动装配条件的bean注入到ioc容器中,关于@import注解原理这里就不再阐述,感兴趣的同学可以参考此篇文章:spring @import注解源码解析
进入类autoconfigurationimportselector,观察其selectimports方法,这个方法执行完毕后,spring会把这个方法返回的类的全限定名数组里的所有的类都注入到ioc容器中
public string[] selectimports(annotationmetadata annotationmetadata) {
        if (!this.isenabled(annotationmetadata)) {
            return no_imports;
        } else {
            autoconfigurationmetadata autoconfigurationmetadata = autoconfigurationmetadataloader.loadmetadata(this.beanclassloader);
            annotationattributes attributes = this.getattributes(annotationmetadata);
            list<string> configurations = this.getcandidateconfigurations(annotationmetadata, attributes);
            configurations = this.removeduplicates(configurations);
            set<string> exclusions = this.getexclusions(annotationmetadata, attributes);
            this.checkexcludedclasses(configurations, exclusions);
            configurations.removeall(exclusions);
            configurations = this.filter(configurations, autoconfigurationmetadata);
            this.fireautoconfigurationimportevents(configurations, exclusions);
            return stringutils.tostringarray(configurations);
        }
    }
观察上方代码:
 protected boolean isenabled(annotationmetadata metadata) {
        return this.getclass() == autoconfigurationimportselector.class ? (boolean)this.getenvironment().getproperty("spring.boot.enableautoconfiguration", boolean.class, true) : true;
    }
private static final string[] no_imports = new string[0];
org.springframework.boot.autoconfigure包下的meta-inf/spring-autoconfigure-metadata.properties文件中这些配置条件主要含义大致是这样的:如果你要自动装配某个类的话,你觉得先存在哪些类或者哪些配置文件等等条件,这些条件的判断主要是利用了@conditionalxxx注解,关于@conditionalxxx系列注解可以参考这篇文章:springboot条件注解@conditional
3. 具体的加载代码就不列出了,无法就是个读取配置文件 4. 这里放个加载之后的结果图: 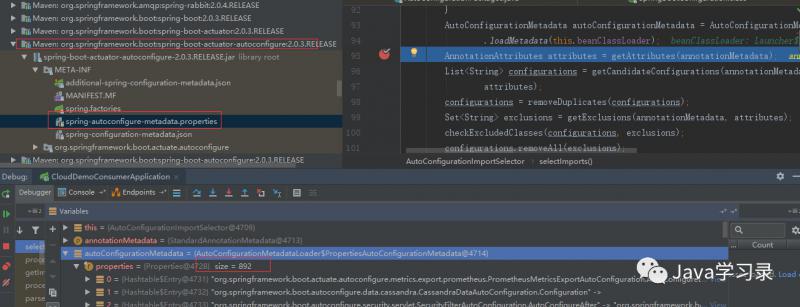 4. 获取`@enableautoconfiguration`注解上的exclude、excludename属性,这两个属性的作用都是排除一些类的 5. 这里又是关键的一步,可以看到刚才图片中spring-autoconfigure-metadata.properties文件的上方存在一个文件spring.factories,这个文件可就不止存在于`org.springframework.boot.autoconfigure`包里了,所有的包里都有可能存在这个文件,所以这一步是加载整个项目所有的spring.factories文件。这个文件的格式是这样的
org.springframework.boot.autoconfigure.enableautoconfiguration=\org.springframework.boot.actuate.autoconfigure.amqp.rabbithealthindicatorautoconfiguration,\org.springframework.boot.actuate.autoconfigure.audit.auditautoconfiguration,\org.springframework.boot.actuate.autoconfigure.audit.auditeventsendpointautoconfiguration
6. 这里存在一个知识点,springboot中的star就是依靠这个文件完成的,假如我们需要自定义一个springboot的star,就可以在我们的项目的meta-inf文件夹下新建一个spring.factories文件
org.springframework.boot.autoconfigure.enableautoconfiguration=cn.shiyujun.testautoconfiguration
这样当别的项目依赖我们的项目时就会自动把我们的`testautoconfiguration`类注入到spring容器中
7. 删除重复的自动配置类
8. 下面三行就是去除我们指定排除的配置类
9. 接着这一行的逻辑稍微复杂一些,主要就是根据加载的配置条件信息来判断各个配置类上的`@conditionalxxx`系列注解是否满足需求
10. 最后就是发布自动装配完成事件,然后返回所有能够自动装配的类的全限定名


到了这里我们已经把springboot自动装配的原理搞清楚了,但是总感觉差点什么,那我们从这些自动装配的类里面挑一个我们比较熟悉的关于servlet的类来看看咋回事吧:
@configuration
@conditionalonwebapplication(
type = type.servlet
)
public class servletendpointmanagementcontextconfiguration {
public servletendpointmanagementcontextconfiguration() {
}
@bean
public exposeexcludepropertyendpointfilter<exposableservletendpoint> servletexposeexcludepropertyendpointfilter(webendpointproperties properties) {
    exposure exposure = properties.getexposure();
    return new exposeexcludepropertyendpointfilter(exposableservletendpoint.class, exposure.getinclude(), exposure.getexclude(), new string[0]);
}

@configuration
@conditionalonclass({resourceconfig.class})
@conditionalonmissingclass({"org.springframework.web.servlet.dispatcherservlet"})
public class jerseyservletendpointmanagementcontextconfiguration {
    public jerseyservletendpointmanagementcontextconfiguration() {
    }

    @bean
    public servletendpointregistrar servletendpointregistrar(webendpointproperties properties, servletendpointssupplier servletendpointssupplier) {
        return new servletendpointregistrar(properties.getbasepath(), servletendpointssupplier.getendpoints());
    }
}

@configuration
@conditionalonclass({dispatcherservlet.class})
public class webmvcservletendpointmanagementcontextconfiguration {
    private final applicationcontext context;

    public webmvcservletendpointmanagementcontextconfiguration(applicationcontext context) {
        this.context = context;
    }

    @bean
    public servletendpointregistrar servletendpointregistrar(webendpointproperties properties, servletendpointssupplier servletendpointssupplier) {
        dispatcherservletpathprovider servletpathprovider = (dispatcherservletpathprovider)this.context.getbean(dispatcherservletpathprovider.class);
        string servletpath = servletpathprovider.getservletpath();
        if (servletpath.equals("/")) {
            servletpath = "";
        }

        return new servletendpointregistrar(servletpath + properties.getbasepath(), servletendpointssupplier.getendpoints());
    }
}
}
``自上而下观察整个类的代码,你会发现这些自动装配的套路都是一样的 1. 如果当前是servlet环境则装配这个bean 2. 当存在类resourceconfig以及不存在类dispatcherservlet时装配jerseyservletendpointmanagementcontextconfiguration3. 当存在dispatcherservlet类时装配webmvcservletendpointmanagementcontextconfiguration`
如对本文有疑问, 点击进行留言回复!!


VideoStudio多相机编辑器怎么用? VideoStudio多相机的使用方法
网友评论