前肾康,上海手机回收,酋长大人别碰我
前边两篇博客介绍了web api的基本框架以及路由配置,这篇博客主要解决在前后端分离项目中,为前端人员提供详细接口说明的问题,主要是通过修改webapi helppage相关代码和添加webapitestclient组件实现webapi接口详细说明以及接口测试。
asp.net web api 2系列(一):初识web api及手动搭建基本框架
asp.net web api 2系列(二):灵活多样的路由配置
通过vs2017创建web api应用程序(注意不是空的api应用程序),系统会自动添加helppage,这里通过修改代码和设置路径,可以实时查看webapi的接口说明。
新建webapitest解决方案,并添加webapitest.web(web api应用程序)和webapi.entities(类库),创建过程可以到系列博客查看,创建完成,解决方案资源管理器如下图所示:

在entities中添加student类,并在controllers中添加studentcontroller(web api控制器类(v2.1)),修改相应代码(具体参照asp.net web api 2系列(二):灵活多样的路由配置),删除原有的valuecontroller,上述操作完成后如下图所示:

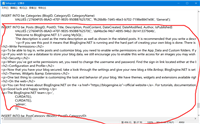
运行程序,点击页面中api菜单(http://www.lhsxpumps.com/_localhost:56783/help),可以看到api接口,如下图所示:

点击上边列表中的接口,可以查看调用说明,如下图所示:

这时发现所有的说明信息都为空(description),接下来添加描述信息。
student.cs中的相应字段和studentcontroller.cs中的接口添加描述信息,如下图所示:


分别勾选webapitest.entities和webapitest.web项目【属性-生成-输出-xml文档文件】,如下图所示:

修改 public static void register(httpconfiguration config):
config.setdocumentationprovider(new xmldocumentationprovider(httpcontext.current.server.mappath("~/bin")));
输出目录都设置到web的bin下,具体截图如下:

添加私有变量:
private list<xpathnavigator> _documentnavigators;
修改构造函数 public xmldocumentationprovider(string documentpath)(其中的files种的xml名字必须和生成的对应):
 public xmldocumentationprovider(string documentpath)
        {
            if (documentpath == null)
            {
                throw new argumentnullexception("documentpath");
            }
            //xpathdocument xpath = new xpathdocument(documentpath);
            //_documentnavigator = xpath.createnavigator();
            _documentnavigators = new list<xpathnavigator>();
            var files = new[] { "webapitest.web.xml", "webapitest.entities.xml" };
            foreach (var file in files)
            {
                var path = path.combine(documentpath, file);
                if (file.exists(path))
                {
                    xpathdocument xpath = new xpathdocument(path);
                    _documentnavigators.add(xpath.createnavigator());
                }
            }
        }
添加私有方法:
  private xpathnavigator selectsinglenode(string selectexpression)
        {
            foreach (var navigator in _documentnavigators)
            {
                var propertynode = navigator.selectsinglenode(selectexpression);
                if (propertynode != null)
                    return propertynode;
            }
            return null;
        }
用selectsinglenode(selectexpression)替换_documentnavigator.selectsinglenode(selectexpression)的调用,在文中大概有四处。
此时完成添加描述的全部操作,运行程序,效果如下图所示:


webapitestclient组件作用主要有以下几个:
(1)将webapi的接口放到了浏览器里面,以可视化的方式展现出来,比如我们通过http://www.lhsxpumps.com/_localhost:11095/help这个地址就能在浏览器里面看到这个服务里面所有的api接口以及接口的详细说明。
(2)能够详细查看api的类说明、方法说明、参数说明、返回值说明。只需要我们在定义方法时候加上 /// 这种详细注释即可,组件自动读取注释里面的内容展现在界面上面。
(3)可以修改http请求头文件head和请求体body里面的参数,指定发送http请求的特性,比如指定我们最常见的contenttype指示参数的类型。
(4)组件拥有测试接口的功能,用过soup ui的朋友应该知道,通过soup ui能够方便测试webservice参数以及返回值。我们的webapitestclient也可以实现类似的功能,直接通过页面上的测试按钮,就能测试接口。
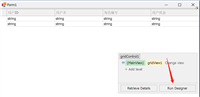
通过nuget引入组件,如下图所示:

安装成功后,项目会自动添加一些主要文件:
scripts\webapitestclient.js
areas\helppage\testclient.css
areas\helppage\views\help\displaytemplates\testclientdialogs.cshtml
areas\helppage\views\help\displaytemplates\testclientreferences.cshtml
修改areas/helppage/views/help/api.cshtml,添加以下内容:
@html.displayformodel("testclientdialogs")
@section scripts{
    <link href="~/areas/helppage/helppage.css" rel="stylesheet" />
    @html.displayformodel("testclientreferences")
}
添加位置如下图所示:

添加完成后,运行程序,调用api/student/{id},此时发现在页面右下角出现一个【test api】按钮,如下图所示:

单击【test api】按钮,可以直接测试次api接口,具体调用后边再讲,此时发现测试页面在当前页面的最下端,不太美观,如下图所示:

研究发现,出现该问题的原因是由于新建的项目自带的jquery和boostrap的版本过高引起,通过nuget将jquery修改为1.12.4,boostrap修改为3.3.7。在此运行程序,测试页面出现页面中间,如下所示:

输出调用参数001,点击【send】按钮,测试api/student/{id},调用结果如下图所示:

其他接口都可以通过此方法调用测试,非常的直观、便捷。
至此,完成了关于webapi接口查看及测试调动的全部过程,上述操作的环境vs2017和.net framework4.6,相关程序代码感兴趣的童鞋也可以直接下载(页面右上角的github)。博文写作不易希望多多支持,后续会更新更多内容,感兴趣的朋友可以加关注,欢迎留言交流!
如对本文有疑问,请在下面进行留言讨论,广大热心网友会与你互动!! 点击进行留言回复


asp.net搭建博客,使用BlogEngine.NET+MySql搭建博客
网友评论