香港yy房产网,exo跨年,鹰潭时尚网
nagios是一款linux上成熟的监视系统运行状态和网络信息的开原it基础设施监视系统,nagios能监视所指定的本地或远程主机及服务,例如http服务、ftp服务等,同时提供异常通知、事件处理等功能,当主机或服务出现故障时,nagios还可以通过邮件、手机短信等形式在第一时间进行通知。nagios可运行在linux和unix平台上,同时提供一个可选的基于浏览器的web界面,方便系统管理员查看系统的运行状态、网络状态、各种系统问题及日志异常等。
环境: 192.168.0.201 mysql主机 rhel6.4
192.186.0.202 nagios主机 rhel6.4
安装相关软件包:
  yum install httpd gcc make perl-extutils-embed.x86_64 -y
  yum localinstall gd-devel-2.0.35-11.el6.x86_64.rpm  -y
安装nagios:
useradd nagios
usermod -g nagios apache
#编译所需软件包
#运行 nagios 服务的用户
#使 apache 用户对 nagios 目录具有写权限,不然 web 页面操作失败
tar jxf nagios-cn-3.2.3.tar.bz2
#nagios 软件安装
cd nagios-cn-3.2.3
./configure –enable-embedded-perl
make all      //根据提示完成安装
make install
make install-init
make install-commandmode
make install-config
make install-webconf   //在apache下通过这条命令可以快速整合
安装nagios-plugins:
yum install mysql-devel openssl-devel -y
tar zxf nagios-plugins-1.4.15.tar.gz
cd nagios-plugins-1.4.15
./configure --with-nagios-user=nagios --with-nagios-group=nagios --enable-extra-opts --enable-libtap --enable-perl-modules
make
make install
配置nagios:
vi /usr/local/nagios/etc/nagios.cfg
   #cfg_file=/usr/local/nagios/etc/objects/localhost.cfg #注释掉localhost.cfg文件
   cfg_file=/usr/local/nagios/etc/objects/services.cfg  #新建 services.cfg 文件,存放服务与服务组定义
   cfg_file=/usr/local/nagios/etc/objects/hosts.cfg   #新建 hosts.cfg 文件,存放主机与主机组定义
配置hosts.cfg:
vi /usr/local/nagios/etc/objects/hosts.cfg
define host{                     //主机的管理
use linux-server                  //使用默认的主机规则
host_name vm2.example.com        //主机名
alias nagios vm2                  //主机别名
address 127.0.0.1                 //主机ip地址
icon_image switch.gif              //图标
statusmap_image switch.gd2
2d_coords 100,200                //2d图像坐标
3d_coords 100,200,100             //3d图像坐标
}
define hostgroup{                //主机组的管理
hostgroup_name linux-servers        //主机组名字
alias linux servers                //别名
members *                      //*代表上面所有主机
配置mysql
----建立nagdb专用数据库
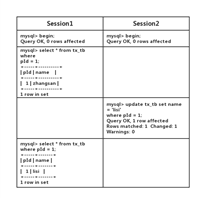
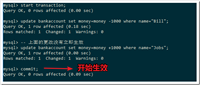
mysql> create database nagdb default charset=utf8;
query ok, 1 row affected (0.01 sec)
mysql> grant select on nagdb.* to 'nagios'@'%';
query ok, 0 rows affected (0.00 sec)
mysql> update mysql.user set 'password' = password('nagios') where 'user'='nagios';
error 1064 (42000): you have an error in your sql syntax; check the manual that corresponds to your mysql server version for the right syntax to use near ''password' = password('nagios') where 'user'='nagios'' at line 1
mysql> update mysql.user set password = password('nagios') where user='nagios';
query ok, 1 row affected (0.03 sec)
rows matched: 1 changed: 1 warnings: 0
mysql> flush privileges;
query ok, 0 rows affected (0.00 sec)
----用以下命令来验证一下:
[root@node2 etc]# /usr/local/nagios/libexec/check_mysql -h 192.168.1.152 -u nagios -d nagdb -p nagios
uptime: 3374 threads: 1 questions: 11 slow queries: 0 opens: 33 flush tables: 1 open tables: 26 queries per second avg: 0.003
备注:如果出现:/usr/local/nagios/libexec/check_mysql: error while loading shared libraries: libmysqlclient.so.18: cannot open shared object file: no such file or directory
请查看$mysql_home/lib
[root@node2 lib]# ln -s ./libmysqlclient.so.18.0.0 /usr/lib/libmysqlclient.so.18
配置nrpe.cfg
[root@node2 etc]# tail /usr/local/nagios/etc/nrpe.cfg
command[check_mysql]=/usr/local/nagios/libexec/check_mysql -h 192.168.1.152 -u nagios -d nagdb -p nagios //加入此行
配置nagios服务端
[root@node1 etc]# cat services.cfg //加入下面内容
define service{
    use               local-service
    host_name            node2
    service_description       mysql
    check_command          check_nrpe!check_mysql
    notifications_enabled      1
    }
最后重启nrpe和服务端的nagios。
如对本文有疑问,请在下面进行留言讨论,广大热心网友会与你互动!! 点击进行留言回复
小白安装登录mysql-8.0.19-winx64的教程图解(新手必看)
Navicat连接MySQL时报10060、1045错误及my.ini位置问题

网友评论