雪狼谷片尾曲,毕节房产网,宅男变身记
mongodb 是一个基于分布式文件存储的数据库,可以在高负载的情况下添加多个节点来承载压力,目前很多项目中用的也越来越多,这篇我们就介绍下如何用python操作mongodb数据库,从基本的安装说起,先熟练mongodb的基本操作,然后通过python实现数据插入、查询,以及mongoengine使用,最后是图形化界面连接mongodb数据库,我们从安装开始:
mongodb 安装:
安装非常简单,直接下载安装包解压,就可以,步骤如下:
wget https://fastdl.mongodb.org/linux/mongodb-linux-x86_64-rhel62-3.6.4.tgztar -zxvf mongodb-linux-x86_64-rhel62-3.6.4.tgzmv mongodb-linux-x86_64-rhel62-3.6.4 /usr/local/mongodb
然后添加系统环境变量,编辑/etc/profile文件加上如下行:
mongodb=/usr/local/mongodbpath=$mongodb/bin:$pathexport path
编辑mongodb配置文件,vi /etc/mongod.conf, 内容如下:
# mongod.conf# for documentation of all options, see:# http://docs.mongodb.org/manual/reference/configuration-options/# where to write logging data.systemlog: destination: file logappend: true path: /var/log/mongodb/mongod.log# where and how to store data.storage: dbpath: /var/lib/mongo journal: enabled: true# engine:# mmapv1:# wiredtiger:# how the process runsprocessmanagement: fork: true # fork and run in background pidfilepath: /var/run/mongodb/mongod.pid # location of pidfile timezoneinfo: /usr/share/zoneinfo# network interfacesnet: port: 27017 bindip: 127.0.0.1,192.168.137.131 # listen to local interface only, comment to listen on all interfaces.#security:#operationprofiling:#replication:#sharding:## enterprise-only options#auditlog:#snmp:
创建数据库文件路径: mkdir -p /data/db
启动和关闭:
mongod & #启动mongod -shutdown -dbpath /data/db #关闭
另一个关闭方式:
登录数据库关闭:mongo # 进入客户端use admin;db.shutdownserver();
上面就是mongodb的基本安装,启动和关闭操作,接下我们安装pymongo来看如何进行插入和查询数据:
pip install pymongo #先安装
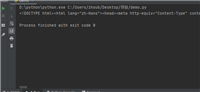
实例1:插入一个对象
#coding=utf-8import datetimeimport pprintfrom pymongo import mongoclientclient = mongoclient()db = client.pythondbpost = {"_id": 100, "author": "kuber", "text": "this is is my first post!", "tags": ["docker", "shell", "pymongo"], "date": datetime.datetime.utcnow()}posts = db.postspost_id = posts.insert_one(post).inserted_idprint("post_id is :", post_id)post = posts.find_one({"_id": post_id})print("find by post id:")pprint.pprint(post)
实例2:插入多个对象:
#!/usr/bin/env python#coding=utf-8import datetimeimport pprintfrom pymongo import mongoclientclient = mongoclient()db = client.pythondbnew_posts = [{"_id": 1000, "author": "curry", "text": "another post!", "tags": ["bulk", "insert"], "date": datetime.datetime(2017, 11, 12, 11, 14)}, {"_id": 1001,"author": "maxsu", "title": "mongodb is fun", "text": "and pretty easy too!", "date": datetime.datetime(2019, 11, 10, 10, 45)}]posts = db.postsresult = posts.insert_many(new_posts)print("bulk inserts result is :", result.inserted_ids)
实例3:数据查询
#!/usr/bin/env python #coding=utf-8 import datetime import pprint from pymongo import mongoclient client = mongoclient() db = client.pythondb posts = db.posts for post in posts.find(): pprint.pprint(post)
以上就是使用pymongo对数据库的插入和查询操作,这种方式可以实现很好的对mongodb的操作,但有时候我们经常用orm进行数据库操作,尤其在使用django做项目时,那有没有类似的方法来操作mongodb呢,当时是有的,接下来我们来介绍下mongoengine, 通过mongoengine可以定义class来定义数据库表和字段,使用也不算复杂,而且它提供了大量的方法供我们使用,接下来看一个例子:
安装:pip install -u mongoengine
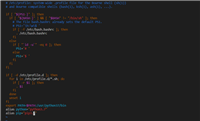
mongoengine实例1:
from mongoengine import *from datetime import datetimeconnect('test', host='localhost', port=27017)class users(document): name = stringfield(required=true, max_length=200) age = intfield(required=true)class categories(document): name = stringfield(max_length=30, required=true) artnum = intfield(default=0, required=true) date = datetimefield(default=datetime.now(), required=true)class posts(document): title = stringfield(max_length=100, required=true) content = stringfield(required=true) tags = listfield(stringfield(max_length=20, required=true), required=true) categories = referencefield(categories)user1 = users( name='zz', age= 11)user1.save() print(user1.name)user1.name = 'zz11'user1.save() print(user1.name)
如果熟悉orm的小伙伴看上面代码会感觉很熟悉,这里就不多介绍了,然后看下查询用户的例子:
users = users.objects.all()for u in users: print("name:",u.name,",age:", u.age)cate =categories(name="linux")cate.save()post = posts(title="mindg.cn", content="mindg.cn",tags=["linux","web"], categories=cate)post.save()cate = posts.objects.all().first().categoriesprint cateprint cate.namecate = categories.objects(name="linux").first()print posts.objects(categories=cate).next
以上就是简单的对mongodb的基本操作,下面我们说一下mongodb的可视化工具,虽然命令行显得比较高端一些,但图形化工具有时候跟他直观一些看到库里存储的内容,
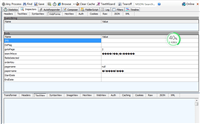
操作mongo数据库用图形化还是很直观,我推荐用官网的mongodb-compas:
图形化客户端连接:
mongodb-compas下载
https://www.mongodb.com/download-center?jmp=hero#compass
下载安装后打开如图展示,是不是非常直观:

如对本文有疑问,请在下面进行留言讨论,广大热心网友会与你互动!! 点击进行留言回复


Python 实现将numpy中的nan和inf,nan替换成对应的均值
python爬虫把url链接编码成gbk2312格式过程解析
网友评论