斗战神火焰蛇果,水果拼盘的做法,穆斯林的葬礼主要内容
为了在 python 中快速构建 api,我主要依赖于 flask 。最近我遇到了一个名为 “api star” 的基于 python 3 的新 api 框架。由于几个原因,我对它很感兴趣。首先,该框架包含 python 新特点,如类型提示和 asyncio。而且它再进一步为开发人员提供了很棒的开发体验。我们很快就会讲到这些功能,但在我们开始之前,我首先要感谢 tom christie,感谢他为 django rest framework 和 api star 所做的所有工作。
现在说回 api star —— 我感觉这个框架很有成效。我可以选择基于 asyncio 编写异步代码,或者可以选择传统后端方式就像 wsgi 那样。它配备了一个命令行工具 —— apistar 来帮助我们更快地完成工作。它支持 django orm 和 sqlalchemy,这是可选的。它有一个出色的类型系统,使我们能够定义输入和输出的约束,api star 可以自动生成 api 的模式(包括文档),提供验证和序列化功能等等。虽然 api star 专注于构建 api,但你也可以非常轻松地在其上构建 web 应用程序。在我们自己构建一些东西之前,所有这些可能都没有意义的。
开始
我们将从安装 api star 开始。为此实验创建一个虚拟环境是一个好主意。如果你不知道如何创建一个虚拟环境,不要担心,继续往下看。
pip install apistar
(上面的命令是在 python3 虚拟环境下使用的)
如果你没有使用虚拟环境或者你的 python 3 的 pip 名为 pip3,那么使用 pip3 install apistar 代替。
一旦我们安装了这个包,我们就应该可以使用 apistar 命令行工具了。我们可以用它创建一个新项目,让我们在当前目录中创建一个新项目。
apistar new .
现在我们应该创建两个文件:app.py,它包含主应用程序,然后是 test.py,它用于测试。让我们来看看 app.py 文件:
from apistar import include, route
from apistar.frameworks.wsgi import wsgiapp as app
from apistar.handlers import docs_urls, static_urls
def welcome(name=none):
if name is none:
return {'message': 'welcome to api star!'}
return {'message': 'welcome to api star, %s!' % name}
routes = [
route('/', 'get', welcome),
include('/docs', docs_urls),
include('/static', static_urls)
]
app = app(routes=routes)
if __name__ == '__main__':
app.main()
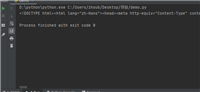
在我们深入研究代码之前,让我们运行应用程序并查看它是否正常工作。我们在浏览器中输入 ,我们将得到以下响应:
{"message": "welcome to api star!"}
如果我们输入:
{"message": "welcome to api star, masnun!"}
同样的,输入 ,我们将看到自动生成的 api 文档。

这个文档可以显示我们在app.py里定义的函数,并且交互式地查看函数返回值
例如我定义了一个函数叫show_task, 输入是task_id,返回值是这个task的详细信息,那么我们在交互界面里可以通过输入一个valid task_id返回查询的结果

现在让我们来看看代码。我们有一个 welcome 函数,它接收一个名为 name 的参数,其默认值为 none。api star 是一个智能的 api 框架。它将尝试在 url 路径或者查询字符串中找到 name 键并将其传递给我们的函数,它还基于其生成 api 文档。这真是太好了,不是吗?
然后,我们创建一个 route 和 include 实例的列表,并将列表传递给 app 实例。route 对象用于定义用户自定义路由。顾名思义,include 包含了在给定的路径下的其它 url 路径。
路由
路由很简单。当构造 app 实例时,我们需要传递一个列表作为 routes 参数,这个列表应该有我们刚才看到的 route 或 include 对象组成。对于 route,我们传递一个 url 路径,http 方法和可调用的请求处理程序(函数或者其他)。对于 include 实例,我们传递一个 url 路径和一个 routes 实例列表。
路径参数
我们可以在花括号内添加一个名称来声明 url 路径参数。例如 /user/{user_id} 定义了一个 url,其中 user_id 是路径参数,或者说是一个将被注入到处理函数(实际上是可调用的)中的变量。这有一个简单的例子:
from apistar import route
from apistar.frameworks.wsgi import wsgiapp as app
def user_profile(user_id: int):
return {'message': 'your profile id is: {}'.format(user_id)}
routes = [
route('/user/{user_id}', 'get', user_profile),
]
app = app(routes=routes)
if __name__ == '__main__':
app.main()
如果我们访问 ,我们将得到以下响应:
{"message": "your profile id is: 23"}
但如果我们尝试访问 ,它将无法匹配。因为我们定义了 user_profile 函数,且为 user_id 参数添加了一个类型提示。如果它不是整数,则路径不匹配。但是如果我们继续删除类型提示,只使用 user_profile(user_id),它将匹配此 url。这也展示了 api star 的智能之处和利用类型和好处。
包含/分组路由
有时候将某些 url 组合在一起是有意义的。假设我们有一个处理用户相关功能的 user 模块,将所有与用户相关的 url 分组在 /user 路径下可能会更好。例如 /user/new、/user/1、/user/1/update 等等。我们可以轻松地在单独的模块或包中创建我们的处理程序和路由,然后将它们包含在我们自己的路由中。
让我们创建一个名为 user 的新模块,文件名为 user.py。我们将以下代码放入这个文件:
from apistar import route
def user_new():
return {"message": "create a new user"}
def user_update(user_id: int):
return {"message": "update user #{}".format(user_id)}
def user_profile(user_id: int):
return {"message": "user profile for: {}".format(user_id)}
user_routes = [
route("/new", "get", user_new),
route("/{user_id}/update", "get", user_update),
route("/{user_id}/profile", "get", user_profile),
]
现在我们可以从 app 主文件中导入 user_routes,并像这样使用它:
from apistar import include
from apistar.frameworks.wsgi import wsgiapp as app
from user import user_routes
routes = [
include("/user", user_routes)
]
app = app(routes=routes)
if __name__ == '__main__':
app.main()
现在 /user/new 将委托给 user_new 函数。
访问查询字符串/查询参数
查询参数中传递的任何参数都可以直接注入到处理函数中。比如 url /call?phone=1234,处理函数可以定义一个 phone 参数,它将从查询字符串/查询参数中接收值。如果 url 查询字符串不包含 phone 的值,那么它将得到 none。我们还可以为参数设置一个默认值,如下所示:
def welcome(name=none):
if name is none:
return {'message': 'welcome to api star!'}
return {'message': 'welcome to api star, %s!' % name}
在上面的例子中,我们为 name 设置了一个默认值 none。
注入对象
通过给一个请求程序添加类型提示,我们可以将不同的对象注入到视图中。注入请求相关的对象有助于处理程序直接从内部访问它们。api star 内置的 http 包中有几个内置对象。我们也可以使用它的类型系统来创建我们自己的自定义对象并将它们注入到我们的函数中。api star 还根据指定的约束进行数据验证。
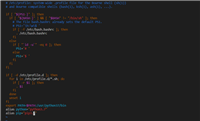
让我们定义自己的 user 类型,并将其注入到我们的请求处理程序中:
from apistar import include, route
from apistar.frameworks.wsgi import wsgiapp as app
from apistar import typesystem
class user(typesystem.object):
properties = {
'name': typesystem.string(max_length=100),
'email': typesystem.string(max_length=100),
'age': typesystem.integer(maximum=100, minimum=18)
}
required = ["name", "age", "email"]
def new_user(user: user):
return user
routes = [
route('/', 'post', new_user),
]
app = app(routes=routes)
if __name__ == '__main__':
app.main()
现在如果我们发送这样的请求:
curl -x post
http://127.0.0.1:8080/
-h 'cache-control: no-cache'
-h 'content-type: application/json'
-d '{"name": "masnun", "email": "masnun@gmail.com", "age": 12}'
猜猜发生了什么?我们得到一个错误,说年龄必须等于或大于 18。类型系允许我们进行智能数据验证。如果我们启用了 docs url,我们还将自动记录这些参数。
发送响应
如果你已经注意到,到目前为止,我们只可以传递一个字典,它将被转换为 json 并作为默认返回。但是,我们可以使用 apistar 中的 response 类来设置状态码和其它任意响应头。这有一个简单的例子:
from apistar import route, response
from apistar.frameworks.wsgi import wsgiapp as app
def hello():
return response(
content="hello".encode("utf-8"),
status=200,
headers={"x-api-framework": "api star"},
content_type="text/plain"
)
routes = [
route('/', 'get', hello),
]
app = app(routes=routes)
if __name__ == '__main__':
app.main()
它应该返回纯文本响应和一个自义标响应头。请注意,content 应该是字节,而不是字符串。这就是我编码它的原因。
继续
我刚刚介绍了 api star 的一些特性,api star 中还有许多非常酷的东西,我建议通过 github readme()文件来了解这个优秀框架所提供的不同功能的更多信息。
总结
以上就是这篇文章的全部内容了,希望本文的内容对大家的学习或者工作具有一定的参考学习价值,谢谢大家对移动技术网的支持。如果你想了解更多相关内容请查看下面相关链接
如对本文有疑问,请在下面进行留言讨论,广大热心网友会与你互动!! 点击进行留言回复


Python 实现将numpy中的nan和inf,nan替换成对应的均值

python爬虫把url链接编码成gbk2312格式过程解析

网友评论