directsound,1.85传奇私发布服,吴小旋
人生三问
1. 内置模块是什么
  内置模块就是python编译器里面自带的一些模块,我们没有必要去写,但是可以直接使用!
2. 为什么要使用内置模块
  在日常工作中,我们需要去写一些模块去解决一些特定的功能,但是对于一些比较常用的功能,python解释器已经帮我们写好了,你说你是想直接拿来就用呢?还是再自己去写一个模块,当然是直接用啊。
3. 内置模块怎么使用
  内置模块和我们自定义的模块是一样的,通过import和from导入进行使用
介绍的模块:
time
datetime
sys
shutil
random
os
模块一: time
1. 时间戳
>>> time.time()  # 代表的是从1970年开始到现在经过的秒数
1539593357.4160235
2. 结构化时间
>>> time.localtime()  # 通过localtime方法获得当前系统的结构化时间
time.struct_time(tm_year=2018, tm_mon=10, tm_mday=15, tm_hour=16, tm_min=49, tm_sec=56, tm_wday=0, tm_yday=288, tm_isdst=0)
>>> a = time.localtime()
>>> a.tm_year   # 可以通过.后面跟上属性查看相应的值
2018
3. 格式化字符串时间
>>> time.strftime('%y-%m-%d %x')  # 通过输入%多少来获得对应的值
'2018-10-15 16:57:24'
>>>
格式化的标准:

%a    locale’s abbreviated weekday name.
%a    locale’s full weekday name.
%b    locale’s abbreviated month name.
%b    locale’s full month name.
%c    locale’s appropriate date and time representation.
%d    day of the month as a decimal number [01,31].
%h    hour (24-hour clock) as a decimal number [00,23].
%i    hour (12-hour clock) as a decimal number [01,12].
%j    day of the year as a decimal number [001,366].
%m    month as a decimal number [01,12].
%m    minute as a decimal number [00,59].
%p    locale’s equivalent of either am or pm.    (1)
%s    second as a decimal number [00,61].    (2)
%u    week number of the year (sunday as the first day of the week) as a decimal number [00,53]. all days in a new year preceding the first sunday are considered to be in week 0.    (3)
%w    weekday as a decimal number [0(sunday),6].
%w    week number of the year (monday as the first day of the week) as a decimal number [00,53]. all days in a new year preceding the first monday are considered to be in week 0.    (3)
%x    locale’s appropriate date representation.
%x    locale’s appropriate time representation.
%y    year without century as a decimal number [00,99].
%y    year with century as a decimal number.
%z    time zone offset indicating a positive or negative time difference from utc/gmt of the form +hhmm or -hhmm, where h represents decimal hour digits and m represents decimal minute digits [-23:59, +23:59].
%z    time zone name (no characters if no time zone exists).
%%    a literal '%' character.
4. 三种时间格式之间的转换
因为计算机认识的时间格式只有时间戳的格式,但是对于我们人类而言,时间戳的格式又太难懂,因此我们把时间戳的格式转换成【结构化的时间】或者是【格式化字符串的时间】类型,转换关系如下。

5. 时间的转换
#------------------------------------------------按照图1中的关系进行时间的转换
# 时间之间的转换操作

# 定义三个类型的时间
a = time.time()     # 得到时间戳
b = time.localtime()   # 结构化时间
c = time.strftime('%y-%m-%d %h-%m-%s')  # 格式化字符串时间

# 结构化时间转为时间戳和格式化字符串时间的两种方式
d = time.mktime(b)
e = time.strftime('%y-%m-%d', b)

# 时间戳转换成结构化时间
f = time.localtime(a)
g = time.gmtime(a)

# 格式化字符串时间转化为结构化时间
h = time.strptime(c, '%y-%m-%d %h-%m-%s')  # c是什么样格式的后面的格式就要写成什么样格式的

6. 图二的两种方式其实就是把时间转换成外国人能够接受的时间
# ---------------------------按照图二的方式进行时间的转换
# 如果不进行传参,ctime和asctime得到得是一样的效果,都是转换成【week month day time year】

>>> time.asctime()
'mon oct 15 18:23:37 2018'
>>> time.ctime()
'mon oct 15 18:23:44 2018'
>>>

# 如果进行传参
>>> a = time.time()  # 先得到时间戳
>>> b = time.localtime()   # 得到结构化时间
>>> time.asctime(b)   # 通过asctime把结构化时间转换成固定的外国人接受的时间
'mon oct 15 18:28:12 2018'
>>> time.ctime(a)  # 通过ctime将时间戳转换成外国人能够接受的时间
'mon oct 15 18:28:06 2018'
>>>
模块二:datatime
>>> print(datetime.datetime.now())   # 通过datetime的now方法获取当前时间格式
2018-10-15 18:40:17.028194
>>> datetime.datetime.fromtimestamp(time.time())
datetime.datetime(2018, 10, 15, 18, 40, 34, 551056)
>>> print(datetime.datetime.fromtimestamp(time.time()))  # 通过fromtimestamp转换成相应的时间格式
2018-10-15 18:40:57.722764
>>>
datetime重要的作用,用来做时间的加减
print(datetime.datetime.now())  # 展示现在的时间 格式为   【year:month:day hour:minute:second 】
print(datetime.datetime.fromtimestamp(time.time()))   # 将时间戳转换成datetime的形式


#  当前时间加减三天
print(datetime.datetime.now() + datetime.timedelta(3))
print(datetime.datetime.now() + datetime.timedelta(-3))

# 当前时间加减三个小时
print(datetime.datetime.now() + datetime.timedelta(hours=3))
print(datetime.datetime.now() + datetime.timedelta(hours=-3))

# 当前时间加减三十分钟
print(datetime.datetime.now() + datetime.timedelta(minutes=30))
print(datetime.datetime.now() + datetime.timedelta(minutes=-30))
替换:
c_time = datetime.datetime.now()
print(c_time, type(c_time))
print(c_time.replace(month=11, year=2020, minute=10))
print(c_time)
模块三: sys模块
'''
sys模块(python解释器相关的)
    1. sys.argv    # 这个是传入的参数,返回的是列表的形式,第一个是当前执行文件的名称
    2. sys.path   # 系统的环境变量,可以通过append方法进行更改
    3. sys.modules  # 内存已经加载的模块,以字典的形式存在
    4. sys.version  # 解释器的版本
    5. sys.platform   # 当前执行的平台
    6. sys.exit()    # 退出当前执行的python解释器

    # 了解
    7. sys.api_version   # api版本号
    8. sys.maxsize  # 最大值得整数32位为 2 ** 32 - 1 64位为2 ** 64 -1
    9. sys.maxunicode   # 最大的unicode  0x10ffff
'''
>>> import sys
>>> sys.version
'3.6.4 (v3.6.4:d48eceb, dec 19 2017, 06:04:45) [msc v.1900 32 bit (intel)]'
>>> sys.api_version
1013
>>> sys.platform
'win32'
>>> sys.path
['', 'e:\\software\\python3\\python36.zip', 'e:\\software\\python3\\dlls', 'e:\\software\\python3\\lib', 'e:\\software\\python3', 'e:\\software\\python3\\lib\\site-packages']
>>> ays.maxunicode
traceback (most recent call last):
  file "<stdin>", line 1, in <module>
nameerror: name 'ays' is not defined
>>> sys.maxunicode
1114111
>>> sys.maxsize
2147483647
>>> sys.modules
{'builtins': <module 'builtins' (built-in)>, 'sys': <module 'sys' (built-in)>, '_frozen_importlib': <module '_frozen_importlib' (frozen)>, '_imp': <module '_imp' (built-in)>, '_warnings': <module '_warnings' (built-in)>, '_thread': <module '_thread' (built-in)>, '_weakref': <module '_weakref' (built-in)>, '_frozen_importlib_external': <module '_frozen_importlib_external' (frozen)>, '_io': <module 'io' (built-in)>, 'marshal': <module 'marshal' (built-in)>, 'nt': <module 'nt' (built-in)>, 'winreg': <module 'winreg' (built-in)>, 'zipimport': <module 'zipimport' (built-in)>, 'encodings': <module 'encodings' from 'e:\\software\\python3\\lib\\encodings\\__init__.py'>, 'codecs': <module 'codecs' from 'e:\\software\\python3\\lib\\codecs.py'>, '_codecs': <module '_codecs' (built-in)>, 'encodings.aliases': <module 'encodings.aliases' from 'e:\\software\\python3\\lib\\encodings\\aliases.py'>, 'encodings.utf_8': <module 'encodings.utf_8' from 'e:\\software\\python3\\lib\\encodings\\utf_8.py'>, '_signal': <module '_signal' (built-in)>, '__main__': <module '__main__' (built-in)>, 'encodings.latin_1': <module 'encodings.latin_1' from 'e:\\software\\python3\\lib\\encodings\\latin_1.py'>, 'io': <module 'io' from 'e:\\software\\python3\\lib\\io.py'>, 'abc': <module 'abc' from 'e:\\software\\python3\\lib\\abc.py'>, '_weakrefset': <module '_weakrefset' from 'e:\\software\\python3\\lib\\_weakrefset.py'>, 'site': <module 'site' from 'e:\\software\\python3\\lib\\site.py'>, 'os': <module 'os' from 'e:\\software\\python3\\lib\\os.py'>, 'errno': <module 'errno' (built-in)>, 'stat': <module 'stat' from 'e:\\software\\python3\\lib\\stat.py'>, '_stat': <module '_stat' (built-in)>, 'ntpath': <module 'ntpath' from 'e:\\software\\python3\\lib\\ntpath.py'>, 'genericpath': <module 'genericpath' from 'e:\\software\\python3\\lib\\genericpath.py'>, 'os.path': <module 'ntpath' from 'e:\\software\\python3\\lib\\ntpath.py'>, '_collections_abc': <module '_collections_abc' from 'e:\\software\\python3\\lib\\_collections_abc.py'>, '_sitebuiltins': <module '_sitebuiltins' from 'e:\\software\\python3\\lib\\_sitebuiltins.py'>, 'sysconfig': <module 'sysconfig' from 'e:\\software\\python3\\lib\\sysconfig.py'>, 'atexit': <module 'atexit' (built-in)>}
>>> sys.exit()
argv的应用:
import sys
# 源文件为python解释器第二个参数
src_file = sys.argv[1]
# 目的文件问传入的第三个参数
dst_file = sys.argv[2]
with open(src_file, 'rb') as read_f, open(dst_file, 'wb') as write_f:
for line in read_f:
write_f.write(line)
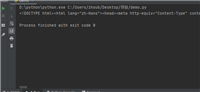
# 在终端中 执行当前文件
# c:\users\administrator>python h:\python_study\day20\内容回顾.py h:\python_study\day20\test2.py h:\python_study\day20\test22.py
sys的应用(进度条)
import sys
import time

def progress(percent, width=50):
    # 当百分比大于1的时候都按照1来显示
    if percent >= 1:
        percent = 1
    # '[%%-%ds]' % width  ====> %-50s
    # 然后通过格式化得到我们想要的值
    show_str = ('[%%-%ds]' % width) % ('#' * int((width * percent)))
    # 最后打印的时候加上百分比
    print('{show_str} {percent}%'.format(
        show_str=show_str,
        percent=int(percent * 100)
    ))


# 模拟下载数据数据大小为1024567
data_size = 1024567
recv_size = 0
while recv_size < data_size:
    # 模拟数据延迟0.1秒
    time.sleep(0.1)
    # 每次下载1024
    recv_size += 1024
    # 得到百分比打印
    percent = recv_size / data_size
    progress(percent)
模块四:random
import random

random.random()   # 得到一个(0-1)之间的浮点数
random.uniform(1, 3)  # 得到一个(1, 3)之间的一个小数

random.randint(1, 3)  # 得到一个[1, 3]之间的整数
random.randrange(1, 3)   # 得到一个[1, 3)之间的一个整数

random.choice([1, '23', [4, 5]])  # 获得列表中的一个值
random.choices([1, '23', [4, 5]], k=2)   # 获得列表中的两个值返回一个列表
random.sample([1, '23', [4, 5]], k=2)  # 列表元素任意2个组合

# 打乱顺序
l = [1,2,3,4,5]
random.shuffle(l) # 传递的必须是一个列表
print(l)
生成一个随机验证码:
# 验证码包含数字和字母
def get_auth_code(num):
    temp_list = []
    while num:
        num -= 1
        # 首先获得数字
        a = str(random.randint(0, 10))
        # 其次获得字符
        b = chr(random.randint(0, 120))
        # 添加到列表中
        temp_list.append(random.choice([a, b]))
    return temp_list

print(' '.join(get_auth_code(4)))
模块五: shutil
'''
shutil 高级的文件,文件夹,压缩包处理模块

文件处理:
    shutil.copyfileobj  传入的是两个对象,源文件,目的文件
    shutil.copyfile     传入的是两个路径,原路径,目的路径
    shutil.copymode     只复制文件的权限,目的恩瑾可定是要存在
    shutil.copystat     只复制文件的状态信息,修改时间,查看时间,更改时间,flag是
    shutil.copy         拷贝文件和权限
    shutil.copy2        拷贝文件和状态信息
    shutil.move()       更改文件名称
文件夹处理
    shutil.copytree     拷贝目录
    shutil.ignore_patterns  根据这个模块去设置是否不拷贝某个类型的文件
    shutil.rmtree       删除目录
压缩包处理
    shutil.make_archive()    压缩后的目录名称,格式,源目录
    shutile.unpack_archive() 压缩后的目录名称, 格式,解压后的目录

    tarfile.open().add()
    zipfile.zipfile().write()
'''
文件的操作:
方法1: copyfileobj:
# 方法copyfileobj
# 我们要首先得到两个打开的文件对象
# src就是源文件对象
# dst目标文件对象
src = open('sys模块.py', 'rb')
dst = open('sys模块2.py', 'wb')
shutil.copyfileobj(src, dst)
src.close()
dst.close()
方法2: copyfile
# 和方法1类似,只不过它传递的是路径,而方法1传递的是对象
# 拷贝一个文件,而不是一个对象,目标文件可以不存在
shutil.copyfile('sys模块.py', 'sys模块3.py')
方法3:copymode
# 拷贝源文件的权限,在linux下面就是xrw之类的
# 但是它的内容,用户,组都是不变的
shutil.copymode('sys模块.py', 'sys模块2.py')  # 目标文件必须要存在
方法4: copystat
# 拷贝源文件的状态信息
# 包括权限,查看时间,修改时间,flags等
shutil.copystat('sys模块.py', 'sys模块2.py')
方法5: copy2和copy
# 拷贝的是文件的内容和权限
shutil.copy('sys模块.py', 'sys模块4.py')


# 拷贝的是文件的内容和状态
shutil.copy2('sys模块.py', 'sys模块5.py')
文件夹操作:
方法1:copytree
# 拷贝一个目录,目标目录不能存在,而且还要对其父目录可以有写权限
# symlinks 代表的是软连接,就相当于是一个快捷方式
# shutil.ignore_patterns拷贝的时候把符合模式的给删除掉就是了
shutil.ignore_patterns()
shutil.copytree(r'..\day20', 'forlder3',
                ignore=shutil.ignore_patterns('*pyc','tmp*'),
                symlinks=true
                )
方法2:rmtree
# 递归的删除一个文件夹
shutil.rmtree('forlder2')
方法3:move
# 就像是linux下面的重命名mv命令
# 参数一为源文件名,参数二为目标文件名
shutil.move('forlder3', 'forlder2')
压缩文件夹
方法1: make_archive
# 参数一:压缩之后的名字
# 参数二: 以什么样的格式压缩,可以是zip,tar,bztar, gztar
# 参数三: 要压缩的目录
'''
owner:    用户,默认当前用户
group:    组,默认当前组
logger:    用于记录日志,通常是logging.logger对象
'''
shutil.make_archive('forlder2', 'zip', root_dir='../day20')
解压文件
方法1:unpack_archive
# 先打包一份zip的文件
shutil.make_archive('day19', 'zip', root_dir='..\day19')
# 解压文件,要加上后缀名称
# 参数一: 解压的文件
# format: 解压的格式
# extract_dir: 解压的目录
shutil.unpack_archive('day19.zip', format='zip',extract_dir='hello')
方法2:tarfile模块
import tarfile
# 压缩
t = tarfile.open('day.tar', mode='w')
t.add('sys模块.py')
t.add('sys模块2.py')
t.add('sys模块3.py')
t.close()
# 解压
t = tarfile.open('day.tar', mode='r')
t.extractall('./day')
t.close()
方法3: zipfile模块
import zipfile
# 压缩
# 首先得到一个zipfile的对象,然后通过write压缩进对象中
z = zipfile.zipfile('day.zip', mode='w')
z.write('sys模块.py')
z.write('sys模块2.py')
z.write('sys模块3.py')
z.close()
# 解压
# 也是先得到对象,然后通过extractall获得对象
z = zipfile.zipfile('day.zip', mode='r')
z.extractall(path='./day')
z.close()
模块六:os模块
'''
os模块: 指的是和操作系统相关的模块

1. 目录操作
    增
        os.mkdir     创建一个单级目录
        os.makedirs  创建多级目录,递归创建
    删
        os.rmdir     删除一个目录
        os.removedirs  递归删除目录,如果目录为空
    改
        chdir       改变当前目录
        pardir      当前执行目录的父目录
        curdir      当前执行文件的目录
    查
        getcwd()    获得当前解释器执行文件目录
        listdir()   以列表的形式返回当前目录下面有什么内容
2. 文件操作
    删
        os.remove()   删除文件
    改
        os.rename()   修改文件名称
    查
        os.stat        查看当前文件的状态信息
        os.path.getsize()   查看当前文件的大小
        os.path.getatime()   查看当前文件的创建时间
        os.path.getmtime()   查看当前文件的修改时间
3. 变量信息
    os.stat     # 文件的状态信息
    os.name     # win是‘nt’, linux平台是'posix'
    os.sep      # 操作系统特定的路径分隔符
    os.linesep  # 换行符win为'\t\n', linux为'\t'
    os.pathsep  # 分割文件路径的字符串win为;, linux为:
    os.environ  # 系统环境变量
    os.system() # 运行shell命令,直接显示
4. 路径的判断
    os.path.exists()   # 判断路径是否存在
    os.path.isfile()   # 判断是否是个文件
    os.path.isdir()    # 判断是否是个目录
    os.path.join()     # 拼接路径
5. 路径操作
    os.path.split()  # 以列表的形式返回文件名和目录
    os.path.basename # 获得得就是split的文件名
    os.path.dirname  # 获得得就是split的目录
5. 规范化路径
    os.path.normcase()  # 将大写变小写,并将所有斜杠转成反斜杠(返回的是原字符串)
    os.path.normpath()  # 会把反斜杠转换成斜杠,然后可以识别相对路径
    os.path.abspath()   # 返回path规范化的绝对路径

'''
# 一般路径的处理使用这种方式
import os, sys

top_dir = os.path.normpath(os.path.join(
    os.path.abspath(__file__),
    os.pardir,
))
print(top_dir)

# 不建议使用下面这种方式
top_dir = os.path.dirname(os.path.dirname(__file__))
在linux和mac平台上,该函数会原样返回path,在windows平台上会将路径中所有字符转换为小写,并将所有斜杠转换为饭斜杠。
>>> os.path.normcase('c:/windows\\system32\\')
'c:\\windows\\system32\\'


规范化路径,如..和/
>>> os.path.normpath('c://windows\\system32\\../temp/')
'c:\\windows\\temp'

>>> a='/users/jieli/test1/\\\a1/\\\\aa.py/../..'
>>> print(os.path.normpath(a))
/users/jieli/test1
如对本文有疑问,请在下面进行留言讨论,广大热心网友会与你互动!! 点击进行留言回复


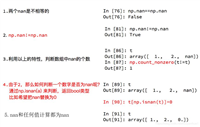
Python 实现将numpy中的nan和inf,nan替换成对应的均值


python爬虫把url链接编码成gbk2312格式过程解析


网友评论