全频段对讲机,殷秀梅 国籍,免费在线伦理片
tags: mit-6.828, os
本文是lab4的实验报告,主要围绕进程相关概念进行介绍。主要将四个知识点:
该部分做三件事:
我们将使jos支持"symmetric multiprocessing" (smp),这是一种所有cpu共享系统资源的多处理器模式。在启动阶段这些cpu将被分为两类:
实现kern/pmap.c中的mmio_map_region()。
解决:可以参照boot_map_region()
void *
mmio_map_region(physaddr_t pa, size_t size)
{
    // where to start the next region.  initially, this is the
    // beginning of the mmio region.  because this is static, its
    // value will be preserved between calls to mmio_map_region
    // (just like nextfree in boot_alloc).
    static uintptr_t base = mmiobase;

    // reserve size bytes of virtual memory starting at base and
    // map physical pages [pa,pa+size) to virtual addresses
    // [base,base+size).  since this is device memory and not
    // regular dram, you'll have to tell the cpu that it isn't
    // safe to cache access to this memory.  luckily, the page
    // tables provide bits for this purpose; simply create the
    // mapping with pte_pcd|pte_pwt (cache-disable and
    // write-through) in addition to pte_w.  (if you're interested
    // in more details on this, see section 10.5 of ia32 volume
    // 3a.)
    //
    // be sure to round size up to a multiple of pgsize and to
    // handle if this reservation would overflow mmiolim (it's
    // okay to simply panic if this happens).
    //
    // hint: the staff solution uses boot_map_region.
    //
    // your code here:
    size = roundup(pa+size, pgsize);
    pa = rounddown(pa, pgsize);
    size -= pa;
    if (base+size >= mmiolim) panic("not enough memory");
    boot_map_region(kern_pgdir, base, size, pa, pte_pcd|pte_pwt|pte_w);
    base += size;
    return (void*) (base - size);
}
在启动ap之前,bsp需要搜集多处理器的信息,比如总共有多少cpu,它们的lapic id以及lapic mmio地址。mp_init()函数从bios中读取这些信息。具体代码在mp_init()中,该函数会在进入内核后被i386_init()调用,主要作用就是读取mp configuration table中保存的cpu信息,初始化cpus数组,ncpu(总共多少可用cpu),bootcpu指针(指向bsp对应的cpuinfo结构)。
真正启动ap的是在boot_aps()中,该函数遍历cpus数组,一个接一个启动所有的ap,当一个ap启动后会执行kern/mpentry.s中的代码,然后跳转到mp_main()中,该函数为当前ap设置gdt,tts,最后设置cpus数组中当前cpu对应的结构的cpu_status为cpu_started。更多关于smp的知识可以参考:https://pdos.csail.mit.edu/6.828/2018/readings/ia32/mpspec.pdf和https://wenku.baidu.com/view/615ea3c6aa00b52acfc7ca97.html
jos使用struct cpuinfo结构来记录cpu的信息:
struct cpuinfo {
    uint8_t cpu_id;                 // local apic id; index into cpus[] below
    volatile unsigned cpu_status;   // the status of the cpu
    struct env *cpu_env;            // the currently-running environment.
    struct taskstate cpu_ts;        // used by x86 to find stack for interrupt
};
cpunum()总是返回调用它的cpu的id,宏thiscpu提供了更加方便的方式获取当前代码所在的cpu对应的cpuinfo结构。
每个cpu如下信息是当前cpu私有的:
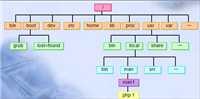
percpu_kstacks[ncpu][kstksize]为每个cpu都保留了kstksize大小的内核栈。从内核线性地址空间看cpu 0的栈从kstacktop开始,cpu 1的内核栈将从cpu 0栈后面kstkgap字节处开始,以此类推,参见inc/memlayout.h。到目前为止cpuinfo和env关系可以总结如下:
修改mem_init_mp(),将内核栈线性地址映射到percpu_kstacks处的物理地址处。
解决:本质上是修改kern_pdir指向的页目录和页表,按照inc/memlayout.h中的结构进行映射即可。
static void
mem_init_mp(void)
{
    // map per-cpu stacks starting at kstacktop, for up to 'ncpu' cpus.
    //
    // for cpu i, use the physical memory that 'percpu_kstacks[i]' refers
    // to as its kernel stack. cpu i's kernel stack grows down from virtual
    // address kstacktop_i = kstacktop - i * (kstksize + kstkgap), and is
    // divided into two pieces, just like the single stack you set up in
    // mem_init:
    //     * [kstacktop_i - kstksize, kstacktop_i)
    //          -- backed by physical memory
    //     * [kstacktop_i - (kstksize + kstkgap), kstacktop_i - kstksize)
    //          -- not backed; so if the kernel overflows its stack,
    //             it will fault rather than overwrite another cpu's stack.
    //             known as a "guard page".
    //     permissions: kernel rw, user none
    //
    // lab 4: your code here:
    for (int i = 0; i < ncpu; i++) {
        boot_map_region(kern_pgdir,
            kstacktop - kstksize - i * (kstksize + kstkgap),
            kstksize,
            paddr(percpu_kstacks[i]),
            pte_w);
    }
}
目前我们已经有多个cpu同时在执行内核代码了,我们必须要处理竞争条件。最简单粗暴的办法就是使用"big kernel lock","big kernel lock"是一个全局锁,进程从用户态进入内核后获取该锁,退出内核释放该锁。这样就能保证只有一个cpu在执行内核代码,但缺点也很明显就是一个cpu在执行内核代码时,另一个cpu如果也想进入内核,就会处于等待的状态。
锁的数据结构在kern/spinlock.h中:
struct spinlock {
    unsigned locked;       // is the lock held?
};
获取锁,释放锁的操作在kern/spinlock.c中:
void
spin_lock(struct spinlock *lk)
{
    // the xchg is atomic.
    // it also serializes, so that reads after acquire are not
    // reordered before it.
    while (xchg(&lk->locked, 1) != 0)           //原理见:https://pdos.csail.mit.edu/6.828/2018/xv6/book-rev11.pdf  chapter 4
        asm volatile ("pause");
}

void
spin_unlock(struct spinlock *lk)
{
    // the xchg instruction is atomic (i.e. uses the "lock" prefix) with
    // respect to any other instruction which references the same memory.
    // x86 cpus will not reorder loads/stores across locked instructions
    // (vol 3, 8.2.2). because xchg() is implemented using asm volatile,
    // gcc will not reorder c statements across the xchg.
    xchg(&lk->locked, 0);
}
这是一种"spin-locks"。对于spin_lock()获取锁的操作,使用xchg这个原子操作,xchg()封装了该指令,交换lk->locked和1的值,并将lk-locked原来的值返回。如果lk-locked原来的值不等于0,说明该锁已经被别的cpu申请了,继续执行while循环吧。对于spin_unlock()释放锁的操作,直接将lk->locked置为0,表明我已经用完了,这个锁可以被别人获取了。
有了获取锁和释放锁的函数,我们看下哪些地方需要加锁,和释放锁:
在前面提的位置添加加锁和释放锁的代码。比较简单就不贴代码了。
现要jos内核需要让cpu能在进程之间切换。目前先实现一个非抢占式的进程调度,需要当前进程主动让出cpu,其他进程才有机会在当前cpu运行。具体实现如下:
实现sched_yield()函数。
void
sched_yield(void)
{
    struct env *idle;

    // implement simple round-robin scheduling.
    //
    // search through 'envs' for an env_runnable environment in
    // circular fashion starting just after the env this cpu was
    // last running.  switch to the first such environment found.
    //
    // if no envs are runnable, but the environment previously
    // running on this cpu is still env_running, it's okay to
    // choose that environment. make sure curenv is not null before
    // dereferencing it.
    //
    // never choose an environment that's currently running on
    // another cpu (env_status == env_running). if there are
    // no runnable environments, simply drop through to the code
    // below to halt the cpu.

    // lab 4: your code here.
    int start = 0;
    int j;
    if (curenv) {
        start = envx(curenv->env_id) + 1;   //从当前env结构的后一个开始
    }
    for (int i = 0; i < nenv; i++) {        //遍历所有env结构
        j = (start + i) % nenv;
        if (envs[j].env_status == env_runnable) {
            env_run(&envs[j]);
        }
    }
    if (curenv && curenv->env_status == env_running) {      //这是必须的,假设当前只有一个env,如果没有这个判断,那么这个cpu将会停机
        env_run(curenv);
    }
    // sched_halt never returns
    sched_halt();
}
需要注意:当前cpu在envs数组中找了一圈后没找到合适的env去执行,需要重新执行之前运行的进程,否则当前cpu就会进入停机状态。
尽管现在内核有能力在多进程之前切换,但是仅限于内核创建的用户进程。目前jos还没有提供系统调用,使用户进程能创建新的进程。
unix提供fork()系统调用创建新的进程,fork()拷贝父进程的地址空间和寄存器状态到子进程。父进程从fork()返回的是子进程的进程id,而子进程从fork()返回的是0。父进程和子进程有独立的地址空间,任何一方修改了内存,不会影响到另一方。
现在需要实现如下系统调用:
实现上述所有的系统调用:
sys_exofork(void):
static envid_t
sys_exofork(void)
{
    // create the new environment with env_alloc(), from kern/env.c.
    // it should be left as env_alloc created it, except that
    // status is set to env_not_runnable, and the register set is copied
    // from the current environment -- but tweaked so sys_exofork
    // will appear to return 0.

    // lab 4: your code here.
    struct env *e;
    int ret = env_alloc(&e, curenv->env_id);    //分配一个env结构
    if (ret < 0) {
        return ret;
    }
    e->env_tf = curenv->env_tf;         //寄存器状态和当前进程一致
    e->env_status = env_not_runnable;   //目前还不能运行
    e->env_tf.tf_regs.reg_eax = 0;      //新的进程从sys_exofork()的返回值应该为0
    return e->env_id;
}
sys_env_set_status(envid_t envid, int status):
static int
sys_env_set_status(envid_t envid, int status)
{
    // hint: use the 'envid2env' function from kern/env.c to translate an
    // envid to a struct env.
    // you should set envid2env's third argument to 1, which will
    // check whether the current environment has permission to set
    // envid's status.
    if (status != env_not_runnable && status != env_runnable) return -e_inval;

    struct env *e;
    int ret = envid2env(envid, &e, 1);
    if (ret < 0) {
        return ret;
    }
    e->env_status = status;
    return 0;
}
sys_page_alloc(envid_t envid, void *va, int perm):
static int
sys_page_alloc(envid_t envid, void *va, int perm)
{
    // hint: this function is a wrapper around page_alloc() and
    //   page_insert() from kern/pmap.c.
    //   most of the new code you write should be to check the
    //   parameters for correctness.
    //   if page_insert() fails, remember to free the page you
    //   allocated!

    // lab 4: your code here.
    struct env *e;                                  //根据envid找出需要操作的env结构
    int ret = envid2env(envid, &e, 1);
    if (ret) return ret;    //bad_env

    if ((va >= (void*)utop) || (rounddown(va, pgsize) != va)) return -e_inval;      //一系列判定
    int flag = pte_u | pte_p;
    if ((perm & flag) != flag) return -e_inval;

    struct pageinfo *pg = page_alloc(1);            //分配物理页
    if (!pg) return -e_no_mem;
    ret = page_insert(e->env_pgdir, pg, va, perm);  //建立映射关系
    if (ret) {
        page_free(pg);
        return ret;
    }

    return 0;
}
sys_page_map(envid_t srcenvid, void srcva,envid_t dstenvid, void dstva, int perm):
static int
sys_page_map(envid_t srcenvid, void *srcva,
         envid_t dstenvid, void *dstva, int perm)
{
    // hint: this function is a wrapper around page_lookup() and
    //   page_insert() from kern/pmap.c.
    //   again, most of the new code you write should be to check the
    //   parameters for correctness.
    //   use the third argument to page_lookup() to
    //   check the current permissions on the page.

    // lab 4: your code here.
    struct env *se, *de;
    int ret = envid2env(srcenvid, &se, 1);
    if (ret) return ret;    //bad_env
    ret = envid2env(dstenvid, &de, 1);
    if (ret) return ret;    //bad_env

    //  -e_inval if srcva >= utop or srcva is not page-aligned,
    //      or dstva >= utop or dstva is not page-aligned.
    if (srcva >= (void*)utop || dstva >= (void*)utop ||
        rounddown(srcva,pgsize) != srcva || rounddown(dstva,pgsize) != dstva)
        return -e_inval;

    //  -e_inval is srcva is not mapped in srcenvid's address space.
    pte_t *pte;
    struct pageinfo *pg = page_lookup(se->env_pgdir, srcva, &pte);
    if (!pg) return -e_inval;

    //  -e_inval if perm is inappropriate (see sys_page_alloc).
    int flag = pte_u|pte_p;
    if ((perm & flag) != flag) return -e_inval;

    //  -e_inval if (perm & pte_w), but srcva is read-only in srcenvid's
    //      address space.
    if (((*pte&pte_w) == 0) && (perm&pte_w)) return -e_inval;

    //  -e_no_mem if there's no memory to allocate any necessary page tables.
    ret = page_insert(de->env_pgdir, pg, dstva, perm);
    return ret;

}
sys_page_unmap(envid_t envid, void *va):
static int
sys_page_unmap(envid_t envid, void *va)
{
    // hint: this function is a wrapper around page_remove().

    // lab 4: your code here.
    struct env *env;
    int ret = envid2env(envid, &env, 1);
    if (ret) return ret;

    if ((va >= (void*)utop) || (rounddown(va, pgsize) != va)) return -e_inval;
    page_remove(env->env_pgdir, va);
    return 0;
}
实现fork()有多种方式,一种是将父进程的内容全部拷贝一次,这样的话父进程和子进程就能做到进程隔离,但是这种方式非常耗时,需要在物理内存中复制父进程的内容。
另一种方式叫做写时拷贝的技术(copy on write),父进程将自己的页目录和页表复制给子进程,这样父进程和子进程就能访问相同的内容。只有当一方执行写操作时,才复制这一物理页。这样既能做到地址空间隔离,又能节省了大量的拷贝工作。我画了个图来比较这两种fork方式:
想要实现写时拷贝的fork()需要先实现用户级别的缺页中断处理函数。
为了实现用户级别的页错误处理函数,进程需要注册页错误处理函数,需要实现一个sys_env_set_pgfault_upcall()系统调用提供支持。
实现sys_env_set_pgfault_upcall(envid_t envid, void *func)系统调用。该系统调用为指定的用户环境设置env_pgfault_upcall。缺页中断发生时,会执行env_pgfault_upcall指定位置的代码。当执行env_pgfault_upcall指定位置的代码时,栈已经转到异常栈,并且压入了utrapframe结构。
static int
sys_env_set_pgfault_upcall(envid_t envid, void *func)
{
    // lab 4: your code here.
    struct env *env;
    int ret;
    if ((ret = envid2env(envid, &env, 1)) < 0) {
        return ret;
    }
    env->env_pgfault_upcall = func;
    return 0;
}
当缺页中断发生时,内核会返回用户模式来处理该中断。我们需要一个用户异常栈,来模拟内核异常栈。jos的用户异常栈被定义在虚拟地址uxstacktop。
缺页中断发生时会进入内核的trap(),然后分配page_fault_handler()来处理缺页中断。在该函数中应该做如下几件事:
utrapframe结构如下:
                    <-- uxstacktop
trap-time esp
trap-time eflags
trap-time eip
trap-time eax       start of struct pushregs
trap-time ecx
trap-time edx
trap-time ebx
trap-time esp
trap-time ebp
trap-time esi
trap-time edi       end of struct pushregs
tf_err (error code)
fault_va            <-- %esp when handler is run
按照上面的描述实现page_fault_handler()。
void
page_fault_handler(struct trapframe *tf)
{
    uint32_t fault_va;

    // read processor's cr2 register to find the faulting address
    fault_va = rcr2();

    // handle kernel-mode page faults.

    // lab 3: your code here.
    if ((tf->tf_cs & 3) == 0)
        panic("page_fault_handler():page fault in kernel mode!\n");

    // lab 4: your code here.
    if (curenv->env_pgfault_upcall) {
        uintptr_t stacktop = uxstacktop;
        if (uxstacktop - pgsize < tf->tf_esp && tf->tf_esp < uxstacktop) {
            stacktop = tf->tf_esp;
        }
        uint32_t size = sizeof(struct utrapframe) + sizeof(uint32_t);
        user_mem_assert(curenv, (void *)stacktop - size, size, pte_u | pte_w);
        struct utrapframe *utr = (struct utrapframe *)(stacktop - size);
        utr->utf_fault_va = fault_va;
        utr->utf_err = tf->tf_err;
        utr->utf_regs = tf->tf_regs;
        utr->utf_eip = tf->tf_eip;
        utr->utf_eflags = tf->tf_eflags;
        utr->utf_esp = tf->tf_esp;              //uxstacktop栈上需要保存发生缺页异常时的%esp和%eip

        curenv->env_tf.tf_eip = (uintptr_t)curenv->env_pgfault_upcall;
        curenv->env_tf.tf_esp = (uintptr_t)utr;
        env_run(curenv);            //重新进入用户态
    }

    // destroy the environment that caused the fault.
    cprintf("[%08x] user fault va %08x ip %08x\n",
        curenv->env_id, fault_va, tf->tf_eip);
    print_trapframe(tf);
    env_destroy(curenv);
}
现在需要实现lib/pfentry.s中的_pgfault_upcall函数,该函数会作为系统调用sys_env_set_pgfault_upcall()的参数。
实现lib/pfentry.s中的_pgfault_upcall函数。
_pgfault_upcall:
    // call the c page fault handler.
    pushl %esp          // function argument: pointer to utf
    movl _pgfault_handler, %eax
    call *%eax              //调用页处理函数
    addl $4, %esp           // pop function argument

    // lab 4: your code here.
    // restore the trap-time registers.  after you do this, you
    // can no longer modify any general-purpose registers.
    // lab 4: your code here.
    addl $8, %esp           //跳过utf_fault_va和utf_err
    movl 40(%esp), %eax     //保存中断发生时的esp到eax
    movl 32(%esp), %ecx     //保存终端发生时的eip到ecx
    movl %ecx, -4(%eax)     //将中断发生时的esp值亚入到到原来的栈中
    popal
    addl $4, %esp           //跳过eip

    // restore eflags from the stack.  after you do this, you can
    // no longer use arithmetic operations or anything else that
    // modifies eflags.
    // lab 4: your code here.
    popfl
    // switch back to the adjusted trap-time stack.
    // lab 4: your code here.
    popl %esp
    // return to re-execute the instruction that faulted.
    // lab 4: your code here.
    lea -4(%esp), %esp      //因为之前压入了eip的值但是没有减esp的值,所以现在需要将esp寄存器中的值减4
    ret
完成lib/pgfault.c中的set_pgfault_handler()。
void
set_pgfault_handler(void (*handler)(struct utrapframe *utf))
{
    int r;

    if (_pgfault_handler == 0) {
        // first time through!
        // lab 4: your code here.
        int r = sys_page_alloc(0, (void *)(uxstacktop-pgsize), pte_w | pte_u | pte_p);  //为当前进程分配异常栈
        if (r < 0) {
            panic("set_pgfault_handler:sys_page_alloc failed");;
        }
        sys_env_set_pgfault_upcall(0, _pgfault_upcall);     //系统调用,设置进程的env_pgfault_upcall属性
    }

    // save handler pointer for assembly to call.
    _pgfault_handler = handler;
}
user_mem_check()中的cprintf()需要去掉,不然faultregs这个测试可能会过不了,坑啊~

到目前已经可以实现用户级别的写时拷贝fork函数了。fork流程如下:
缺页处理函数pgfault()流程如下:
实现lib/fork.c中的fork, duppage and pgfault。
static void
pgfault(struct utrapframe *utf)
{
    void *addr = (void *) utf->utf_fault_va;
    uint32_t err = utf->utf_err;
    int r;

    // check that the faulting access was (1) a write, and (2) to a
    // copy-on-write page.  if not, panic.
    // hint:
    //   use the read-only page table mappings at uvpt
    //   (see <inc/memlayout.h>).

    // lab 4: your code here.
    if (!((err & fec_wr) && (uvpt[pgnum(addr)] & pte_cow))) { //只有因为写操作写时拷贝的地址这中情况,才可以抢救。否则一律panic
        panic("pgfault():not cow");
    }


    // allocate a new page, map it at a temporary location (pftemp),
    // copy the data from the old page to the new page, then move the new
    // page to the old page's address.
    // hint:
    //   you should make three system calls.

    // lab 4: your code here.
    addr = rounddown(addr, pgsize);
    if ((r = sys_page_map(0, addr, 0, pftemp, pte_u|pte_p)) < 0)        //将当前进程pftemp也映射到当前进程addr指向的物理页
        panic("sys_page_map: %e", r);
    if ((r = sys_page_alloc(0, addr, pte_p|pte_u|pte_w)) < 0)   //令当前进程addr指向新分配的物理页
        panic("sys_page_alloc: %e", r);
    memmove(addr, pftemp, pgsize);                              //将pftemp指向的物理页拷贝到addr指向的物理页
    if ((r = sys_page_unmap(0, pftemp)) < 0)                    //解除当前进程pftemp映射
        panic("sys_page_unmap: %e", r);
}

static int
duppage(envid_t envid, unsigned pn)
{
    int r;

    // lab 4: your code here.
    void *addr = (void*) (pn * pgsize);
    if (uvpt[pn] & pte_share) {
        sys_page_map(0, addr, envid, addr, pte_syscall);        //对于表示为pte_share的页,拷贝映射关系,并且两个进程都有读写权限
    } else if ((uvpt[pn] & pte_w) || (uvpt[pn] & pte_cow)) { //对于utop以下的可写的或者写时拷贝的页,拷贝映射关系的同时,需要同时标记当前进程和子进程的页表项为pte_cow
        if ((r = sys_page_map(0, addr, envid, addr, pte_cow|pte_u|pte_p)) < 0)
            panic("sys_page_map:%e", r);
        if ((r = sys_page_map(0, addr, 0, addr, pte_cow|pte_u|pte_p)) < 0)
            panic("sys_page_map:%e", r);
    } else {
        sys_page_map(0, addr, envid, addr, pte_u|pte_p);    //对于只读的页,只需要拷贝映射关系即可
    }
    return 0;
}

envid_t
fork(void)
{
    // lab 4: your code here.
    extern void _pgfault_upcall(void);
    set_pgfault_handler(pgfault);   //设置缺页处理函数
    envid_t envid = sys_exofork();  //系统调用,只是简单创建一个env结构,复制当前用户环境寄存器状态,utop以下的页目录还没有建立
    if (envid == 0) {               //子进程将走这个逻辑
        thisenv = &envs[envx(sys_getenvid())];
        return 0;
    }
    if (envid < 0) {
        panic("sys_exofork: %e", envid);
    }

    uint32_t addr;
    for (addr = 0; addr < ustacktop; addr += pgsize) {
        if ((uvpd[pdx(addr)] & pte_p) && (uvpt[pgnum(addr)] & pte_p) //为什么uvpt[pagenumber]能访问到第pagenumber项页表条目:https://pdos.csail.mit.edu/6.828/2018/labs/lab4/uvpt.html
            && (uvpt[pgnum(addr)] & pte_u)) {
            duppage(envid, pgnum(addr));    //拷贝当前进程映射关系到子进程
        }
    }
    int r;
    if ((r = sys_page_alloc(envid, (void *)(uxstacktop-pgsize), pte_p | pte_w | pte_u)) < 0)    //为子进程分配异常栈
        panic("sys_page_alloc: %e", r);
    sys_env_set_pgfault_upcall(envid, _pgfault_upcall);     //为子进程设置_pgfault_upcall

    if ((r = sys_env_set_status(envid, env_runnable)) < 0)  //设置子进程为env_runnable状态
        panic("sys_env_set_status: %e", r);
    return envid;
}
目前程序一旦进入用户模式,除非发生中断,否则cpu永远不会再执行内核代码。我们需要开启时钟中断,强迫进入内核,然后内核就可以切换另一个进程执行。
lapic_init()和pic_init()设置时钟中断控制器产生中断。需要写代码来处理中断。
修改trap_dispatch(),使时钟中断发生时,切换到另一个进程执行。
    if (tf->tf_trapno == irq_offset + irq_timer) {
        lapic_eoi();
        sched_yield();
        return;
    }
到目前为止,我们都在做隔离的事情。操作系统另一个重要的内容是允许程序相互交流。
我们将要实现sys_ipc_recv()和sys_ipc_try_send()这两个系统调用,来实现进程间通信。并且实现两个包装函数ipc_recv()和 ipc_send()。
jos中进程间通信的“消息”包含两部分:
sys_ipc_recv()和sys_ipc_try_send()是这么协作的:
实现sys_ipc_recv()和sys_ipc_try_send()。包装函数ipc_recv()和 ipc_send()。
static int
sys_ipc_try_send(envid_t envid, uint32_t value, void *srcva, unsigned perm)
{
    // lab 4: your code here.
    struct env *rcvenv;
    int ret = envid2env(envid, &rcvenv, 0);
    if (ret) return ret;
    if (!rcvenv->env_ipc_recving) return -e_ipc_not_recv;

    if (srcva < (void*)utop) {
        pte_t *pte;
        struct pageinfo *pg = page_lookup(curenv->env_pgdir, srcva, &pte);

        //按照注释的顺序进行判定
        if (debug) {
            cprintf("sys_ipc_try_send():srcva=%08x\n", (uintptr_t)srcva);
        }
        if (srcva != rounddown(srcva, pgsize)) {        //srcva没有页对齐
            if (debug) {
                cprintf("sys_ipc_try_send():srcva is not page-alligned\n");
            }
            return -e_inval;
        }
        if ((*pte & perm & 7) != (perm & 7)) {  //perm应该是*pte的子集
            if (debug) {
                cprintf("sys_ipc_try_send():perm is wrong\n");
            }
            return -e_inval;
        }
        if (!pg) {          //srcva还没有映射到物理页
            if (debug) {
                cprintf("sys_ipc_try_send():srcva is not maped\n");
            }
            return -e_inval;
        }
        if ((perm & pte_w) && !(*pte & pte_w)) {    //写权限
            if (debug) {
                cprintf("sys_ipc_try_send():*pte do not have pte_w, but perm have\n");
            }
            return -e_inval;
        }

        if (rcvenv->env_ipc_dstva < (void*)utop) {
            ret = page_insert(rcvenv->env_pgdir, pg, rcvenv->env_ipc_dstva, perm); //共享相同的映射关系
            if (ret) return ret;
            rcvenv->env_ipc_perm = perm;
        }
    }
    rcvenv->env_ipc_recving = 0;                    //标记接受进程可再次接受信息
    rcvenv->env_ipc_from = curenv->env_id;
    rcvenv->env_ipc_value = value;
    rcvenv->env_status = env_runnable;
    rcvenv->env_tf.tf_regs.reg_eax = 0;
    return 0;
}

static int
sys_ipc_recv(void *dstva)
{
    // lab 4: your code here.
    if (dstva < (void *)utop && dstva != rounddown(dstva, pgsize)) {
        return -e_inval;
    }
    curenv->env_ipc_recving = 1;
    curenv->env_status = env_not_runnable;
    curenv->env_ipc_dstva = dstva;
    sys_yield();
    return 0;
}
int32_t
ipc_recv(envid_t *from_env_store, void *pg, int *perm_store)
{
    // lab 4: your code here.
    if (pg == null) {
        pg = (void *)-1;
    }
    int r = sys_ipc_recv(pg);
    if (r < 0) {                //系统调用失败
        if (from_env_store) *from_env_store = 0;
        if (perm_store) *perm_store = 0;
        return r;
    }
    if (from_env_store)
        *from_env_store = thisenv->env_ipc_from;
    if (perm_store)
        *perm_store = thisenv->env_ipc_perm;
    return thisenv->env_ipc_value;
}

void
ipc_send(envid_t to_env, uint32_t val, void *pg, int perm)
{
    // lab 4: your code here.
    if (pg == null) {
        pg = (void *)-1;
    }
    int r;
    while(1) {
        r = sys_ipc_try_send(to_env, val, pg, perm);
        if (r == 0) {       //发送成功
            return;
        } else if (r == -e_ipc_not_recv) {  //接收进程没有准备好
            sys_yield();
        } else {            //其它错误
            panic("ipc_send():%e", r);
        }
    }
}
ipc原理可以总结为下图:

本lab还是围绕进程这个概念来展开的。主要介绍了四部分:
具体代码在:
如有错误,欢迎指正(*^_^*):
15313676365
如对本文有疑问,请在下面进行留言讨论,广大热心网友会与你互动!! 点击进行留言回复


网友评论