莫可欣个人资料,bt论坛,金娜娜图片
应用系统分布式构建运维
1+x初级,项目四
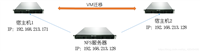
准备两台主机
# hostnamectl set-hostname mysql1
# hostnamectl set-hostname mysql2
# setenforce 0
# systemctl stop firewalld
# vi /etc/hosts
加入以下内容
192.168.37.16 mysql1
192.168.37.17 mysql2
# yum install -y mariadb mariadb-server
启动数据库服务并设置开机自启
# systemctl start mariadb
# systemctl enable mariadb
created symlink from /etc/systemd/system/multi-user.target.wants/mariadb.service to /usr/lib/systemd/system/mariadb.service.
修改mysql1节点的数据库配置文件
# vi /etc/my.cnf
[mysqld]
log_bin=mysql-bin ##记录操作日志
binlog_ignore_db=mysql ##不同步mysql系统数据库
server_id=16 ##数据库集群中的每个节点id都要不同
datadir=/var/lib/mysql
socket=/var/lib/mysql/mysql.sock
重启数据库服务
# systemctl restart mariadb
进入数据库
# mysql -uroot -p123456
授权在任何客户端机器上可以以root用户登录到数据库
> grant all privileges on *.* to root@'%' identified by "123456";
在主节点上创建一个用户连接节点mysql2,并赋予从节点同步主节点数据库的权限
> grant replication slave on *.* to 'user'@'mysql2' identified by '123456';
修改mysql2节点的数据库配置文件
# vi /etc/my.cnf
[mysqld]
log_bin=mysql-bin ##记录操作日志
binlog_ignore_db=mysql ##不同步mysql系统数据库
server_id=17 ##数据库集群中的每个节点id都要不同
datadir=/var/lib/mysql
socket=/var/lib/mysql/mysql.sock
重启数据库服务
# systemctl restart mariadb
进入数据库
# mysql -uroot -p123456
配置从节点连接主节点的连接信息
> change master to master_host='mysql1',master_user='user',master_password='123456';
开启从节点服务
> start slave;
查看从节点服务状态
> show slave status\g

配置数据库主从集群成功
在主节点中创建库
> create database test;
> use test;
在库中创建表
> create table company(id int not null primary key,name varchar(50),addr varchar(255));
插入表数据
> insert into company values(1,"alibaba","china");
查看表数据
> select * from company;

查看数据库列表
> show databases;
> use test;

查询表
> show tables;

查询内容,验证复制功能
> select * from company;
验证从数据库的复制功能成功
# hostnamectl set-hostname nginx
# setenforce 0
# systemctl stop firewalld
编译安装基础环境
# yum install -y gcc gcc-c++ openssl-devel zlib-devel zlib pcre-devel
创建指定用户
# groupadd -g 1001 nginx
# useradd -u 900 nginx -g nginx -s /sbin/nologin
# tail -1 /etc/passwd
nginx:x:900:1001::/home/nginx:/sbin/nologin
将提供的nginx-1.12.2.tar.gz压缩包上传至/usr/local/src/目录下,并解压到当前目录
# cd /usr/local/src
# tar -zxvf nginx-1.12.2.tar.gz
编译并安装
# cd nginx-1.12.2
# ./configure --prefix=/usr/local/nginx --with-http_dav_module \
> --with-http_stub_status_module --with-http_addition_module \
> --with-http_sub_module --with-http_flv_module --with-http_mp4_module \
> --with-http_ssl_module --with-http_gzip_static_module --user=nginx --group=nginx
没有报错,进行安装
# make && make install
创建软链接
# ln -s /usr/local/nginx/sbin/nginx /usr/local/sbin/
启动测试
# nginx -t
nginx: the configuration file /usr/local/nginx/conf/nginx.conf syntax is ok
nginx: configuration file /usr/local/nginx/conf/nginx.conf test is successful
# nginx
# netstat -ntpl

80端口启动,表示nginx服务启动成功
# hostnamectl set-hostname php
# setenforce 0
# systemctl stop firewalld
编译安装基础环境
# yum install -y gcc gcc-c++ libxml2-devel libcurl-devel openssl-devel bzip2-devel
将提供的libmcrypt-2.5.8.tar.gz压缩包上传至/usr/local/src目录下,并解压到当前目录
# cd /usr/local/src
# tar -zxvf libmcrypt-2.5.8.tar.gz
编译安装服务
# cd libmcrypt-2.5.8
# ./configure --prefix=/usr/local/libmcrypt && make && make install
将提供的php-5.6.27.tar.gz压缩包上传至/usr/local/src目录下,并解压到当前目录
# cd /usr/local/src/
# tar -zxvf php-5.6.27.tar.gz
编译安装服务
# cd php-5.6.27
# ./configure --prefix=/usr/local/php5.6 --with-mysql=mysqlnd \
--with-pdo-mysql=mysqlnd --with-mysqli=mysqlnd --with-openssl --enable-fpm \
--enable-sockets --enable-sysvshm --enable-mbstring --with-freetype-dir \
--with-jpeg-dir --with-png-dir --with-zlib --with-libxml-dir=/usr --enable-xml --with-mhash \
--with-mcrypt=/usr/local/libmcrypt --with-config-file-path=/etc \
--with-config-file-scan-dir=/etc/php.d --with-bz2 --enable-maintainer-zts
没有报错,进行安装
# make && make install
这个nginx的id号要和nginx主机上的保持一致
# groupadd -g 1001 nginx
# useradd -u 900 nginx -g nginx -s /sbin/nologin
# tail -1 /etc/passwd
nginx:x:900:1001::/home/nginx:/sbin/nologin
php压缩包中提供了php环境需要用到的模板文件,需要对文件进行改名后才能使用
复制文件并改名
# cp php.ini-production /etc/php.ini
# cp sapi/fpm/init.d.php-fpm /etc/init.d/php-fpm
赋予文件执行权限
# chmod +x /etc/init.d/php-fpm
添加php服务到启动列表,并设置开机自启
# chkconfig --add php-fpm
# chkconfig php-fpm on
修改php的主配置文件
# cp /usr/local/php5.6/etc/php-fpm.conf.default /usr/local/php5.6/etc/php-fpm.conf
# grep -n '^'[a-z] /usr/local/php5.6/etc/php-fpm.conf
149:user = nginx
150:group = nginx
164:listen = 192.168.37.13:9000
224:pm = dynamic
235:pm.max_children = 50
240:pm.start_servers = 5
245:pm.min_spare_servers = 5
250:pm.max_spare_servers = 35
启动php服务
# service php-fpm start
starting php-fpm done
查看启动状态
# netstat -ntpl

9000端口启动,表示php环境安装完毕
已经完成了主从数据库的安装配置、nginx服务的安装、php环境的安装的四台机器进行部署
修改配置文件
# vi /usr/local/nginx/conf/nginx.conf
location / {
root /www; ##更改网页目录
index index.php index.htm;
}
location ~ \.php$ { ##去掉这部分前面的注释符
root /www; ##更改目录
fastcgi_pass 192.168.37.13:9000; ##添加php主机ip地址
fastcgi_index index.php;
fastcgi_param script_filename /scripts$fastcgi_script_name;
include fastcgi_params;
}
添加配置
# vi /usr/local/nginx/conf/fastcgi_params
fastcgi_param script_name $fastcgi_script_name;
fastcgi_param script_filename $document_root$fastcgi_script_name; ##添加这行
fastcgi_param request_uri $request_uri;
在nginx和php节点,创建/www目录,并修改用户和用户组
# mkdir /www
# chown nginx:nginx /www/
将提供的wordpress-4.7.3-zh_cn.zip压缩包上传至nginx节点和php节点的/root目录下并解压
# yum install -y unzip
# unzip wordpress-4.7.3-zh_cn.zip
将解压后的文件复制到/www目录下
# mv wordpress/* /www/
修改wordpress的配置文件(nginx节点)
将模板文件复制并修改
# cp /www/wp-config-sample.php /www/wp-config.php
# vi /www/wp-config.php
登录数据库
# mysql -uroot -p123456
创建数据库
> create database wordpress;
重启nginx服务
# nginx -s reload
使用网页访问192.168.37.12(nginx节点ip)
填写信息之后点击左下角安装

进入后台界面

点击左上角图标

分布式部署完成
如对本文有疑问,请在下面进行留言讨论,广大热心网友会与你互动!! 点击进行留言回复

网友评论