家装效果图大全,清明休假,无敌金箍棒
接着上一章继续聊这个项目
本章主要会介绍到一下几点
一.基础类接口的实现
1.首先创建iconfiggeter接口

接口代码如下:
public interface iconfiggeter
    {
        tconfig get<tconfig>(string key);
        tconfig get<tconfig>();
        string this[string key] { get; }
    }
2.实现接口

接口实现代码如下
/// <summary>
    /// 配置文件提供者
    /// </summary>
    public class configgeter : iconfiggeter
    {
        private readonly iconfiguration _configuration;

        public configgeter(iconfiguration configuration)
        {
            _configuration = configuration;
        }

        public tconfig get<tconfig>(string key)
        {
            if (string.isnullorwhitespace(key))
                throw new argumentexception("value cannot be null or whitespace.", nameof(key));
            var section = _configuration.getsection(key);
            return section.get<tconfig>();
        }

        public tconfig get<tconfig>()
        {
            return get<tconfig>(typeof(tconfig).fullname);
        }

        public string this[string key] => _configuration[key];
    }
3.创建一个configlocator配置文件获取器

实现代码如下:
public class configlocator
    {
        private readonly iconfiggeter _currentserviceprovider;
        private static iconfiggeter _serviceprovider;

        public configlocator(iconfiggeter currentserviceprovider)
        {
            _currentserviceprovider = currentserviceprovider;
        }

        public static configlocator instance => new configlocator(_serviceprovider);

        public static void setlocatorprovider(iconfiggeter serviceprovider)
        {
            _serviceprovider = serviceprovider;
        }

        public tconfig get<tconfig>(string key)
        {
            return _currentserviceprovider.get<tconfig>(key);
        }

        public tconfig get<tconfig>()
        {
            return _currentserviceprovider.get<tconfig>(typeof(tconfig).name);
        }

        public string this[string key] => _currentserviceprovider[key];
    }
二.在program里将其注入,注意这里我没有放到startup

我们自定义了一个hostbuilder类,里面定义了两个方法:programmain()和createdefaultbuilder();,

实现代码如下:
public static class hostbuilder
    {

        public static void programmain(action main)
        {
            main();
        }

        /// <summary>
        /// 加入自定义默认配置
        /// </summary>
        /// <param name="webhostbuilder"></param>
        /// <returns></returns>
        public static iwebhostbuilder createdefaultbuilder(this iwebhostbuilder webhostbuilder) =>
            webhostbuilder.configureappconfiguration(
                (ctx, config) => configlocator.setlocatorprovider(new configgeter(config.build())))
                .configureservices((ctx, services) =>
                {
                    services
                    .addregistercontainer();
                });
    }
注意:这里是我们使用配置文件的关键:
webhostbuilder.configureappconfiguration(
(ctx, config) => configlocator.setlocatorprovider(new configgeter(config.build())))
三.在控制器里使用一下我们的configlocator试试效果如何
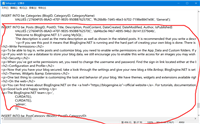
1.在appsetting.json里加一些配置信息
如图:

这里我们获取一下单键的值,以及复合类型的值,eg:log4netconfig,persion,大家记得他们的值是多少我么在控制器里获取一下
2.新建测试控制器,为何不用单元测试呢?你们懂的,,,我就不多说了
如图:

代码如下:
namespace tb.aspnetcore.website.controllers
{
    public class persion
    {
        public string name { get; set; }

        public int age { get; set; }
    }
    public class testcontroller : controller
    {
        public iactionresult index()
        {
            var log4net = configlocator.instance["log4netconfig"];

            var persion = configlocator.instance.get<persion>("persion");


            return view();
        }
    }
}
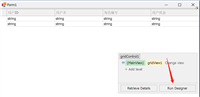
3.测试结果
快速监视结果显示是我们配置文件的值


本章就扯到这里吧,说多了就没意识了,下章会说一下redis在我这里的玩法,会涉及到redis的发布订阅,以及redis的timeout问题

如对本文有疑问,请在下面进行留言讨论,广大热心网友会与你互动!! 点击进行留言回复


asp.net搭建博客,使用BlogEngine.NET+MySql搭建博客
网友评论