企业取名测算,阴阳师泡沫公主,大秦女商
首先要搞清楚的就是thinkphp3.2.3的分页类已经被移到了think\page.class.php,这是跟以前的版本有些不一样的,使用起来还是跟以前版本差不多,但是默认的效果不敢恭维,所以最好是自己加些样式。
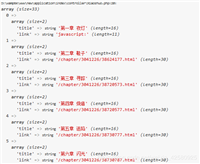
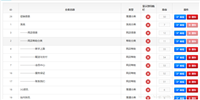
我加了一些样式(不怎么好看),大家可以自行的再去改进分页样式,效果图:

在这里我有先把page的设置做成了一个函数getpage,将这个方法放到application\common\common\function.php(注意function不是类)中方便其他地方调用,代码如下:
<?php
/**
 * todo 基础分页的相同代码封装,使前台的代码更少
 * @param $count 要分页的总记录数
 * @param int $pagesize 每页查询条数
 * @return \think\page
 */
function getpage($count, $pagesize = 10) {
  $p = new think\page($count, $pagesize);
  $p->setconfig('header', '<li class="rows">共<b>%total_row%</b>条记录 第<b>%now_page%</b>页/共<b>%total_page%</b>页</li>');
  $p->setconfig('prev', '上一页');
  $p->setconfig('next', '下一页');
  $p->setconfig('last', '末页');
  $p->setconfig('first', '首页');
  $p->setconfig('theme', '%first%%up_page%%link_page%%down_page%%end%%header%');
  $p->lastsuffix = false;//最后一页不显示为总页数
  return $p;
}
?>
控制器中使用的代码如下:
public function showallusers() {
    $m = m('user');
    $where = "id>10";
    $count = $m->where($where)->count();
    $p = getpage($count,1);
    $list = $m->field(true)->where($where)->order('id')->limit($p->firstrow, $p->listrows)->select();
    $this->assign('select', $list); // 赋值数据集
    $this->assign('page', $p->show()); // 赋值分页输出
    $this->display();
  }
接下来在view中的使用:
<!doctype html public "-//w3c//dtd xhtml 1.0 transitional//en" "http://www.w3.org/tr/xhtml1/dtd/xhtml1-transitional.dtd">
<html xmlns="http://www.w3.org/1999/xhtml">
  <head>

    <meta http-equiv="content-type" content="text/html; charset=utf-8" />
    <title>用户信息输出</title>
    <link href="__root__/public/css/style.css" rel="stylesheet" type="text/css" />
    <link href="__root__/public/css/mypage.css" rel="stylesheet" type="text/css"/>
  </head>

  <body>
    <table width="405" border="1" cellpadding="1" cellspacing="1" bgcolor="#99cc33" bordercolor="#ffffff">
      <tr>
        <td colspan="3" bgcolor="#ffffff" class="title" align="center">当前登录用户:{$think.session.admin}</td>
      </tr>
      <tr>
        <td colspan="3" bgcolor="#ffffff" class="title" align="center">用户信息</td>
      </tr>
      <tr class="title">
        <td bgcolor="#ffffff" width="44">id</td>
        <td bgcolor="#ffffff" width="120">用户名</td>
        <td bgcolor="#ffffff" width="223">密码</td>
      </tr>
      <foreach name='select' item='user' >
        <tr class="content">
          <td bgcolor="#ffffff"> {$user.id}</td>
          <td bgcolor="#ffffff"> {$user.account}</td>
          <td bgcolor="#ffffff"> {$user.pwd}</td>
        </tr>
      </foreach>
      <tr class="content">
        <!--<td colspan="3" bgcolor="#ffffff"> {$page}</td>-->
        <td colspan="3" bgcolor="#ffffff"><div class="pages">
            {$page}
        </div></td>
      </tr>
    </table>
  </body>
</html>
其中设置分页的样式mypage.css,如下:
.pages a,.pages span {
  display:inline-block;
  padding:2px 5px;
  margin:0 1px;
  border:1px solid #f0f0f0;
  -webkit-border-radius:3px;
  -moz-border-radius:3px;
  border-radius:3px;
}
.pages a,.pages li {
  display:inline-block;
  list-style: none;
  text-decoration:none; color:#58a0d3;
}
.pages a.first,.pages a.prev,.pages a.next,.pages a.end{
  margin:0;
}
.pages a:hover{
  border-color:#50a8e6;
}
.pages span.current{
  background:#50a8e6;
  color:#fff;
  font-weight:700;
  border-color:#50a8e6;
}
这样就可以了。
以上就是本文的全部内容,希望对大家的学习有所帮助,也希望大家多多支持移动技术网。
如对本文有疑问,请在下面进行留言讨论,广大热心网友会与你互动!! 点击进行留言回复

YII2框架中使用RBAC对模块,控制器,方法的权限控制及规则的使用示例
YII2框架中ActiveDataProvider与GridView的配合使用操作示例
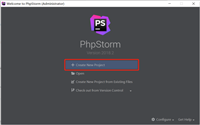
PhpStorm的使用教程(本地运行PHP+远程开发+快捷键)
网友评论