东莞制衣,遭嫌弃偷补酒壮阳,尹湘峰
关于验证码部分,在我这篇文章里说的挺详细的了:python高级应用(3)—— 为你的项目添加验证码
这里还是再给一个前后端分离的实例,因为极验官网给的是用session作为验证的,而我们做前后端分离的用的是token,而不是session,所以对于目前来说就不适用了,所以需要根据具体业务逻辑来改动。当然,大佬可以直接忽略
好的,直接上例子:
还是用的 python高级应用(3)—— 为你的项目添加验证码 这文章最后的loginauth例子,这里改成使用djagnorestframwork的项目:
url没变:

view也只是做了稍微的小改动,改动部分就是我标记出来的部分,因为不能用session,所以这里采用redis存储数据并获取数据,有关redis配置请移步:数据库之redis篇(3)—— python操作redis

html,只改了两处的请求地址,写成了绝对地址

在启动项目之前,需要设置一个中间件,不然会有跨域请求问题,有跨域请求解决问题,请移步:前后端分离djangorestframework——解决跨域请求 这里就不多介绍了
在utils目录下创建一个中间件,定义类名mycors

配置文件里导入:

注意,由于已经设置了中间件添加允许请求头,那个csrf的中间件就可以不用管,当然你注释掉也没有问题
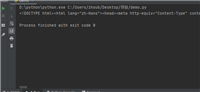
启动项目:
然后再pycharm下,单独对html文件启动,作为一个客户端来访问:
点击验证码:

没有问题
相关代码:

from django.contrib import admin
from django.urls import re_path, path
from generic.views import authview,gtview

urlpatterns = [
    path('admin/', admin.site.urls),

    re_path(r'^pc-geetest/register', gtview.as_view()),
    re_path(r'^pc-geetest/validate', gtview.as_view()),
    path('auth/', authview.as_view()),
]
# coding:utf-8
from rest_framework.views import apiview
from django.shortcuts import render
from django.http import httpresponse
from utils.geetest import geetestlib
import redis
import json

pc_geetest_id = "b46d1900d0a894591916ea94ea91bd2c"
pc_geetest_key = "36fc3fe98530eea08dfc6ce76e3d24c4"
conn = redis.redis(host='127.0.0.1')  # 前提自己安装上redis并配置好可以连接

class authview(apiview):
    def get(self, request):
        return render(request, "")

class gtview(apiview):
    def get(self, request):
        user_id = 'test'
        gt = geetestlib(pc_geetest_id, pc_geetest_key)
        status = gt.pre_process(user_id)
        # request.session[gt.gt_status_session_key] = status
        # request.session["user_id"] = user_id
        conn.set(gt.gt_status_session_key, status)
        conn.set("user_id", user_id)
        response_str = gt.get_response_str()
        return httpresponse(response_str)

    def post(self, request):
        gt = geetestlib(pc_geetest_id, pc_geetest_key)
        challenge = request.post.get(gt.fn_challenge, '')
        validate = request.post.get(gt.fn_validate, '')
        seccode = request.post.get(gt.fn_seccode, '')
        # status = request.session[gt.gt_status_session_key]
        # user_id = request.session["user_id"]
        status = conn.get(gt.gt_status_session_key)
        user_id = conn.get("user_id")
        if status:
            result = gt.success_validate(challenge, validate, seccode, user_id)
        else:
            result = gt.failback_validate(challenge, validate, seccode)
        result = {"status": "success"} if result else {"status": "fail"}
        return httpresponse(json.dumps(result))
<!doctype html>
<html>
<head>
<meta charset="utf-8">
<meta name="viewport" content="width=device-width, initial-scale=1">
<title>gt-python-django-demo</title>
<style>
body {
margin: 50px 0;
text-align: center;
}
.inp {
border: 1px solid gray;
padding: 0 10px;
width: 200px;
height: 30px;
font-size: 18px;
}
.btn {
border: 1px solid gray;
width: 100px;
height: 30px;
font-size: 18px;
cursor: pointer;
}
#embed-captcha {
width: 300px;
margin: 0 auto;
}
.show {
display: block;
}
.hide {
display: none;
}
#notice {
color: red;
}
</style>
</head>
<body>
<h1>请登录</h1>
<br><br>
<!-- 为使用方便,直接使用jquery.js库,如您代码中不需要,可以去掉 -->
<script src="http://code.jquery.com/jquery-1.12.3.min.js"></script>
<!-- 引入封装了failback的接口--initgeetest -->
<script src="http://static.geetest.com/static/tools/gt.js"></script>
<form class="popup" action="http://127.0.0.1:8002/pc-geetest/validate" method="post">
<br>
<p>
<label for="username2">用户名:</label>
<input class="inp" id="username2" type="text" value="极验验证">
</p>
<br>
<p>
<label for="password2">密 码:</label>
<input class="inp" id="password2" type="password" value="123456">
</p>
<div id="embed-captcha"></div>
<p id="wait" class="show">正在加载验证码......</p>
<p id="notice" class="hide">请先拖动验证码到相应位置</p>
<br>
<input class="btn" id="embed-submit" type="submit" value="提交">
</form>
<script>
var handlerembed = function (captchaobj) {
$("#embed-submit").click(function (e) {
var validate = captchaobj.getvalidate();
if (!validate) {
$("#notice")[0].classname = "show";
settimeout(function () {
$("#notice")[0].classname = "hide";
}, 2000);
e.preventdefault();
}
});
// 将验证码加到id为captcha的元素里,同时会有三个input的值:geetest_challenge, geetest_validate, geetest_seccode
captchaobj.appendto("#embed-captcha");
captchaobj.onready(function () {
$("#wait")[0].classname = "hide";
});
// 更多接口参考:http://www.geetest.com/install/sections/idx-client-sdk.html
};
$.ajax({
// 获取id,challenge,success(是否启用failback)
url: "http://127.0.0.1:8002/pc-geetest/register?t=" + (new date()).gettime(), // 加随机数防止缓存
type: "get",
datatype: "json",
success: function (data) {
// 使用initgeetest接口
// 参数1:配置参数
// 参数2:回调,回调的第一个参数验证码对象,之后可以使用它做appendto之类的事件
initgeetest({
gt: data.gt,
challenge: data.challenge,
product: "embed", // 产品形式,包括:float,embed,popup。注意只对pc版验证码有效
offline: !data.success // 表示用户后台检测极验服务器是否宕机,一般不需要关注
// 更多配置参数请参见:http://www.geetest.com/install/sections/idx-client-sdk.html#config
}, handlerembed);
}
});
</script>
</body>
</html>
from django.utils.deprecation import middlewaremixin


class mycors(middlewaremixin):
    def process_response(self, request, response):
        response["access-control-allow-origin"] = "*"
        if request.method == "options":
            response["access-control-allow-headers"] = "content-type"
        return response
好的,这样的感觉还是在搬砖,用的别人的代码,再来一个使用vue作为前端主要代码,对html文件做大的改写
这次是用的是极验给第一个案例,弹出式的:

同样的,除了html文件,其他没做多大改动:
url:

view,redis自己记着配置就行,还要注意的是这次这里用的request.data,不是request.post了,我在这里耗了好久

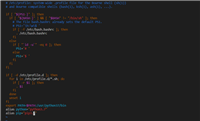
html:


启动项目,解释一下,不知道是不是我的浏览器显示比例的问题,我只要用自己的id和key,它这个验证码按钮就会跑到左边去,我试了用官方给的示例id和key就正常,如果你们也遇到就自己去调试css了,这里暂且这样了

点击验证:

没有问题:

相关代码:
from django.shortcuts import render
from rest_framework.views import apiview
import redis
from utils.geetest import geetestlib
from django.http import httpresponse
import json

# create your views here.

pc_geetest_id = "b46d1900d0a894591916ea94ea91bd2c"
pc_geetest_key = "36fc3fe98530eea08dfc6ce76e3d24c4"
conn = redis.redis(host='127.0.0.1')  # 前提自己安装上redis并配置好可以连接

class authview(apiview):
    def get(self, request):
        return render(request, "")


class gtview(apiview):
    def get(self, request):
        user_id = 'test'
        gt = geetestlib(pc_geetest_id, pc_geetest_key)
        status = gt.pre_process(user_id)
        # request.session[gt.gt_status_session_key] = status
        # request.session["user_id"] = user_id
        conn.set(gt.gt_status_session_key, status)
        conn.set("user_id", user_id)
        response_str = gt.get_response_str()
        return httpresponse(response_str)

    def post(self, request):
        gt = geetestlib(pc_geetest_id, pc_geetest_key)
        challenge = request.data.get(gt.fn_challenge, '')
        validate = request.data.get(gt.fn_validate, '')
        seccode = request.data.get(gt.fn_seccode, '')
        # status = request.session[gt.gt_status_session_key]
        # user_id = request.session["user_id"]
        status = conn.get(gt.gt_status_session_key)
        user_id = conn.get("user_id")
        if status:
            result = gt.success_validate(challenge, validate, seccode, user_id)
        else:
            result = gt.failback_validate(challenge, validate, seccode)
        result = {"status": "success"} if result else {"status": "fail"}
        return httpresponse(json.dumps(result))
<!doctype html>
<html lang="en">
<head>
<meta charset="utf-8">
<meta http-equiv="x-ua-compatible" content="ie=edge">
<meta name="viewport" content="width=device-width, initial-scale=1">
<title>title</title>
<script src="https://cdn.jsdelivr.net/npm/vue/dist/vue.js"></script>
<script src="http://static.geetest.com/static/tools/gt.js"></script>
<script src="https://cdn.bootcss.com/axios/0.19.0-beta.1/axios.js"></script>
<style>
body {
margin: 50px 0;
text-align: center;
}
.inp {
border: 1px solid gray;
padding: 0 10px;
width: 200px;
height: 30px;
font-size: 18px;
}
.btn {
border: 1px solid gray;
width: 100px;
height: 30px;
font-size: 18px;
cursor: pointer;
}
#embed-captcha {
width: 300px;
margin: 0 auto;
}
.show {
display: block;
}
.hide {
display: none;
}
#notice {
color: red;
}
/* 以下遮罩层为demo.用户可自行设计实现 */
#mask {
display: none;
position: fixed;
text-align: center;
left: 0;
top: 0;
width: 100%;
height: 100%;
background-color: rgba(0, 0, 0, 0.5);
overflow: auto;
}
/* 可自行设计实现captcha的位置大小 */
.popup-mobile {
position: relative;
}
#popup-captcha-mobile {
position: fixed;
display: none;
left: 50%;
top: 50%;
transform: translate(-50%, -50%);
-webkit-transform: translate(-50%, -50%);
z-index: 9999;
}
</style>
</head>
<body>
<div id="app">
<div class="popup">
<h2>django rest framework 中测试极验 </h2>
<br>
<p>
<label>用户名:</label>
<input id="username1" class="inp" type="text" value="极验验证" v-model="username">
</p>
<br>
<p>
<label>密 码:</label>
<input id="password1" class="inp" type="password" value="123456" v-model="pwd">
</p>
<br>
<input class="btn" id="popup-submit" type="submit" value="提交" ref="popup">
<div id="popup-captcha"></div>
</div>
</div>
<script>
// vue.prototype.$axios = axios;
const app = new vue({
el: "#app",
data: {
username: "极验验证",
pwd: "123456"
},
mounted() {
let that = this;
// 验证开始需要向网站主后台获取id,challenge,success(是否启用failback)
axios.request({
url: "http://127.0.0.1:8002/pc-geetest/register?t=" + (new date()).gettime(), // 加随机数防止缓存
method: "get",
}).then(function (data) {
console.log(data.data);
// 使用initgeetest接口
// 参数1:配置参数
// 参数2:回调,回调的第一个参数验证码对象,之后可以使用它做appendto之类的事件
initgeetest({
gt: data.data.gt,
challenge: data.data.challenge,
product: "popup", // 产品形式,包括:float,embed,popup。注意只对pc版验证码有效
offline: !data.data.success, // 表示用户后台检测极验服务器是否宕机,一般不需要关注
new_captcha: true
// 更多配置参数请参见:http://www.geetest.com/install/sections/idx-client-sdk.html#config
}, function (captchaobj) {
// 成功的回调
console.log("进入成功的回调");
captchaobj.onsuccess(function () {
let validate = captchaobj.getvalidate();
axios.request({
url: "http://127.0.0.1:8002/pc-geetest/ajax_validate", // 进行二次验证
method: "post",
data: {
username: that.username,
password: that.pwd,
geetest_challenge: validate.geetest_challenge,
geetest_validate: validate.geetest_validate,
geetest_seccode: validate.geetest_seccode
}
}).then(function (data) {
console.log(data.data);
if (data && (data.data.status === "success")) {
alert("登录成功")
} else {
alert("登录失败")
}
})
});
console.log(that.$refs.popup);
that.$refs.popup.onclick = function () {
captchaobj.show();
};
// 将验证码加到id为captcha的元素里
captchaobj.appendto("#popup-captcha");
// 更多接口参考:http://www.geetest.com/install/sections/idx-client-sdk.html
});
})
}
})
</script>
</body>
</html>
(其他没做任何改动,同上)
好的,完事儿了。感兴趣的可以把极验给的三个验证码都由之前的jquery改成vue试试,哈哈
总结:
说白了还是那一套官方给你的案例,根据自己实际情况改来改去就行了,不过得看得懂极验给的demo才可以随意改动
如对本文有疑问,请在下面进行留言讨论,广大热心网友会与你互动!! 点击进行留言回复


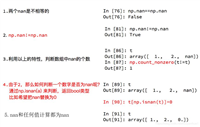
Python 实现将numpy中的nan和inf,nan替换成对应的均值
python爬虫把url链接编码成gbk2312格式过程解析


网友评论