欣欣卡盟,无字天书有声小说,神策数据
upyter notebook已经逐渐取代ide成为了多平台上写简单python脚本或应用的几家选择。
jupyter notebook可以通过pip/pip3安装:
pip3 install jupyter
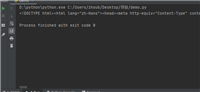
然后在目标文件夹目录下,输入指令jupyter notebook开启服务,可在浏览器地址localhost:8888中访问主页
允许远程访问
在本地,我们访问localhost:8888就能看到jupyter notebook的本地主页,但是在远程访问中,并不能直接这么做。因此需要以下一些操作:
1. 生成一个 notebook 配置文件
默认情况下,配置文件 ~/.jupyter/jupyter_notebook_config.py 并不存在,需要自行创建。使用下列命令生成配置文件:
jupyter notebook --generate-config
如果是 root 用户执行上面的命令,会发生一个问题:
running as root it not recommended.
use --allow-root to bypass.
提示信息很明显,root 用户执行时需要加上 –allow-root 选项。
jupyter notebook --generate-config --allow-config
执行成功后,会出现下面的信息:
writing default config to: /root/.jupyter/jupyter_notebook_config.py
2. 生成密码
从 jupyter notebook 5.0 版本开始,提供了一个命令来设置密码:jupyter notebook password,生成的密码存储在 jupyter_notebook_config.json。
$ jupyter notebook password
enter password: ****
verify password: ****
[notebookpasswordapp] wrote hashed password to /users/you/.jupyter/jupyter_notebook_confi
3. 远程访问
以上设置完以后就可以在服务器上启动 jupyter notebook,jupyter notebook, root 用户使用 jupyter notebook --allow-root。打开 ip:指定的端口(默认为8888), 输入密码就可以访问了。
若8888端口被占用,浏览器打开 ip:指定的端口(默认为8888) 应该访问不了,可以用如下方式启动 jupyter notebook
jupyter notebook --no-browser --port 6000 --ip=192.168.1.103
就是指定端口号和ip。通过这种方式在浏览器输入 ip:端口号,应该就能看到对应界面了。
总结
以上就是这篇文章的全部内容了,希望本文的内容对大家的学习或者工作具有一定的参考学习价值,谢谢大家对移动技术网的支持。如果你想了解更多相关内容请查看下面相关链接
如对本文有疑问,请在下面进行留言讨论,广大热心网友会与你互动!! 点击进行留言回复


Python 实现将numpy中的nan和inf,nan替换成对应的均值
python爬虫把url链接编码成gbk2312格式过程解析

网友评论