conime,公务员报名人数查询,lass.exe
lnmp是一套技术的组合,l=linux、n=nginx、m~=mysql、p~=php
首先nginx服务是不能处理动态请求,那么当用户发起动态请求时, nginx又是如何进行处理的。
当用户发起http请求,请求会被nginx处理,如果是静态资源请求nginx则直接返回,如果是动态请求nginx则通过fastcgi协议转交给后端的php程序处理,具体如下图所示


1.用户通过http协议发起请求,请求会先抵达lnmp架构中的nginx
2.nginx会根据用户的请求进行判断,这个判断是有location进行完成
3.判断用户请求的是静态页面,nginx直接进行处理
4.判断用户请求的是动态页面,nginx会将该请求交给fastcgi协议下发
5.fastgi会将请求交给php-fpm管理进程, php-fpm管理进程接收到后会调用具体的工作进程warrap
6.warrap进程会调用php程序进行解析,如果只是解析代码php直接返回
7.如果有查询数据库操作,则由php连接数据库(用户 密码 ip)发起查询的操作
8.最终数据由*mysql->php->php-fpm->fastcgi->nginx->http->user
注意:php和mysql建立连接,一定是开发建立连接
1.php想连接数据库,必须安装php-mysqlnd
2.php连接数据库,必须通过代码连接
[root@web01 ~]# vim /etc/yum.repos.d/nginx.repo
[nginx]
name=nginx repo
baseurl=http://nginx.org/packages/centos/7/$basearch/
gpgcheck=0
enabled=1
[root@web01 ~]# groupadd www -g 666
[root@web01 ~]# useradd www -u 666 -g 666 -s /sbin/nologin -m
[root@web01 ~]# yum install -y nginx
[root@web01 ~]# vim /etc/nginx/nginx.conf
user  www;
[root@web01 ~]# systemctl start nginx
[root@web01 ~]# systemctl enable nginx
http://10.0.0.7
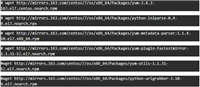
#卸载系统自带的php5.4
[root@web01 ~]# yum remove php-mysql-5.4 php php-fpm php-common

方法一:
#配置第三方源
[root@nginx ~]# vim /etc/yum.repos.d/php.repo
[php-webtatic]
name = php repository
baseurl = http://us-east.repo.webtatic.com/yum/el7/x86_64/
gpgcheck = 0

[root@web02 ~]# yum -y install php71w php71w-cli php71w-common php71w-devel php71w-embedded php71w-gd php71w-mcrypt php71w-mbstring php71w-pdo php71w-xml php71w-fpm php71w-mysqlnd php71w-opcache php71w-pecl-memcached php71w-pecl-redis php71w-pecl-mongodb
方法二:
#更改php源
yum install http://rpms.remirepo.net/enterprise/remi-release-7.rpm
#安装php
[root@nginx ~]# yum -y install php71-php php71-php-cli php71-php-common php71-php-devel php71-php-embedded php71-php-gd php71-php-mcrypt php71-php-mbstring php71-php-pdo php71-php-xml php71-php-fpm php71-php-mysqlnd php71-php-opcache php71-php-pecl-memcached php71-php-pecl-redis php71-php-pecl-mongodb
[root@web01 conf.d]# vim /etc/php-fpm.d/www.conf
user = www
group = www
[root@web01 conf.d]# systemctl start php-fpm
[root@web01 conf.d]# systemctl enable php-fpm
root@nginx ~]# cat /etc/nginx/conf.d/php.conf
server {
        listen 80;
        server_name php.driverzeng.com;
        root /code; #注意站点目录分类
        index index.php ;
        location ~ \.php$ {

                fastcgi_pass 127.0.0.1:9000;
                fastcgi_param script_filename $document_root$fastcgi_script_name;
                include   fastcgi_params ;
        }
}


#写index.php
[root@web02 wordpress]# vim index.php
<?php
        phpinfo();
?>
yum install -y mariadb-server
[root@web01 ~]# systemctl start mariadb
[root@web01 ~]# systemctl enable mariadb
站点目录下
<?php
    $servername = "localhost";
    $username = "root";
    $password = "zls123.com";

    // 创建连接
    $conn = mysqli_connect($servername, $username, $password);

    // 检测连接
    if (!$conn) {
        die("connection failed: " . mysqli_connect_error());
    }
    echo "小哥哥,php可以连接mysql...";
?>

<img style='width:100%;height:100%;' src=https://www.driverzeng.com/zenglaoshi/php_mysql.png>
[root@web01 ~]# mysqladmin -uroot password 'zls123.com'
[root@web01 ~]# mysql -uroot -pzls123.com
#查看有哪些数据库
mariadb [(none)]> show databases;
+--------------------+
| database           |
+--------------------+
| information_schema |
| mysql              |
| performance_schema |
| test               |
+--------------------+
#创建数据库
mariadb [(none)]> create database wordpress;
query ok, 1 row affected (0.00 sec)
------
#使用库
mariadb [(none)]> use wordpress;

#查看前缀
mariadb [wordpress]> show tables;
#退出
mariadb [wordpress]> \q 或者exit
[root@web02 code]# tar xf latest-zh_cn.tar.gz
[root@web02 code]# chown -r www.www /code/
注意:状态码413,报错,上传文件nginx下
解决方法
[root@web01 wordpress]# vim /etc/php.ini
/size修改尺寸 2处

[root@web01 wordpress]# vim /etc/nginx/conf.d/blog.drz.com.conf

server {
        listen 80;
        server_name blog.drz.com;
        root /code/wordpress;
        index index.php ;
        client_max_body_size 10m; #修改尺寸
        location ~ \.php$ {

                fastcgi_pass 127.0.0.1:9000;
                fastcgi_param script_filename $document_root$fastcgi_script_name;
                include fastcgi_params;
        }

}
能够解决
| 主机名称 | 应用环境 | 外网地址 | 内网地址 |
|---|---|---|---|
| web01 | nginx+php | 10.0.0.7 | 172.16.1.7 |
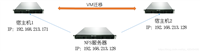
| db01 | mysql | 172.16.1.51 |
1)导出源数据库中的数据
[root@web02 ~]# mysqldump -uroot -pzls123.com -b wordpress > /tmp/wordpress.sql
2)将导出的数据,传到新数据库的服务器上(mariadb必须开启)
[root@web02 code]# scp /tmp/wordpress.sql 172.16.1.51:/tmp
3)在db01服务器上,安装数据库
[root@db01 ~]# yum install -y mariadb-server
4)启动数据库并加入开机自启
[root@db01 ~]# systemctl start mariadb
[root@db01 ~]# systemctl enable mariadb
5)设置mysql密码
[root@db01 ~]# mysqladmin -uroot -p password 'zls123.com'
6)将导出的数据,导入数据库内
[root@db01 ~]# mysql -uroot -pzls123.com < /tmp/wordpress.sql
7)连接数据库并查看
[root@db01 ~]# mysql -uroot -pzls123.com
mariadb [(none)]> show databases;
+--------------------+
| database           |
+--------------------+
| information_schema |
| mysql              |
| performance_schema |
| test               |
| wordpress          |
+--------------------+
#查看库中的表
mariadb [(none)]> show tables from wordpress;
+-----------------------+
| tables_in_wordpress   |
+-----------------------+
| wp_commentmeta        |
| wp_comments           |
| wp_links              |
| wp_options            |
| wp_postmeta           |
| wp_posts              |
| wp_term_relationships |
| wp_term_taxonomy      |
| wp_termmeta           |
| wp_terms              |
| wp_usermeta           |
| wp_users              |
+-----------------------+
8)停止旧的数据库
[root@web02 code]# systemctl stop mariadb
9)测试连接数据库
[root@web02 ~]# mysql -uroot -pzls123.com -h172.16.1.51
报错:
[root@web02 ~]# mysql -uroot -pzls123.com -h172.16.1.51
error 2003 (hy000): can't connect to mysql server on '172.16.1.51' (113)

#关闭防火墙
[root@db01 ~]# systemctl stop firewalld
[root@web02 ~]# mysql -uroot -pzls123.com -h172.16.1.51
error 1130 (hy000): host '172.16.1.8' is not allowed to connect to this mariadb server

#授权用户允许远程连接
mariadb [(none)]> grant all on wordpress.* to wp@'172.16.1.%' identified by 'zls123.com';#注意一一对应
10)创建远程连接mysql的用户
db01#授权用户允许远程连接
mariadb [(none)]> grant all on wordpress.* to wp@'172.16.1.%' identified by 'zls123.com';

mariadb [(none)]> select user,host from mysql.user;
+------+------------+
| user | host       |
+------+------------+
| root | 127.0.0.1  |
| wp   | 172.16.1.% |
| root | ::1        |
|      | db01       |
| root | db01       |
|      | localhost  |
| root | localhost  |
+------+------------+
11)编辑php代码连库文件
[root@web02 ~]# vim /code/wordpress/wp-config.php
// ** mysql 设置 - 具体信息来自您正在使用的主机 ** //
/** wordpress数据库的名称 */
define( 'db_name', 'wordpress' );

/** mysql数据库用户名 */
define( 'db_user', 'wp' );

/** mysql数据库密码 */
define( 'db_password', 'zls123.com' );

/** mysql主机 */
define( 'db_host', '172.16.1.51' );

方法二:zh的修改
[root@web01 zh]#  grep -r "zls123.com" ./*
system/config/database.php:  'password' => 'zls123.com',
[root@web01 zh]# vim /code/zh/system/config/database.php
'host' => '172.16.1.51',
'username' => 'zls',
'password' => 'zls123.com',
'dbname' => 'zh',
12)重启php
[root@web02 ~]# systemctl restart php-fpm
13)测试数据库连接
[root@web02 ~]# mysql -uwp -pzls123.com -h172.16.1.51
14)打开浏览器访问
优点
cd /解压目录下 [root@web02 nginx_php_mariadb]# yum install -y ./*.rpm
[root@web02 conf.d]# scp ./* 172.16.1.8:/etc/nginx/conf.d/
[root@web01 ~]# scp -r /code 172.16.1.8:/
[root@web01 ~]# groupadd www -g 666
[root@web01 ~]# useradd www -u 666 -g 666 -s /sbin/nologin -m
[root@web01 ~]# vim /etc/nginx/nginx.conf
[root@web01 ~]# vim /etc/php-fpm.d/www.conf
[root@web01 ~]# chown -r www.www /code/
[root@web01 ~]# systemctl start nginx php-fpm
[root@web01 ~]# systemctl enable nginx php-fpm
注意:1.白屏,没有将库导入到新库下,
2.建立连接时路径,一一对应,数据库改权限时
| 主机名称 | 应用环境 | 外网地址 | 内网地址 |
|---|---|---|---|
| web01 | nginx+php | 10.0.0.7 | 172.16.1.7 |
| web02 | nginx+php | 10.0.0.8 | 172.16.1.8 |
| nfs | nfs | 172.16.1.31 | |
| db01 | mysql | 172.16.1.51 |
[root@nfs ~]# yum install -y nfs-utils
[root@nfs ~]# vim /etc/exports
#wordpress静态资源共享目录
/data/wordpress 172.16.1.0/24(rw,sync,all_squash,anonuid=666,anongid=666)
#wecenter静态资源共享目录
/data/zh 172.16.1.0/24(rw,sync,all_squash,anonuid=666,anongid=666)
#edusoho静态资源共享目录
/data/edusoho 172.16.1.0/24(rw,sync,all_squash,anonuid=666,anongid=666)
[root@nfs ~]# systemctl start rpcbind nfs-server
[root@nfs ~]# systemctl enable rpcbind nfs-server
[root@nfs ~]# cat /var/lib/nfs/etab
/data/edusoho   172.16.1.0/24(rw,sync,wdelay,hide,nocrossmnt,secure,root_squash,all_squash,no_subtree_check,secure_locks,acl,no_pnfs,anonuid=666,anongid=666,sec=sys,rw,secure,root_squash,all_squash)
/data/zh    172.16.1.0/24(rw,sync,wdelay,hide,nocrossmnt,secure,root_squash,all_squash,no_subtree_check,secure_locks,acl,no_pnfs,anonuid=666,anongid=666,sec=sys,rw,secure,root_squash,all_squash)
/data/wordpress 172.16.1.0/24(rw,sync,wdelay,hide,nocrossmnt,secure,root_squash,all_squash,no_subtree_check,secure_locks,acl,no_pnfs,anonuid=666,anongid=666,sec=sys,rw,secure,root_squash,all_squash)
[root@nfs ~]# groupadd www -g 666
[root@nfs ~]# useradd  www -u 666 -g 666 -s /sbin/nologin -m
[root@nfs ~]# mkdir /data/{wordpress,edusoho,zh} -p
[root@nfs ~]# chown -r www.www /data/
[root@web01 ~]# yum install -y nfs-utils
[root@web02 ~]# yum install -y nfs-utils
[root@web01 ~]# showmount -e 172.16.1.31
export list for 172.16.1.31:
/data/edusoho   172.16.1.0/24
/data/zh        172.16.1.0/24
/data/wordpress 172.16.1.0/24

[root@web02 edusoho]# showmount -e 172.16.1.31
export list for 172.16.1.31:
/data/edusoho   172.16.1.0/24
/data/zh        172.16.1.0/24
/data/wordpress 172.16.1.0/24
[root@web01 ~]# scp -r /code/wordpress/wp-content/uploads/* 172.16.1.31:/data/wordpress
[root@web02 ~]# scp -r /code/wordpress/wp-content/uploads/* 172.16.1.31:/data/wordpress
[root@web01 ~]# mount -t nfs 172.16.1.31:/data/wordpress /code/wordpress/wp-content/uploads/
[root@web02 ~]# mount -t nfs 172.16.1.31:/data/wordpress /code/wordpress/wp-content/uploads/
将挂载信息加入开机自启
[root@web02 ~]# tail -1 /etc/fstab
172.16.1.31:/data/blog  /code/wordpress/wp-content/uploads nfs defaults 0 0
[root@web02 ~]# mount –a
[root@nfs ~]# chown -r www.www /data/
1)安装rsync
[root@backup ~]# yum install -y rsync
2)配置rsync
[root@backup ~]# vim /etc/rsyncd.conf
uid = www
gid = www
port = 873
fake super = yes
use chroot = no
max connections = 200
timeout = 600
ignore errors
read only = false
list = false
auth users = rsync_backup
secrets file = /etc/rsync.passwd
log file = /var/log/rsyncd.log
#####################################
[zls]
comment = welcome to oldboyedu backup!
path = /backup

[nfs]
comment = welcome to oldboyedu backup!
path = /data
3)创建系统用户(www),为了和web nfs统一
[root@backup ~]# groupadd www -g 666
[root@backup ~]# useradd www -u 666 -g 666 -s /sbin/nologin -m
4)创建虚拟的认证用户和密码文件并授权
[root@backup ~]# echo 'rsync_backup:123' > /etc/rsync.passwd #跟rsync配置文件保持一致
[root@backup ~]# chmod 600 /etc/rsync.passwd
5)创建目录
[root@backup ~]# mkdir  /data
[root@backup ~]# chown -r www.www  /data/
#检查
[root@backup ~]# ll -d  /data/
drwxr-xr-x 2 www www 6 aug  7 16:56 /backup/
drwxr-xr-x 2 www www 6 aug  7 16:56 /data/
6)启动rsync服务并加入开机自启
[root@backup ~]# systemctl start rsyncd
[root@backup ~]# systemctl enable rsyncd
[root@nfs ~]# yum install -y rsync inotify-tools
方法一:
[root@nfs ~]# echo '123' > /etc/rsync.pass #最好sersync后创建,跟配置文件保持一致
[root@nfs ~]# chmod 600 /etc/rsync.pass

#方式二(推荐):
[root@nfs ~]# export rsync_password=123
[root@web01 ~]# export rsync_password=123
[root@nfs ~]# rsync -avz /etc/passwd rsync_backup@172.16.1.41::nfs
#安装依赖
[root@nfs ~]# yum install -y rsync inotify-tools

[root@nfs ~]# wget https://raw.githubusercontent.com/wsgzao/sersync/master/sersync2.5.4_64bit_binary_stable_final.tar.gz
[root@nfs ~]# tar xf sersync2.5.4_64bit_binary_stable_final.tar.gz
[root@nfs ~]# mv gnu-linux-x86 /usr/local/sersync
[root@nfs ~]# vim /usr/local/sersync/confxml.xml
<?xml version="1.0" encoding="iso-8859-1"?>
<head version="2.5">
    <host hostip="localhost" port="8008"></host>
    <debug start="false"/>
    <filesystem xfs="false"/>
    <filter start="false">
    <exclude expression="(.*)\.svn"></exclude>
    <exclude expression="(.*)\.gz"></exclude>
    <exclude expression="^info/*"></exclude>
    <exclude expression="^static/*"></exclude>
    </filter>
    <inotify>
    <delete start="true"/>
    <createfolder start="true"/>
    <createfile start="true"/>
    <closewrite start="true"/>
    <movefrom start="true"/>
    <moveto start="true"/>
    <attrib start="true"/>
    <modify start="true"/>
    </inotify>

    <sersync>
    <localpath watch="/data">
        <remote ip="172.16.1.41" name="nfs"/>
        <!--<remote ip="192.168.8.39" name="tongbu"/>-->
        <!--<remote ip="192.168.8.40" name="tongbu"/>-->
    </localpath>
    <rsync>
        <commonparams params="-az"/>
        <auth start="true" users="rsync_backup" passwordfile="/etc/rsync.passwd"/>
        <userdefinedport start="false" port="874"/><!-- port=874 -->
        <timeout start="true" time="100"/><!-- timeout=100 -->
        <ssh start="false"/>
    </rsync>
    <faillog path="/tmp/rsync_fail_log.sh" timetoexecute="60"/><!--default every 60mins execute once-->
    <crontab start="false" schedule="600"><!--600mins-->
        <crontabfilter start="false">
        <exclude expression="*.php"></exclude>
        <exclude expression="info/*"></exclude>
        </crontabfilter>
    </crontab>
    <plugin start="false" name="command"/>
    </sersync>

    <plugin name="command">
    <param prefix="/bin/sh" suffix="" ignoreerror="true"/>  <!--prefix /opt/tongbu/mmm.sh suffix-->:
    <filter start="false">
        <include expression="(.*)\.php"/>
        <include expression="(.*)\.sh"/>
    </filter>
    </plugin>

    <plugin name="socket">
    <localpath watch="/opt/tongbu">
        <deshost ip="192.168.138.20" port="8009"/>
    </localpath>
    </plugin>
    <plugin name="refreshcdn">
    <localpath watch="/data0/htdocs/cms.xoyo.com/site/">
        <cdninfo domainname="ccms.chinacache.com" port="80" username="xxxx" passwd="xxxx"/>
        <sendurl base="http://pic.xoyo.com/cms"/>
        <regexurl regex="false" match="cms.xoyo.com/site([/a-za-z0-9]*).xoyo.com/images"/>
    </localpath>
    </plugin>
</head>
[root@nfs sersync]# echo '123' > /etc/rsync.passwd
[root@nfs sersync]# chmod 600 /etc/rsync.passwd
[root@nfs data]# /usr/local/sersync/sersync2 -rdo /usr/local/sersync/confxml.xml
server {
    listen 80;

    # [改] 网站的域名
    server_name www.xxxx.com;

    #301跳转可以在nginx中配置

    # 程序的安装路径
    root /code/edusoho/web;#注意路径

    # 日志路径
    access_log /var/log/nginx/example.com.access.log;
    error_log /var/log/nginx/example.com.error.log;

    location / {
        index app.php;
        try_files $uri @rewriteapp;
    }

    location @rewriteapp {
        rewrite ^(.*)$ /app.php/$1 last;
    }

    location ~ ^/udisk {
        internal;
        root /var/www/edusoho/app/data/;
    }

    location ~ ^/(app|app_dev)\.php(/|$) {
        fastcgi_pass   127.0.0.1:9000;
        fastcgi_split_path_info ^(.+\.php)(/.*)$;
        include fastcgi_params;
        fastcgi_param  script_filename    $document_root$fastcgi_script_name;
        fastcgi_param  https              off;
        fastcgi_param http_x-sendfile-type x-accel-redirect;
        fastcgi_param http_x-accel-mapping /udisk=/code/edusoho/app/data/udisk;
        fastcgi_buffer_size 128k;
        fastcgi_buffers 8 128k;
    }

    # 配置设置图片格式文件
    location ~* \.(jpg|jpeg|gif|png|ico|swf)$ {
        # 过期时间为3年
        expires 3y;

        # 关闭日志记录
        access_log off;

        # 关闭gzip压缩,减少cpu消耗,因为图片的压缩率不高。
        gzip off;
    }

    # 配置css/js文件
    location ~* \.(css|js)$ {
        access_log off;
        expires 3y;
    }

    # 禁止用户上传目录下所有.php文件的访问,提高安全性
    location ~ ^/files/.*\.(php|php5)$ {
        deny all;
    }

    # 以下配置允许运行.php的程序,方便于其他第三方系统的集成。
    location ~ \.php$ {
        # [改] 请根据实际php-fpm运行的方式修改
        fastcgi_pass   127.0.0.1:9000;
        fastcgi_split_path_info ^(.+\.php)(/.*)$;
        include fastcgi_params;
        fastcgi_param  script_filename    $document_root$fastcgi_script_name;
        fastcgi_param  https              off;
    }
}
如对本文有疑问,请在下面进行留言讨论,广大热心网友会与你互动!! 点击进行留言回复

网友评论