ellesse官网,木下あずみ,杨印海
1.tesserocr的使用
#从文件识别图像字符
in [7]: tesserocr.file_to_text('image.png')
out[7]: 'python3webspider\n\n'

#查看tesseract已安装的语言包
in [8]: tesserocr.get_languages()
out[8]: ('/usr/share/tesseract/tessdata/', ['eng'])

#从图片数据识别图像字符
in [9]: tesserocr.image_to_text(im)
out[9]: 'python3webspider\n\n'

#查看版本信息
in [10]: tesserocr.tesseract_version()
out[10]: 'tesseract 3.04.00\n leptonica-1.72\n libgif 4.1.6(?) : libjpeg 6b (libjpeg-turbo 1.2.90) : libpng 1.5.13 : libtiff 4.0.3 : zlib 1.2.7 : libwebp 0.3.0\n'
2.pytesseract使用
功能:
参数:
image_to_data(image, lang=none, config='', nice=0, output_type=output.string)
from pil import image
import pytesseract

#如果path中没有tesseract可执行文件,请指定tesseract路径
pytesseract.pytesseract.tesseract_cmd='c:\program files (x86)\tesseract-ocr\\tesseract.exe'

#打印识别的图像的字符串
print(pytesseract.image_to_string(image.open('test.png')))

#指定语言识别图像字符串,eng为英语
print(pytesseract.image_to_string(image.open('test-european.jpg'), lang='eng'))

#获取图像边界框
print(pytesseract.image_to_boxes(image.open('test.png')))

#获取包含边界框,置信度,行和页码的详细数据
print(pytesseract.image_to_data(image.open('test.png')))

#获取方向和脚本检测
print(pytesseract.image_to_osd(image.open('test.png'))
图像识别简单应用
一般图像处理验证,需要通过对图像进行灰度处理、二值化后增加图像文字的辨识度,下面是一个简单的对图像验证码识别处理,如遇到复杂点的图像验证码如中间带多条同等大小划线的验证码需要对文字进行乔正切割等操作,但它的识别度也只有百分之30左右,所以得另外想别的办法来绕过验证
from pil import image
import pytesseract

im = image.open('66.png')
#二值化图像传入图像和阈值
def erzhihua(image,threshold):
  ''':type image:image.image'''
  image=image.convert('l')
  table=[]
  for i in range(256):
    if i < threshold:
      table.append(0)
    else:
      table.append(1)
  return image.point(table,'1')
image=erzhihua(im,127)
image.show()
result=pytesseract.image_to_string(image,lang='eng')
print(result)
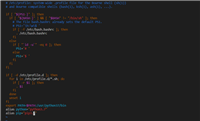
模拟自动识别验证码登陆:
#!/usr/bin/env python
# -*- coding: utf-8 -*-
# @time  : 2018/7/13 8:58
# @author : py.qi
# @file  : login.py
# @software: pycharm
from selenium import webdriver
from selenium.common.exceptions import timeoutexception,webdriverexception
from selenium.webdriver.common.by import by
from selenium.webdriver.common.keys import keys
from selenium.webdriver.support.ui import webdriverwait
from selenium.webdriver.support import expected_conditions as ec
from selenium.webdriver.remote.webelement import webelement
from io import bytesio
from pil import image
import pytesseract
import time

user='zhang'
password='123'
url='http://10.0.0.200'
driver=webdriver.chrome()
wait=webdriverwait(driver,10)

#识别验证码
def acker(content):
  im_erzhihua=erzhihua(content,127)
  result=pytesseract.image_to_string(im_erzhihua,lang='eng')
  return result

#验证码二值化
def erzhihua(image,threshold):
  ''':type image:image.image'''
  image=image.convert('l')
  table=[]
  for i in range(256):
    if i < threshold:
      table.append(0)
    else:
      table.append(1)
  return image.point(table,'1')

#自动登陆
def login():
  try:
    driver.get(url)
    #获取用户输入框
    input=wait.until(ec.presence_of_element_located((by.css_selector,'#loginname'))) #type:webelement
    input.clear()
    #发送用户名
    input.send_keys(user)
    #获取密码框
    inpass=wait.until(ec.presence_of_element_located((by.css_selector,'#password'))) #type:webelement
    inpass.clear()
    #发送密码
    inpass.send_keys(password)
    #获取验证输入框
    yanzheng=wait.until(ec.presence_of_element_located((by.css_selector,'#code'))) #type:webelement
    #获取验证码在画布中的位置
    codeimg=wait.until(ec.presence_of_element_located((by.css_selector,'#codeimg'))) #type:webelement
    image_location = codeimg.location
    #截取页面图像并截取掩码码区域图像
    image=driver.get_screenshot_as_png()
    im=image.open(bytesio(image))
    imag_code=im.crop((image_location['x'],image_location['y'],488,473))
    #输入验证码并登陆
    yanzheng.clear()
    yanzheng.send_keys(acker(imag_code))
    time.sleep(2)
    yanzheng.send_keys(keys.enter)
  except timeoutexception as e:
    print('timeout:',e)
  except webdriverexception as e:
    print('webdriver error:',e)
if __name__ == '__main__':
  login()
以上就是本文的全部内容,希望对大家的学习有所帮助,也希望大家多多支持移动技术网。
如对本文有疑问,请在下面进行留言讨论,广大热心网友会与你互动!! 点击进行留言回复


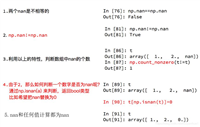
Python 实现将numpy中的nan和inf,nan替换成对应的均值
python爬虫把url链接编码成gbk2312格式过程解析
网友评论