夏川真凉,邪恶动态图xxoo,整容天后电影完整版
你是不是羡慕java springboot里功能强大的@注解功能,spring boot倡导是一种开箱即用、方便快捷、约定优于配置的开发流程,虽然现在.net core也往相同的方向走,但在使用上总有点别扭,目前市面上貌似还没有轻量级的真正意义上的开箱即用的基于.net core的框架。
想想多年前自己开发基于配置的devfx开发框架,因为需要配置,造成开发人员苦不堪言,而且还容易配置错误,导致各种奇怪的错误;于是便有全新重写devfx框架的想法,经过n个月的奋战,终于可以放出来用了。
框架不求功能全面,只求使用方便、灵活。
目前框架提供基于attribute的ioc di容器,完全可以面向接口编程了;提供轻量级的业务参数配置方案,未来计划作为集中配置的基础;提供极简但不失灵活的数据访问框架,类似mybatis基于sql的数据访问;还有基于http/json的远程调用方案(以优雅的本地调用方式来远程调用);主要是以上几个功能。
框架是基于.net standard 2.0开发,理论上.net framework 4.6.1也能使用,因为框架已完全重新重写了,命名空间啥的都有改变,所以不兼容之前的版本,目前版本是5.0.2。
ok,show me the code。下面让我们来快速入门,看看怎么个开箱即用。
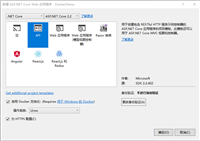
打开vs2019,建立基于.net core 2.2或3.0的控制台项目consoleapp1,下面的例子是基于.net core 3.0的。使用nuget安装devfx 5.0.2版本

上图,忽略devfx.*,这是老旧版本,目前基于.net standard只有一个包,就是devfx
创建业务逻辑接口和实现类
using devfx;

namespace consoleapp1
{
    //业务逻辑接口,[service]特性告诉devfx这个接口需要被di
    [service]
    public interface imyservice
    {
        string getusername(string userid);
    }
}
using devfx;
using system;

namespace consoleapp1
{
    //业务逻辑实现类,[object]特性告诉devfx这个类需要放入到ioc容器里,devfx会扫描这个类实现了哪些接口,并做映射
    [object]
    internal class myservice : imyservice
    {
        public string getusername(string userid) {
            return $"{userid}_{datetime.now.ticks}";
        }
    }
}
开始调用逻辑
using devfx;
using system;

namespace consoleapp1
{
    class program
    {
        static void main(string[] args) {
            //控制台程序需要显式调用框架的初始化方法
            //asp.net core(通用主机)可以使用usedevfx扩展方法来初始化框架
            objectservice.init();
            //获取接口实现类的实例
            var myservice = objectservice.getobject<imyservice>();
            console.writeline(myservice.getusername("iamdevfx"));
            //还能直接获取myservice类的实例
            var myservice1 = objectservice.getobject<myservice>();
            //2种方式获取的实例是同一个
            console.writeline($" myservice={myservice.gethashcode()}{environment.newline}myservice1={myservice1.gethashcode()}");
        }
    }
}
运行下:

是不是很简单?开箱即用!
接下介绍下自动装配的例子
我们建立另外一个业务逻辑接口和相应的实现类,同样分别标上[service]和[object]
using devfx;

namespace consoleapp1
{
    [service]
    public interface ibizservice
    {
        string getuserdisplayname(string userid);
    }

    [object]
    internal class bizservice : ibizservice
    {
        public string getuserdisplayname(string userid) {
            return "iambizservice";
        }
    }
}
改下之前的业务类myservice
using devfx;
using system;

namespace consoleapp1
{
    //业务逻辑实现类,[object]特性告诉devfx这个类需要放入到ioc容器里,devfx会扫描这个类实现了哪些接口,并做映射
    [object]
    internal class myservice : imyservice
    {
        //自动装配(注入)
        [autowired]
        protected ibizservice bizservice { get; set; }

        public string getusername(string userid) {
            return $"{userid}_{datetime.now.ticks}_{this.bizservice.getuserdisplayname(userid)}";
        }
    }
}
运行下:

接下来介绍下基于xml的配置,可能有些同学会问,.net core不是自带配置了么?别急,看下我们的使用方式你就清楚谁便捷了。
业务参数指的比如微信的api接口地址、appid等程序里需要使用的,或者一些开关之类的参数
首先定义需要承载业务参数的接口
using devfx.configuration;

namespace consoleapp1
{
    //定义需要承载业务参数的接口,[settingobject("~/myservice/weixin")]告诉框架这是一个配置承载对象
    //    其中~/myservice/weixin为配置在配置文件里的路径
    [settingobject("~/myservice/weixin")]
    public interface iweixinsetting
    {
        string apiurl { get; }
        string appid { get; }
        string appkey { get; }
    }
}
使用自动装配特性,装配到业务逻辑里,我们修改下myservice类
using devfx;
using system;

namespace consoleapp1
{
    //业务逻辑实现类,[object]特性告诉devfx这个类需要放入到ioc容器里,devfx会扫描这个类实现了哪些接口,并做映射
    [object]
    internal class myservice : imyservice
    {
        //自动装配(注入)
        [autowired]
        protected ibizservice bizservice { get; set; }
        //配置自动注入
        [autowired]
        protected iweixinsetting weixinsetting { get; set; }

        public string getusername(string userid) {
            return $"{userid}_{datetime.now.ticks}_{this.bizservice.getuserdisplayname(userid)}_weixin={this.weixinsetting.apiurl}";
        }
    }
}
在项目里添加app.config,并设置为有更新就输出

app.config内容如下:
<?xml version="1.0" encoding="utf-8" ?>
<configuration>
    <devfx>
        <myservice>
            <weixin apiurl="https://api.weixin.qq.com/sns/oauth2/access_token"
                    appid="1234567890" appkey="0123456789" />
        </myservice>
    </devfx>
</configuration>
运行下:

最后介绍下类似mybatis的数据访问是如何开箱即用的,因为涉及到数据库,稍微复杂些,但还是很方便的。
我们以操作mysql为例,首先需要使用nuget安装mysql驱动包,目前框架默认使用社区版的mysql驱动:mysqlconnector

定义我们的数据访问层接口
using consoleapp1.models;
using devfx;
using devfx.data;

namespace consoleapp1.data
{
    //定义数据操作接口,[dataservice]告诉框架这是一个数据操作接口
    [dataservice(groupname = "myservice")]
    public interface imydataservice : isessiondataservice
    {
        eventmessage geteventmessagebyid(string id);
    }
}
在项目中,添加一个.sqlconfig文件,用来编写对应的sql语句,并把这个文件按嵌入资源形式设置

sqlconfig内容如下:
<?xml version="1.0" encoding="utf-8" ?>
<configuration>
    <devfx>
        <data>
            <statements name="myservice">
                <add name="geteventmessagebyid">
                    <sql>
                        <![cdata[select * from eventmessages where messageguid = @id]]>
                    </sql>
                </add>
            </statements>
        </data>
    </devfx>
</configuration>
相信聪明的你能看出对应关系
然后就是在app.config里配置链接字符串,如下
<?xml version="1.0" encoding="utf-8" ?>
<configuration>
    <devfx>
        <data debug="true">
            <connectionstrings>
                <add name="eventmessageconnection" connectionstring="database=eventmessages;data source=数据库ip;user id=数据库用户;password=密码;character set=utf8" providername="system.data.mysqlclient" />
            </connectionstrings>
            <datastorages defaultstorage="eventmessagestorage">
                <add name="eventmessagestorage" connectionname="eventmessageconnection" type="mysql" />
            </datastorages>
        </data>

        <myservice>
            <weixin apiurl="https://api.weixin.qq.com/sns/oauth2/access_token"
                    appid="1234567890" appkey="0123456789" />
        </myservice>
    </devfx>
</configuration>
调整下我们myserivce类
using consoleapp1.data;
using devfx;
using system;

namespace consoleapp1
{
    //业务逻辑实现类,[object]特性告诉devfx这个类需要放入到ioc容器里,devfx会扫描这个类实现了哪些接口,并做映射
    [object]
    internal class myservice : imyservice
    {
        //自动装配(注入)
        [autowired]
        protected ibizservice bizservice { get; set; }
        //配置自动注入
        [autowired]
        protected iweixinsetting weixinsetting { get; set; }
        //数据访问接口自动注入
        [autowired]
        protected imydataservice mydataservice { get; set; }

        public string getusername(string userid) {
            var msg = this.mydataservice.geteventmessagebyid("0000e69f407a4b69bbf3866a499a2eb6");
            var str = $"eventmessage:{msg.messageguid}_{msg.category}_{msg.priority}_{msg.createdtime}";
            return $"{userid}_{datetime.now.ticks}_{this.bizservice.getuserdisplayname(userid)}_weixin={this.weixinsetting.apiurl}{environment.newline}{str}";
        }
    }
}
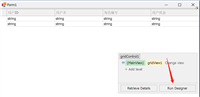
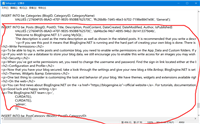
运行下:

当然数据访问不仅仅是查询,还应该有crud、分页以及事务才完整,这些后续会详细展开。
ok,上面就是这些核心功能的展示,另外框架还支持自定义attribute的处理方便自行扩展。
后续会比较详细介绍实现原理以及对框架的拓展,比如服务注册发现、配置中心等等。
有兴趣的同学可以一起共同讨论维护,项目开源地址在:
码字不容易啊,感兴趣的可以去star下。
示例代码在此:https://files.cnblogs.com/files/r2/consoleapp1.zip
如对本文有疑问,请在下面进行留言讨论,广大热心网友会与你互动!! 点击进行留言回复


asp.net搭建博客,使用BlogEngine.NET+MySql搭建博客
网友评论