电玩恶魔魔幻红蝎星1,鸭王粤语,出售宠物
最近公司有个新的需求,写了一个接口,想要把服务暴露出去,但是这个服务所在的进程是非web项目,(可以理解成schedule/batch等进程项目),所以没有tomcat等容器,而且只有这一个服务,无论是加dubbo服务还是加tomcat等容器都显得复杂了。那么应该如何将服务暴露出去?
经过网上搜索后,最终解决问题,记录在此。
为了快速搭建,使用springboot来搭建项目:
项目结构如图:

首先需要创建一个接口,服务的提供者和服务的调用方都依赖这个模块。
package com.xiazhi.spring.service.api;

import com.sun.istack.internal.notnull;
import com.sun.istack.internal.nullable;

/**
 * @author 赵帅
 * @date 2020/6/8
 */
public interface iuserservice {

  /**
   * 获取姓名
   * @return 姓名
   */
  string getname();

  /**
   * 根据姓名获取年龄
   * @param name 姓名
   * @return 年龄
   */
  @notnull
  integer getage(@nullable string name);
}
然后在service模块中,实现接口作为服务的提供方,需要依赖的jar包有:
<dependencies>
    <dependency>
      <groupid>com.xiazhi</groupid>
      <artifactid>spring-service-api</artifactid>
      <version>${project.version}</version>
    </dependency>

    <dependency>
      <groupid>org.springframework.boot</groupid>
      <artifactid>spring-boot-starter-web</artifactid>
      <exclusions>
        <exclusion>
          <groupid>org.springframework.boot</groupid>
          <artifactid>spring-boot-starter-tomcat</artifactid>
        </exclusion>
      </exclusions>
    </dependency>

    <dependency>
      <groupid>javax.servlet</groupid>
      <artifactid>servlet-api</artifactid>
      <version>2.5</version>
    </dependency>
  </dependencies>
配置文件需要加上:
spring.main.web-application-type=none
实现接口:
package com.xiazhi.spring.service.impl;

import com.sun.istack.internal.notnull;
import com.sun.istack.internal.nullable;
import com.xiazhi.spring.service.api.iuserservice;
import org.springframework.stereotype.service;

/**
 * @author 赵帅
 * @date 2020/6/8
 */
@service
public class userserviceimpl implements iuserservice {

  @override
  public string getname() {
    return "张一";
  }

  @override
  @notnull
  public integer getage(@nullable string name) {
    if ("".equals(name)) {
      return 10;
    }
    return 18;
  }
}
暴露服务:
package com.xiazhi.spring.service.config;

import com.sun.net.httpserver.httphandler;
import com.xiazhi.spring.service.api.iuserservice;
import org.springframework.context.annotation.bean;
import org.springframework.context.annotation.configuration;
import org.springframework.core.task.taskexecutor;
import org.springframework.remoting.httpinvoker.simplehttpinvokerserviceexporter;
import org.springframework.remoting.support.simplehttpserverfactorybean;

import java.util.hashmap;
import java.util.map;

/**
 * @author 赵帅
 * @date 2020/6/8
 */
@configuration
public class httpinvokerconfiguration {

  private final iuserservice userservice;
  private final taskexecutor taskexecutor;

  public httpinvokerconfiguration(iuserservice userservice, taskexecutor taskexecutor) {
    this.userservice = userservice;
    this.taskexecutor = taskexecutor;
  }

  /**
   * 将iuserservice服务暴露出去
   */
  @bean
  public simplehttpinvokerserviceexporter serviceexporter() {
    simplehttpinvokerserviceexporter exporter = new simplehttpinvokerserviceexporter();
    exporter.setservice(userservice);
    exporter.setserviceinterface(iuserservice.class);
    return exporter;
  }

  /**
   * 为暴露的服务启用http服务
   * @return httpserver工厂类
   */
  @bean
  public simplehttpserverfactorybean serverfactorybean() {
    simplehttpserverfactorybean factorybean = new simplehttpserverfactorybean();
    map<string, httphandler> map = new hashmap<>(2);
    factorybean.setcontexts(map);
    factorybean.setport(9999);
    factorybean.setexecutor(taskexecutor);
    return factorybean;
  }
}
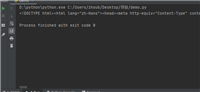
启动服务。
然后是服务的调用方,依赖有:
<dependencies>
    <dependency>
      <groupid>com.xiazhi</groupid>
      <artifactid>spring-service-api</artifactid>
      <version>${project.version}</version>
    </dependency>
    <dependency>
      <groupid>org.springframework.boot</groupid>
      <artifactid>spring-boot-starter-web</artifactid>
    </dependency>
  </dependencies>
配置文件:
package com.xiazhi.spring.config;

import com.xiazhi.spring.service.api.iuserservice;
import org.springframework.context.annotation.bean;
import org.springframework.context.annotation.configuration;
import org.springframework.remoting.httpinvoker.httpinvokerproxyfactorybean;

/**
 * @author 赵帅
 * @date 2020/6/8
 */
@configuration
public class httpserviceconfiguration {

  /**
   * 使用http代理工厂调用服务
   * @return http代理工厂创建代理对象
   */
  @bean
  public httpinvokerproxyfactorybean httpinvokerproxyfactorybean() {
    httpinvokerproxyfactorybean factorybean = new httpinvokerproxyfactorybean();
    factorybean.setserviceurl("http://localhost:9999/userservice");
    factorybean.setserviceinterface(iuserservice.class);
    return factorybean;
  }
}
使用接口,调用方法:
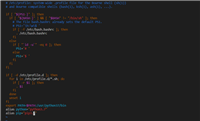
package com.xiazhi.spring.controller;

import com.xiazhi.spring.service.api.iuserservice;
import org.springframework.web.bind.annotation.getmapping;
import org.springframework.web.bind.annotation.restcontroller;

/**
 * @author 赵帅
 * @date 2020/6/8
 */
@restcontroller
public class usercontroller {

  private final iuserservice userservice;

  public usercontroller(iuserservice userservice) {
    this.userservice = userservice;
  }

  @getmapping("/test")
  public string test() {
    string name = userservice.getname();
    integer age = userservice.getage(null);
    system.out.println(string.format("姓名:[%s],age:[%s]", name, age));
    return name;
  }
}
运行,调用test路径测试调用结果。
项目完整结构:

以上就是本文的全部内容,希望对大家的学习有所帮助,也希望大家多多支持移动技术网。
如对本文有疑问,请在下面进行留言讨论,广大热心网友会与你互动!! 点击进行留言回复


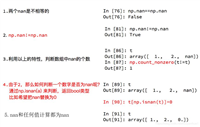
Python 实现将numpy中的nan和inf,nan替换成对应的均值

python爬虫把url链接编码成gbk2312格式过程解析

网友评论