
有时,数据科学家必须仔细查看这些细节才能提高性能。在这种情况下,最好自己亲手构建此类模型,这可以帮助你最大程度地控制网络。因此在本文中,我们将仅使用 NumPy 尝试创建 CNN。我们会创建三个层,即卷积层(简称 conv)、ReLU 层和最大池化层。所涉及的主要步骤如下:


滤波器组的大小由上述 0 数组指定,但不是由滤波器的实际值指定。可以按如下方式覆写这些值,以检测垂直和水平边缘。

3. 卷积层
在准备好滤波器之后,下一步就是用它们对输入图像执行卷积操作。下面一行使用 conv 函数对图像执行卷积操作:
1. l1_feature_map = conv(img, l1_filter)
此类函数只接受两个参数,即图像和滤波器组,实现如下:
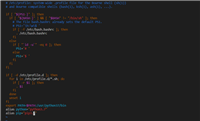
1. def conv(img, conv_filter): 2. if len(img.shape) > 2 or len(conv_filter.shape) > 3: # Check if number of image channels matches the filter depth. 3. if img.shape[-1] != conv_filter.shape[-1]: 4. print("Error: Number of channels in both image and filter must match.") 5. sys.exit() 6. if conv_filter.shape[1] != conv_filter.shape[2]: # Check if filter dimensions are equal. 7. print('Error: Filter must be a square matrix. I.e. number of rows and columns must match.') 8. sys.exit() 9. if conv_filter.shape[1]%2==0: # Check if filter diemnsions are odd. 10. print('Error: Filter must have an odd size. I.e. number of rows and columns must be odd.') 11. sys.exit() 12. 13. # An empty feature map to hold the output of convolving the filter(s) with the image. 14. feature_maps = numpy.zeros((img.shape[0]-conv_filter.shape[1]+1, 15. img.shape[1]-conv_filter.shape[1]+1, 16. conv_filter.shape[0])) 17. 18. # Convolving the image by the filter(s). 19. for filter_num in range(conv_filter.shape[0]): 20. print("Filter ", filter_num + 1) 21. curr_filter = conv_filter[filter_num, :] # getting a filter from the bank. 22. """ 23. Checking if there are mutliple channels for the single filter. 24. If so, then each channel will convolve the image. 25. The result of all convolutions are summed to return a single feature map. 26. """ 27. if len(curr_filter.shape) > 2: 28. conv_map = conv_(img[:, :, 0], curr_filter[:, :, 0]) # Array holding the sum of all feature maps. 29. for ch_num in range(1, curr_filter.shape[-1]): # Convolving each channel with the image and summing the results. 30. conv_map = conv_map + conv_(img[:, :, ch_num], 31. curr_filter[:, :, ch_num]) 32. else: # There is just a single channel in the filter. 33. conv_map = conv_(img, curr_filter) 34. feature_maps[:, :, filter_num] = conv_map # Holding feature map with the current filter. 35. return feature_maps # Returning all feature maps.
该函数首先确保每个滤波器的深度等于图像通道的数量。在下面的代码中,外部的 if 语句将检查通道和滤波器是否有深度。如果有,则内部 if 语句检查它们是否相等,如果不匹配,脚本将退出。

特征图大小将与上述代码中的(img_rows-filter_rows+1, image_columns-filter_columns+1, num_filters)值相等。请注意,滤波器组中的每个滤波器都有一个输出特征图。因此将滤波器组(conv_filter.shape[0])中的滤波器数量将指定为第三个参数。

如果要卷积的图像通道数大于 1,则滤波器深度必须与通道数量相等。在这种情况下,卷积是通过将每个图像通道与其在滤波器中对应的通道进行卷积来完成的。最后的结果加起来就是输出特征图。如果图像只有一个通道,则卷积将非常容易。此类行为由 if-else 块决定:

它在图像上迭代,并根据以下代码提取与滤波器大小相等的区域:
1. curr_region = img[r:r+filter_size, c:c+filter_size]
然后,它在区域和滤波器之间应用逐元素乘法,并根据以下代码对它们求和,以获取单个值作为输出:
1. #Element-wise multipliplication between the current region and the filter. 2. curr_result = curr_region * conv_filter
3. conv_sum = numpy.sum(curr_result) #Summing the result of multiplication. 4. result[r, c] = conv_sum #Saving the summation in the convolution layer feature map.
在滤波器对输入图像执行卷积操作之后,特征图由 conv 函数返回。下图为此类卷积层返回的特征图。

卷积层的输出将被应用到 ReLU 层。
4. ReLU 层
ReLU 层对卷积层返回的每个特征图应用 ReLU 激活函数。根据以下代码使用 relu 函数使用它:

这很简单。只要循环地将 ReLU 函数应用于特征图中的每个元素,并在特征图中的原始值大于 0 时将其返回。其他情况下返回 0。ReLU 层的输出如下图所示。

ReLU 层的输出将馈送到最大池化层。
5. 最大池化层
最大池化层接受 ReLU 层的输出,并根据以下代码应用最大池化操作:
1. l1_feature_map_relu_pool = pooling(l1_feature_map_relu, 2, 2)
最大池化层使用 pooling 函数实现,如下所示:

该函数接受三个输入,即 ReLU 层的输出、池化掩码大小和步长。它只需创建一个空数组,如前所述,用于保存此类层的输出。此类数组的大小是根据大小和步长参数指定的,如以下代码所示:
1. pool_out = numpy.zeros((numpy.uint16((feature_map.shape[0]-size+1)/stride),
2. numpy.uint16((feature_map.shape[1]-size+1)/stride),
3. feature_map.shape[-1]))
然后,它会根据循环变量 map_num 和外部循环一个一个通道地处理图像。最大池操作将应用于输入中的每个通道。根据所使用的步长和大小裁剪区域,根据以下代码在输出数组中返回最大值:
pool_out[r2, c2, map_num] = numpy.max(feature_map[r:r+size, c:c+size])
这种池化层的输出如下图所示。请注意,池化层输出要小于其输入,即使它们在图形中看起来大小相同。

6. 层级的堆叠
至此,具有卷积、ReLU 和最大池化层的 CNN 体系架构已经完成。除了前面提到的层以外,还可以堆叠其它层来加深网络。

前一卷积层使用 3 个滤波器,其值随机生成。因此,这种卷积层会带来 3 个特征图。后面的 ReLU 层和池化层也是如此,这些层的输出如下所示:

1. # Third conv layer
2. l3_filter = numpy.random.rand(1, 7, 7, l2_feature_map_relu_pool.shape[-1])
3. print("\n**Working with conv layer 3**")
4. l3_feature_map = conv(l2_feature_map_relu_pool, l3_filter)
5. print("\n**ReLU**")
6. l3_feature_map_relu = relu(l3_feature_map)
7. print("\n**Pooling**")
8. l3_feature_map_relu_pool = pooling(l3_feature_map_relu, 2, 2)
9. print("**End of conv layer 3**\n")
下图显示了前几层的输出。前一卷积层仅使用一个滤波器,因此只有一个特征图作为输出。

但是请记住,前面每一层的输出是下一层的输入,例如以下代码接受先前的输出作为它们的输入。

欢迎关注我的博客或者公众号:https://home.cnblogs.com/u/Python1234/ Python学习交流


网友评论