男佣的幸福生活,回到商末之从奴隶到将军,四川商务职业学院教务管理系统
参考文档:
|
hostname |
ip |
service |
remark |
|
gitlab |
172.30.200.55 |
gitlab 11.1.2 |
ps:disable selinux; remove firewalld, instead of iptables; configure ntp; aliyun repo; update openssl and so on. |
|
gitlab-runner |
172.30.200.56 |
gitlab-runner 11.1.0 docker 1.12.6 |
# gitlab通过nginx对外提供portal服务,提前打开默认的tcp80与443端口;
# gitlan-runner主机的iptables可暂不处理
[root@gitlab ~]# vim /etc/sysconfig/iptables
-a input -p tcp -m state --state new -m tcp --dport 80 -j accept
-a input -p tcp -m state --state new -m tcp --dport 443 -j accept

[root@gitlab ~]# service iptables restart
基于https通信,验证环境采用自签名的ca证书,以下操作在ca服务器上操作。
# 主要设置部分默认选项,生成csr请求文件时可避免收工输入;
# 涉及[ req_distinguished_name ] section,修改/新增部分用红色字体标识
[root@gitlab ~]# vim /etc/pki/tls/openssl.cnf
[ req_distinguished_name ]
countryname                     = country name (2 letter code)
countryname_default             = cn
countryname_min                 = 2
countryname_max                 = 2

stateorprovincename             = state or province name (full name)
stateorprovincename_default     = sichuan

localityname                    = locality name (eg, city)
localityname_default            = chengdu

0.organizationname              = organization name (eg, company)
0.organizationname_default      = netonline

# we can do this but it is not needed normally :-)
#1.organizationname             = second organization name (eg, company)
#1.organizationname_default     = world wide web pty ltd

organizationalunitname          = organizational unit name (eg, section)
organizationalunitname_default  = cloud-team

commonname                      = common name (eg, your name or your server\'s hostname)
commonname_max                  = 64
# 新增,可对*.netonline.com进行签名;default为不设置,可对所有域名签名
commonname_default              = *.netonline.com

emailaddress                    = email address
emailaddress_max                = 64

# set-ex3                       = set extension number
# 对服务器证书进行签名时需要初始文件;
# 默认需要创建在/etc/pki/ca/目录下
[root@gitlab ~]# touch /etc/pki/ca/index.txt /etc/pki/ca/serial
[root@gitlab ~]# echo "01" >> /etc/pki/ca/serial
# ca根秘钥,.key文件(或xx-key.pem)
[root@gitlab ~]# openssl genrsa -out /etc/pki/ca/private/ca.key 2048

# ca根证书请求,.csr文件;
# 在openssl.cnf中已有默认配置,一路回车即可,这里暂不设置email与证书请求密码
[root@gitlab ~]# openssl req -new -key /etc/pki/ca/private/ca.key -out /etc/pki/ca/private/ca.csr

# ca根证书,.crt文件(或xx-crt.pem);
# -days 3650:设置根证书有效时间,单位:day
# 生成根证书与根证书请求文件可合并执行,如:openssl req -new -x509 -key /path/to/ca.key -out /path/to/ca.crt
[root@gitlab ~]# openssl req -x509 -days 3650 -in /etc/pki/ca/private/ca.csr -key /etc/pki/ca/private/ca.key -out /etc/pki/ca/private/ca.crt
(1). 自签名的根证书需要导入至本地客户端(firefox 57.0.2):工具-->选项-->隐私与安全-->证书-->查看证书-->证书机构-->导入,如下:

(2). 导入生成的自签名根证书,如下:

(3). 信任根证书认证机构(选项后期可调整,这里先全选),如下:

(4). 自签名的根证书安装完成后,可查看(根据"organization name"排序),如下:

# server端秘钥(.key或.pem)与证书需要放置在web服务器特性位置,这里暂放在/root/ssl/目录
[root@gitlab ~]# mkdir -p /root/ssl
[root@gitlab ~]# openssl genrsa -out /root/ssl/gitlab.netonline.com.key 2048

# common name:匹配web服务器的ip/domain/hostname等,因ca根证书已经确定了后缀,这里后缀需要保持一致
[root@gitlab ~]# openssl req -new -key /root/ssl/gitlab.netonline.com.key -out /root/ssl/gitlab.netonline.com.csr

# 采用ca根证书签名,生成server端证书(.crt或.pem);
# 签署证书时会校验/etc/pki/tls/openssl.cnf文件中[ policy_match ]定义的匹配项,如有强制匹配或必填项不符合要求,会有相应报错
[root@gitlab ~]# openssl ca -in /root/ssl/gitlab.netonline.com.csr -out /root/ssl/gitlab.netonline.com.crt -cert /etc/pki/ca/private/ca.crt -keyfile /etc/pki/ca/private/ca.key

# 使用国内镜像源,安装gitlab-ce版本
[root@gitlab ~]# vim /etc/yum.repos.d/gitlab-ce.repo
[gitlab-ce]
name=gitlab ce repository
baseurl=https://mirrors.tuna.tsinghua.edu.cn/gitlab-ce/yum/el$releasever/
gpgcheck=0
enabled=1
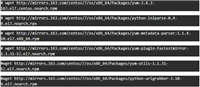
[root@gitlab ~]# yum makecache
[root@gitlab ~]# yum install gitlab-ce -y
# 以下只列出配置文件的修改部分(附参数所在行数)
[root@gitlab ~]# vim /etc/gitlab/gitlab.rb
# gitlab默认不采用https
13 external_url 'https://gitlab.netonline.com'

# 默认情况下,启用https后,服务器不在监听tcp80端口
903 nginx['redirect_http_to_https'] = true

# 如果采用https,默认从/etc/gitlab/ssl/目录下加载服务器证书与秘钥;
# 注意将生成服务器证书与秘钥复制或移动到相应目录;
# 后期如果只是变更证书,但gitlab.rb文件未变更,命令”gitlab-ctl reconfigure”对已启动的gitlab-nginx服务无效,可采用命令”gitlab-ctl hup nginx”使gitlab-nginx重载证书
915 nginx['ssl_certificate'] = "/etc/gitlab/ssl/gitlab.netonline.com.crt"
916 nginx['ssl_certificate_key'] = "/etc/gitlab/ssl/gitlab.netonline.com.key"
[root@gitlab ~]# mkdir -p /etc/gitlab/ssl
[root@gitlab ~]# cp /root/ssl/gitlab.netonline.com.crt /etc/gitlab/ssl/
[root@gitlab ~]# cp /root/ssl/gitlab.netonline.com.key /etc/gitlab/ssl/
# 通过yum一键安装的gitlab,gitlab.rb配置完成后,通过命令”gitlab-ctl reconfigure”,各组件按既定组合方式完成配置并启动服务
[root@gitlab ~]# gitlab-ctl reconfigure

# 监听端口
[root@gitlab ~]# netstat -tunlp

通过本地客户端访问gitlab web服务(提前绑定hosts):
(1). 首次登陆,账号root,密码重新配置;

(2). 网站已被自签名的ca证书机构验证,网址前端显示为安全连接;

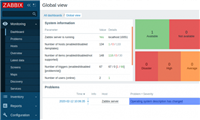
(3). 使用root账号与刚确定的密码登陆gitlab首页,如下:

流程同github,以下做简单演示。
# 在本地生成ssh keys;
# -c: -c comment,可选项,这里采用gitlab默认地址(账号-->settings-->emails);
# 生成的id_rsa与id_rsa.pub默认在~/.ssh目录
[root@gitlab-runner ~]# ssh-keygen -t rsa -c admin@example.com

登陆gitlab,账号-->settings-->ssh keys,在"key"对话框中粘帖~/.ssh/id_rsa.pub的内容,"add key"即可(title部分自动补全),如下:

同github,登陆gitlab首页,点击"create a proiect",填写"project name",设置"visibility level","initialize repository with a readme"项可选,点击"create project"即可,如下:

# 建立本地repository目录
[root@gitlab-runner ~]# mkdir -p ~/gitlab
[root@gitlab-runner ~]# cd ~/gitlab/

# 必须在本地repository目录中初始化,初始化后再目录中生成.git目录,跟踪管理版本信息等
[root@gitlab-runner gitlab]# git init

# 配置全局访问参数,默认配置的全局参数在~/.gitconfig文件中记录
[root@gitlab-runner gitlab]# git config --global user.email "admin@example.com"
[root@gitlab-runner gitlab]# git config --global user.name "root"

# 关联远程repository(关联不同于连接),注意:关联并非连接;
# origin是默认的远程repository名字;
# 远程repository地址从gitlab的具体project页获取
[root@gitlab-runner gitlab]# git remote add origin git@gitlab.netonline.com:root/gitlab.git

# 版本合并,远程本地master分支版本归一
[root@gitlab-runner gitlab]# git pull git@gitlab.netonline.com:root/gitlab.git master
如对本文有疑问,请在下面进行留言讨论,广大热心网友会与你互动!! 点击进行留言回复


网友评论