吉林小说网香醉迷艳,我的老婆是太妹,海阔天空歌词谐音
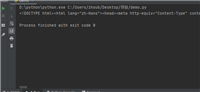
qt 5.11 与 qt 5.12 中qquick的差异还是蛮大的,由开发环境:pyqt5.11 + qt5.12 部署到 pyqt5.11 + qt5.11时遇到以下问题:
1.当一个item引用另一个item,当层次比较深入时,有可能引用不到此item对象。这时可以用alias别名尝试把此对象作为顶层类的属性。另还有一个可能是因为item文件的命名冲突,比如我把item文件命名为contentleft.qml就会出现一些莫名奇妙的问题,后来把名称改为contentleft.qml就没有。
2.有些str类型的属性可以直接用于qml,但有些会提示qstring不对
    #barcode
    @pyqtproperty(str,notify=barcodechanged)
    def barcode(self):
        return self._barcode

    @barcode.setter
    def barcode(self, value):
        self._barcode = value
        self.barcodechanged.emit(value)
把以上写法改为下面写法即没问题:
projectname = pyqtproperty(str, fget=getprojectvalue, fset= setprojectvalue, notify=projectnamechanged)
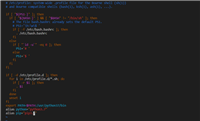
1.把python类注册成qml类
qmlregistertype(cameraopencv,'mycamera',1,0,'mycustomopencvitem')
可以直接在qml用
import qtquick 2.9
import qtquick.controls 2.2
import qtquick.layouts 1.1
import mycamera 1.0

item{
    id:root
    property alias mycustomopencvitem: mycustomopencvitem
    rectangle{
        color:"black"
        anchors.fill: parent
        mycustomopencvitem{
            id:mycustomopencvitem
            objectname:"camera_win"
            anchors.fill:parent
        }
        mousearea{
            anchors.fill: parent
            onclicked: {
                 content.contentmiddle.mycustomopencvitem.save()
            }
        }
    }
}
2.把python对象传至qml
        self.imagemodel = modelimages()
        self.rootcontext().setcontextproperty('imagesmodel', self.imagemodel)
qml中直接调用
        listview {
            id : m_listview
            width: parent.width
            height: root.height
            clip: true
            model: imagesmodel //modelimages
            delegate: m_delegate
            spacing: 5
            focus: true
            verticallayoutdirection: listview.bottomtotop
            add: transition {
                numberanimation { properties: "y";duration: 400 }
            }
            remove: transition {
                numberanimation { properties: "y";duration: 400 }
            }
        }
3.设置可在qml中用的属性
方法一:
self._goodsname = '' #当前商品名称
goodsnamechanged = pyqtsignal(str)
    @pyqtproperty(str,notify=goodsnamechanged)
    def goodsname(self):
        return self._goodsname

    @goodsname.setter
    def goodsname(self, value):
        self._goodsname = value
        self.goodsnamechanged.emit(value)
方法二:
projectname = pyqtproperty(str, fget=getprojectvalue, fset= setprojectvalue, notify=projectnamechanged)
4.qml动态设置component
                function getloader (){

                    switch (uploadstatus)
                    {
                    case "imguploadfail":
                        return uploadfail
                    case "imguploadok":
                        return uploadok
                    case "imguploading":
                        return uploading
                    case "imguploadready":
                        return null
                    default:
                        return null
                    }

                }

                loader{
                    id:currload
                    anchors.fill:parent
                    sourcecomponent:getloader()
                }
5.使用虚拟键盘
需要先安装virtualkeyboard插件
先声明:
os.environ["qt_im_module"] = "qtvirtualkeyboard"
qml中:
import qtquick.virtualkeyboard 2.2
        //键盘
        inputpanel{
            id: vkb
            z:3
            visible: false
            anchors.bottom: parent.bottom
            width: parent.width * 0.85
            height: parent.height * 0.3
            x:parent.width * 0.5 - width * 0.5
            //这种集成方式下点击隐藏键盘的按钮是没有效果的,
            //只会改变active,因此我们自己处理一下
            onactivechanged: {
                if(!active) { visible = false; }
            }
        }
如对本文有疑问,请在下面进行留言讨论,广大热心网友会与你互动!! 点击进行留言回复


Python 实现将numpy中的nan和inf,nan替换成对应的均值
python爬虫把url链接编码成gbk2312格式过程解析
网友评论