蔡力,何为不负阎罗不负卿,今晚快乐大本营嘉宾是谁
1.数据读取
利用原生xgboost库读取libsvm数据
 import xgboost as xgb
 data = xgb.dmatrix(libsvm文件)
使用sklearn读取libsvm数据
 from sklearn.datasets import load_svmlight_file
 x_train,y_train = load_svmlight_file(libsvm文件)
使用pandas读取完数据后在转化为标准形式
2.模型训练过程
1.未调参基线模型
使用xgboost原生库进行训练
import xgboost as xgb
from sklearn.metrics import accuracy_score

dtrain = xgb.dmatrix(f_train, label = l_train)
dtest = xgb.dmatrix(f_test, label = l_test)
param = {'max_depth':2, 'eta':1, 'silent':0, 'objective':'binary:logistic' }
num_round = 2
bst = xgb.train(param, dtrain, num_round)
train_preds = bst.predict(dtrain)
train_predictions = [round(value) for value in train_preds] #进行四舍五入的操作--变成0.1(算是设定阈值的符号函数)
train_accuracy = accuracy_score(l_train, train_predictions) #使用sklearn进行比较正确率
print ("train accuary: %.2f%%" % (train_accuracy * 100.0))

from xgboost import plot_importance #显示特征重要性
plot_importance(bst)#打印重要程度结果。
pyplot.show()
使用xgbclassifier进行训练
# 未设定早停止, 未进行矩阵变换
from xgboost import xgbclassifier
from sklearn.datasets import load_svmlight_file #用于直接读取svmlight文件形式, 否则就需要使用xgboost.dmatrix(文件名)来读取这种格式的文件
from sklearn.metrics import accuracy_score
from matplotlib import pyplot


num_round = 100
bst1 =xgbclassifier(max_depth=2, learning_rate=1, n_estimators=num_round, #弱分类树太少的话取不到更多的特征重要性
          silent=true, objective='binary:logistic')
bst1.fit(f_train, l_train)

train_preds = bst1.predict(f_train)
train_accuracy = accuracy_score(l_train, train_preds)
print ("train accuary: %.2f%%" % (train_accuracy * 100.0))

preds = bst1.predict(f_test)
test_accuracy = accuracy_score(l_test, preds)
print("test accuracy: %.2f%%" % (test_accuracy * 100.0))

from xgboost import plot_importance #显示特征重要性
plot_importance(bst1)#打印重要程度结果。
pyplot.show()
2.两种交叉验证方式
使用cross_val_score进行交叉验证
#利用model_selection进行交叉训练
from xgboost import xgbclassifier
from sklearn.model_selection import stratifiedkfold
from sklearn.model_selection import cross_val_score
from sklearn.metrics import accuracy_score
from matplotlib import pyplot

param = {'max_depth':2, 'eta':1, 'silent':0, 'objective':'binary:logistic' }
num_round = 100
bst2 =xgbclassifier(max_depth=2, learning_rate=0.1,n_estimators=num_round, silent=true, objective='binary:logistic')
bst2.fit(f_train, l_train)
kfold = stratifiedkfold(n_splits=10, random_state=7)
results = cross_val_score(bst2, f_train, l_train, cv=kfold)#对数据进行十折交叉验证--9份训练,一份测试
print(results)
print("cv accuracy: %.2f%% (%.2f%%)" % (results.mean()*100, results.std()*100))

from xgboost import plot_importance #显示特征重要性
plot_importance(bst2)#打印重要程度结果。
pyplot.show()

使用gridsearchcv进行网格搜索
#使用sklearn中提供的网格搜索进行测试--找出最好参数,并作为默认训练参数
from xgboost import xgbclassifier
from sklearn.model_selection import gridsearchcv
from sklearn.metrics import accuracy_score
from matplotlib import pyplot

params = {'max_depth':2, 'eta':0.1, 'silent':0, 'objective':'binary:logistic' }
bst =xgbclassifier(max_depth=2, learning_rate=0.1, silent=true, objective='binary:logistic')
param_test = {
 'n_estimators': range(1, 51, 1)
}
clf = gridsearchcv(estimator = bst, param_grid = param_test, scoring='accuracy', cv=5)# 5折交叉验证
clf.fit(f_train, l_train) #默认使用最优的参数


preds = clf.predict(f_test)

test_accuracy = accuracy_score(l_test, preds)
print("test accuracy of gridsearchcv: %.2f%%" % (test_accuracy * 100.0))

clf.cv_results_, clf.best_params_, clf.best_score_
3.早停止调参–early_stopping_rounds(查看的是损失是否变化)
#进行提早停止的单独实例
import xgboost as xgb
from xgboost import xgbclassifier
from sklearn.metrics import accuracy_score
from matplotlib import pyplot

param = {'max_depth':2, 'eta':1, 'silent':0, 'objective':'binary:logistic' }
num_round = 100
bst =xgbclassifier(max_depth=2, learning_rate=0.1, n_estimators=num_round, silent=true, objective='binary:logistic')
eval_set =[(f_test, l_test)]
bst.fit(f_train, l_train, early_stopping_rounds=10, eval_metric="error",eval_set=eval_set, verbose=true) #early_stopping_rounds--当多少次的效果差不多时停止  eval_set--用于显示损失率的数据 verbose--显示错误率的变化过程

# make prediction
preds = bst.predict(f_test)

test_accuracy = accuracy_score(l_test, preds)
print("test accuracy: %.2f%%" % (test_accuracy * 100.0))
4.多数据观察训练损失
#多参数顺
import xgboost as xgb
from xgboost import xgbclassifier
from sklearn.metrics import accuracy_score
from matplotlib import pyplot

num_round = 100
bst =xgbclassifier(max_depth=2, learning_rate=0.1, n_estimators=num_round, silent=true, objective='binary:logistic')
eval_set = [(f_train, l_train), (f_test, l_test)]
bst.fit(f_train, l_train, eval_metric=["error", "logloss"], eval_set=eval_set, verbose=true)

# make prediction
preds = bst.predict(f_test)
test_accuracy = accuracy_score(l_test, preds)
print("test accuracy: %.2f%%" % (test_accuracy * 100.0))

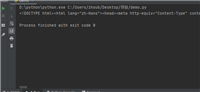
5.模型保存与读取
#模型保存
bst.save_model('demo.model')

#模型读取与预测
modelfile = 'demo.model'

# 1
bst = xgb.booster({'nthread':8}, model_file = modelfile)

# 2

f_test1 = xgb.dmatrix(f_test) #尽量使用xgboost的自己的数据矩阵
ypred1 = bst.predict(f_test1)
train_predictions = [round(value) for value in ypred1]
test_accuracy1 = accuracy_score(l_test, train_predictions)
print("test accuracy: %.2f%%" % (test_accuracy1 * 100.0))
以上就是本文的全部内容,希望对大家的学习有所帮助,也希望大家多多支持移动技术网。
如对本文有疑问,请在下面进行留言讨论,广大热心网友会与你互动!! 点击进行留言回复


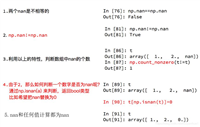
Python 实现将numpy中的nan和inf,nan替换成对应的均值
python爬虫把url链接编码成gbk2312格式过程解析
网友评论